background image

RQT8212

29

Ed

it

in

g

EN

GL

IS

H

 (play only)

1

While stopped


Press [FUNCTIONS].

2

Press [

e

r

] to select “To Others” and 

press [ENTER].

3

Press [

e

r

] to select “PLAYLISTS” 

and press [ENTER].

4

Press [

e

r

w

q

] to select the playlist.

To start play 

 Press [ENTER].

To edit 

 Step 5.

To show other pages/Multiple editing (

 page 26)

5

Press [SUB MENU], then [

e

r

] to 

select the operation and press 
[ENTER].

If you select “Edit”, press [

e

r

] to select the operation and 

press [ENTER].

6

Press [

e

r

w

q

] to select the 

chapter.

To start play 

 Press [ENTER]. 

To edit 

 Step 7.

To show other pages/Multiple editing (

 page 26)

7

Press [SUB MENU], then [

e

r

] to 

select the operation and press 
[ENTER].

To exit the screen

Press [RETURN] several times. 

To return to the previous screen

Press [RETURN].

 Multiple editing is possible.

Editing chapters in a playlist does not modify the source titles and 
source chapters.

 Multiple editing is possible.

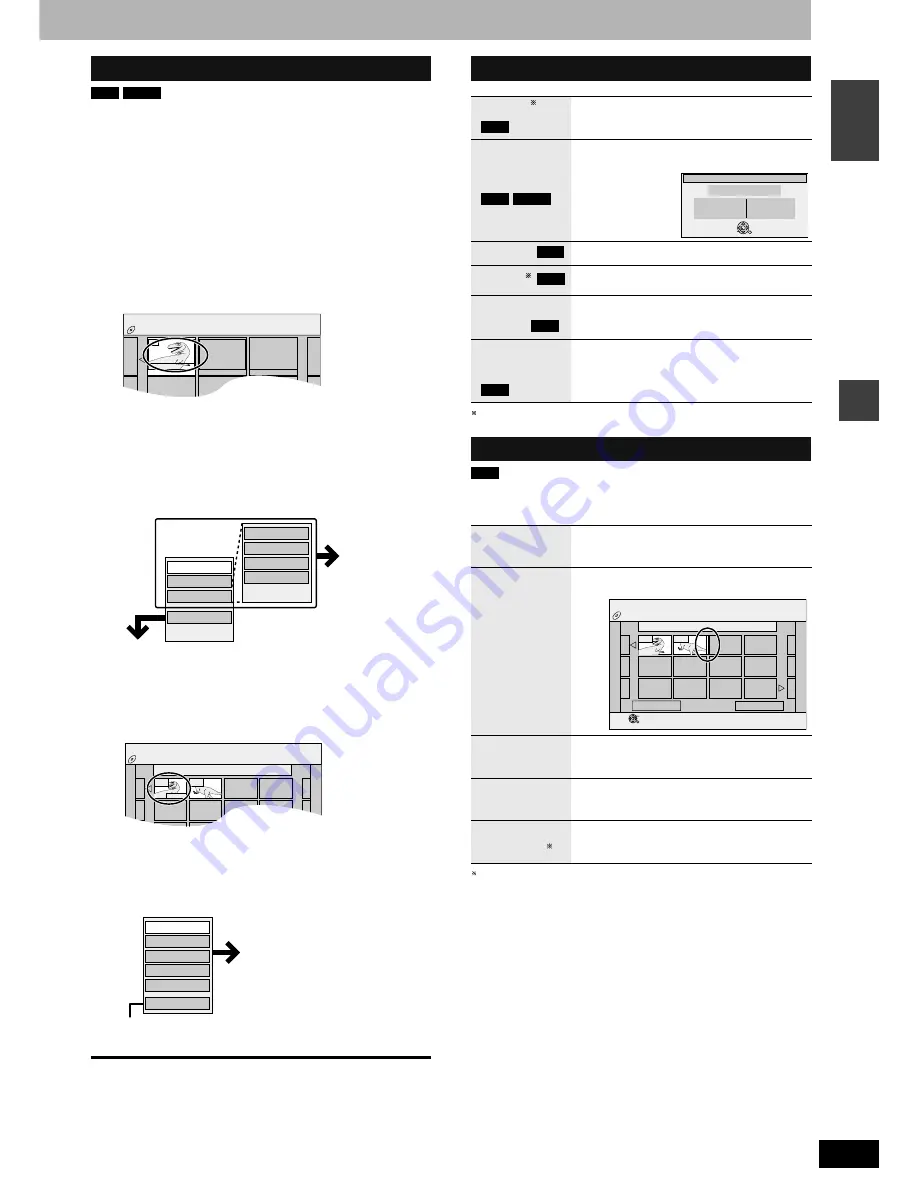
Editing and playing playlists/chapters

RAM

-RW(VR)

DVD-RAM

PLAYLISTS

PLAYLIST VIEW

01

- -

- -

- -

- -

- -

Create

27. 10. MON  0:30

Copy

Enter Name

Change Thumbnail

Create

Properties

Edit

Chapter View

Erase

Refer to “Playlist 
operations”.

If you select “Chapter View”

DVD-RAM

PLAYLISTS

CHAPTER VIEW

08 27. 10. MON 0:30

---

---

---

---

---

---

---

---

---

---

001

002

0:00.00

Move Chapter

Create Chapter

Combine Chapters

Erase Chapter

PLAYLIST View

Add Chapter

Refer to “Chapter operations”.

You can go back to the PLAYLIST View. 

Playlist operations

Erase 

Press [

w

q

] to select “Erase” and press 

[ENTER]. 

Properties

Playlist information (e.g., time and date) is 
shown.

Press [ENTER] 
to exit the screen.

Create 

 page 28, Creating playlists, Step 5-8

Copy  

Press [

w

q

] to select “Copy” and press 

[ENTER].

Enter 
Name 

 page 33, Entering text

Change 
Thumbnail

 page 27, Change Thumbnail

Chapter operations

Add 
Chapter

Move 
Chapter

Press [

e

r

w

q

] to select the position to 

insert the chapter and press [ENTER].

Create 
Chapter

 page 27, Create Chapter

Combine 
Chapters

 page 27, Combine Chapters

Erase 
Chapter 

 page 27, Erase Chapter

RAM

RAM

-RW(VR)

Properties

No.

Chapters

01

012

Date

Total

20. 6.2004 WED

0:30.05

Dinosaur

ENTER

RETURN

RAM

RAM

RAM

RAM

RAM

 page 28, Creating playlists, Step 5–7

DVD-RAM

PLAYLISTS

Move Chapter

Previous

Page 01/01

Next

08

27. 10. MON 0:30

---

---

---

---

---

---

---

---

---

---

001

002

ENTER

RETURN

Summary of Contents for Diga DMR-ES20

Page 1: ...g operating or adjusting this product please read the instructions completely Please keep this manual for future reference Region number supported by this unit Region numbers are allocated to DVD players and DVD Video according to where they are sold The region number of this unit is 2 The unit will play DVD Video marked with labels containing 2 or ALL Example 2 ALL 3 5 2 Web Site http www panason...

Page 2: ... AUSSETZEN VORSICHT VAROITUS LAITTEEN KÄYTTÄMINEN MUULLA KUIN TÄSSÄ KÄYTTÖOHJEESSA MAINITULLA TAVALLA SAATTAA ALTISTAA KÄYTTÄJÄN TURVALLISUUSLUOKAN 1 YLITTÄVÄLLE NÄKYMÄTTÖMÄLLE LASERSÄTEILYLLE VAROITUS TULIPALO SÄHKÖISKUVAARAN TAI TUOTETTA KOHTAAVAN MUUN VAHINGON VÄHENTÄMISEKSI EI LAITETTA SAA ALTISTAA SATEELLE KOSTEUDELLE VESIPISAROILLE TAI ROISKEELLE EIKÄ NESTETTÄ SISÄLTÄVIÄ ESINEITÄ KUTEN ESIME...

Page 3: ...C MANAGEMENT 31 Setting the protection 31 Providing a disc with a name 31 Erasing all titles Erase all titles 31 Erasing all the contents of a disc Format Disc 32 Enabling DVD R DVD RW DVD Video format or R to be played on other equipment Finalize 32 Entering text 33 Changing the unit s settings 33 Common procedures 33 Summary of settings 34 Tuning 37 TV System 38 Clock settings 39 Child Lock 39 S...

Page 4: ...atible players It is not necessary to finalize the disc page 40 Only after finalizing the disc page 32 What you can do on this unit Can do Cannot do Chasing playback Recording broadcasts that allow one copy CPRM page 40 compatible discs only Recording both M 1 and M 2 of bilingual broadcast Only one is recorded page 35 Bilingual Audio Selection Recording 16 9 aspect picture The picture is recorded...

Page 5: ...rding discs recordable until the disc is full 8 hours 8 hours Only after finalizing the disc page 32 Only after finalizing the disc page 32 Only one is recorded page 35 Bilingual Audio Selection Only one is recorded page 35 Bilingual Audio Selection The picture is recorded in 4 3 aspect The picture is recorded in 4 3 aspect The available space on DVD RW DVD Video format increases only when the las...

Page 6: ...ng page 16 Programme recording standby release page 17 18 Linked timer recordings with external equipment page 19 Show timer recording programme screen page 18 page 37 Manual tuning operation Erase items page 21 Start recording page 14 Recording function REC OPEN CLOSE CH EXT LINK Display below Disc tray page 14 20 Open close disc tray page 14 20 Channel select page 14 Start recording page 14 Remo...

Page 7: ...be affected by copyright protection systems and the picture will not be shown correctly on the television When connecting to a television with a built in VCR connect to the input terminals on the television side not the VCR side When the unit is not to be used for a long time To save power unplug it from the household mains socket This unit consumes a small amount of power even when it is turned o...

Page 8: ...ision s rear panel Red White Yellow RF coaxial cable AC mains lead Connect only after all other connections are complete Audio Video cable VCR s rear panel Red White Yellow Red White Yellow Red White Yellow Use a splitter if you also want to connect the aerial to your VCR 1 4 To household mains socket AC 220 to 240 V 50 Hz AUDIO IN R L VIDEO IN COMPONENT VIDEO IN S VIDEO IN Television s rear panel...

Page 9: ...cancel TV appears on the unit s display If the television is compatible with RGB input the RGB output signal from the decoder can also be output from the main unit the same way OPTICAL IN Optical digital audio cable Do not bend this cable sharply Insert fully with this side facing up This unit s rear panel Amplifier s rear panel AUDIO IN R L Amplifier s rear panel This unit s rear panel Audio cabl...

Page 10: ...If you select Schweiz Suisse or Svizzera in the Country setting or when the television tuning setting has been set to Switzerland the Power Save setting menu appears Select On or Off page 36 To stop partway Press RETURN If the clock setting menu appears Set the clock manually page 39 To confirm that stations have been tuned correctly page 37 To restart Preset Download page 38 SKIP SLOW SEARCH REC ...

Page 11: ...arts This takes about 8 minutes Auto Setup is complete when you see the television picture To stop partway Press RETURN If the clock setting menu appears Set the clock manually page 39 To confirm that stations have been tuned correctly page 37 To restart Auto Setup page 38 You can also use the following method to restart Auto Setup When the unit is on and stopped Press and hold 2 CH and CH 1 on th...

Page 12: ...DEO OUT terminals if AV1 Output in the SETUP menu is set to RGB without component Set this item to either Video with component or S Video with component page 35 If the unit is connected to the television through VIDEO OUT S VIDEO OUT or AV1 terminal output will be interlace irrespective of the settings To exit the screen Press RETURN several times To return to the previous screen Press RETURN Sele...

Page 13: ...e DVD 1 DVD 2 or DVD 3 and press ENTER To change the code on the remote control 7 While pressing ENTER press and hold the numbered button 1 2 or 3 for more than 2 seconds 8 Press ENTER When the following indicator appears on the unit s display Note Executing Shipping Condition in the SETUP menu returns the main unit code to DVD 1 Change the remote control code to 1 step 7 Television operation Bran...

Page 14: ...e display Recording will take place on open space on disc Data will not be overwritten You cannot change the channel or recording mode during recording You can change the channel or recording mode while paused however the recording will then be as a separate title You can change the audio being received by pressing AUDIO during recording This does not affect the actual recording of the audio Recor...

Page 15: ...format a disc Erasing all the contents of a disc Format Disc page 32 When connected to a television that has the Q Link function using a fully wired 21 pin Scart cable page 7 This function allows you to immediately start recording the programme that you are viewing on the TV Insert a disc page 14 Press and hold DIRECT TV REC for 1 second Recording starts To stop recording Press g Press q PLAY duri...

Page 16: ... on the other equipment 4 Press REC Recording starts To skip unwanted parts Press h to pause recording Press again to restart recording To stop recording Press g Flexible Recording SKIP SLOW SEARCH REC MODE REC F Rec TIME SLIP FUNCTIONS DIRECT NAVIGATOR TOP MENU RETURN STATUS DISPLAY SUB MENU CANCEL MANUAL SKIP INPUTSELECT AUDIO ERASE EXT LINK CREATE CHAPTER PROG CHECK TIMER ShowView RETURN e r w ...

Page 17: ... EXT LINK Linked timer recording with external equipment e g digital satellite receiver ShowView CANCEL REC OPEN CLOSE CH EXT LINK g REC MODE EXT LINK RAM R RW V R ShowView Remain Enter ShowView Number by using 0 9 key 1 58 SP 12 53 00 15 7 TUE To release the unit from recording standby Press z TIMER The unit turns on and z goes out Be sure to press z TIMER before the programme start time to put t...

Page 18: ...C Check to make sure OK is displayed RAM To release the unit from recording standby Press z TIMER The unit turns on and z goes out Be sure to press z TIMER before the programme start time to put the unit on recording standby Timer recording will work only if z is displayed To cancel recording when recording has already begun Press z TIMER You can also press and hold g on the main unit for more tha...

Page 19: ...Input to match the connected equipment in the SETUP menu page 35 Set the Ext Link to match the connected equipment in the SETUP menu page 35 Ext Link 1 Start and stop timings of recording are controlled by the control signal from a digital satellite receiver Ext Link 2 When an external equipment with a timer function turns on recording starts When it turns off recording stops 1 Make timer programm...

Page 20: ...s Press the numbered buttons to select the item e g 5 0 5 15 1 5 To return to the menu screen Press AUDIO You can change the audio channel number each time you press the button This allows you to change things like the soundtrack language e g English is the selected language page 24 Soundtrack REC OPEN CLOSE SKIP SLOW SEARCH REC MODE REC F Rec TIME SLIP FUNCTIONS DIRECT NAVIGATOR TOP MENU RETURN S...

Page 21: ... parts only While paused press w w h or q h q Each press shows the next frame Press and hold to change in succession forward or backward Press q PLAY to restart play Forward direction only Displaying the television image as a picture in picture Skipping the specified time Time Slip 1 Press TIME SLIP 2 Press e r to select the time and press ENTER Play skips the specified time Press TIME SLIP to sho...

Page 22: ...ayable Regarding MP3 File format MP3 Files must have the extension mp3 or MP3 Bit rates 32 kbps to 320 kbps Sampling frequency 16 kHz 22 05 kHz 24 kHz 32 kHz 44 1 kHz 48 kHz This unit is not compatible with ID3 tags Regarding still pictures JPEG TIFF File format JPEG TIFF non compressed RGB chunky format Files must have the extension jpg JPG tif and TIF Number of pixels 34 x 34 to 6144 x 4096 Sub ...

Page 23: ...and press ENTER To return the picture to its original size Press SUB MENU Press e r to select Zoom out and press ENTER To return the rotated picture to its original position Press SUB MENU Press e r to select the opposite rotation button and press ENTER Note The rotation and enlargement information will not be stored When zooming in the picture may be cut off Press STATUS twice To exit the picture...

Page 24: ...el Off L R Digital 2 0 ch Sound Other Menu Item Setting Disc menu Setting the disc content Soundtrack The disc s audio attributes appear Select the audio and language below Audio attribute Language SVCD only Select the soundtrack number 1 2 Subtitle Turn the subtitle on off and select the language below Language Only discs that contain subtitle on off information Subtitle on off information cannot...

Page 25: ...ts it Auto 2 Compatible with 30 frame per second film content in addition to 24 frame per second film content Video Select when using Auto 1 and Auto 2 and the video content is distorted AV in NR Only when AV1 AV2 AV3 AV4 or DV is selected Reduces video tape noise while dubbing Automatic Noise reduction only works on picture input from a video tape On Noise reduction works for any input video Off ...

Page 26: ...UB MENU DIRECTTV REC AV CANCEL MANUAL SKIP INPUTSELECT AUDIO ERASE EXT LINK CREATE CHAPTER PROG CHECK EXT LINK TIMER ShowView RETURN e r w q ENTER DIRECT NAVIGATOR SUB MENU h q u i RAM R RW V R Title Chapter Programmes are recorded as a single title consisting of one chapter Title Chapter Start End You can divide a title into multiple chapters page 21 27 Create Chapter RAM Title Chapter Chapter Ch...

Page 27: ...e the title Press e r to select Exit and press ENTER Press w q to select Divide and press ENTER To confirm the division point Press e r to select Preview and press ENTER The unit plays 10 seconds before and after the division point To change the division point Restart play and press e r to select Divide then press ENTER at the point you want to change Note The divided titles retain the name and CP...

Page 28: ...ers 8 Press RETURN To exit the screen Press RETURN several times To return to the previous screen Press RETURN Creating playlists SKIP SLOW SEARCH REC MODE REC F Rec TIME SLIP FUNCTIONS DIRECT NAVIGATOR TOP MENU RETURN STATUS DISPLAY SUB MENU CANCEL MANUAL SKIP INPUTSELECT AUDIO ERASE EXT LINK CREATE CHAPTER PROG CHECK EXT LINK TIMER ShowView RETURN e r w q ENTER SUB MENU FUNCTIONS You can arrange...

Page 29: ...30 Copy Enter Name Change Thumbnail Create Properties Edit Chapter View Erase Refer to Playlist operations If you select Chapter View DVD RAM PLAYLISTS CHAPTER VIEW 08 27 10 MON 0 30 001 002 0 00 00 Move Chapter Create Chapter Combine Chapters Erase Chapter PLAYLIST View Add Chapter Refer to Chapter operations You can go back to the PLAYLIST View Playlist operations Erase Press w q to select Erase...

Page 30: ...and DV equipment then connect the equipment with the unit s DV input terminal left 2 Turn on the main unit and DV equipment 3 Pause play of the DV equipment at the point you want recording to start When the output signal from the external equipment is NTSC change the TV System to NTSC in the SETUP menu page 38 1 While stopped Press REC MODE to select the recording mode 2 Press FUNCTIONS 3 Press e ...

Page 31: ...the previous screen Press RETURN Preparation Release protection left 1 While stopped Press FUNCTIONS 2 Press e r to select To Others and press ENTER 3 Press e r to select DISC MANAGEMENT and press ENTER 4 Press e r to select Erase all titles and press ENTER 5 Press w q to select Yes and press ENTER 6 Press w q to select Start and press ENTER A message appears when finished 7 Press ENTER Note Once ...

Page 32: ...ble disc it may take longer than displayed on the confirmation screen approximately four times You cannot finalize DVD R DVD RW DVD Video format or R recorded on other manufacturer s equipment DVD R DVD RW DVD Video format or R finalized on this unit may not be playable on other players due to the condition of the recording Visit Panasonic s homepage for more information about DVDs http www panaso...

Page 33: ...r to select the tab and press q 5 Press e r to select the menu and press ENTER 6 Press e r to select the option and press ENTER To exit the screen Press RETURN several times To return to the previous screen Press RETURN Characters Characters Title 64 44 Title 44 Playlist 64 Disc 40 Disc 64 timer recording Title timer recording page 17 18 Step 3 Title page 26 Step 3 Playlist page 29 Step 5 Disc pag...

Page 34: ... Dutch Original The original language of each disc will be selected Other Subtitle Automatic If the language selected for Soundtrack is not available subtitles of that language will automatically appear if available on that disc English French German Italian Spanish Dutch Other Menus English French German Italian Spanish Dutch Other Settings for recording Press ENTER to show the following setting ...

Page 35: ...PEG decoder PCM When connected to equipment without a built in MPEG decoder Audio Mode for DV Input You can select the kind of audio when recording from the unit s DV input terminal page 30 Stereo 1 Records audio L1 R1 Stereo 2 Records added audio such as narration L2 R2 subsequent to original recording Mix Records both Stereo 1 and Stereo 2 When recording bilingual broadcast to a DVD R DVD RW DVD...

Page 36: ...ings ratings level ratings password and remote control code return to the factory presets Yes No Language code list Enter the code with the numbered buttons Abkhazian 6566 Catalan 6765 Gujarati 7185 Lingala 7678 Rhaeto Romance Tamil 8465 Afar 6565 Chinese 9072 Hausa 7265 Lithuanian 7684 8277 Tatar 8484 Afrikaans 6570 Corsican 6779 Hebrew 7387 Macedonian 7775 Romanian 8279 Telugu 8469 Albanian 8381...

Page 37: ...CHANGE Pos To change the programme position in which the TV stations are assigned Press e r or numbered buttons to select the number of the desired programme position and press ENTER Name To enter or change the name of a TV station Press e r w q to enter station name and press ENTER If the station name needs a blank space select the blank between Z and Channel To enter newly available TV stations ...

Page 38: ...ER PAL factory preset Select when connecting to a PAL or Multi system television Programmes recorded using NTSC are played as PAL 60 Select to record television programmes and PAL input from other equipment NTSC Select when connecting to a NTSC television Television programmes cannot be recorded properly Select to record NTSC input from other equipment The confirmation screen appears 7 Press w q t...

Page 39: ... screen Press RETURN several times To return to the previous screen Press RETURN The Child Lock deactivates all buttons on the unit and remote control Use it to prevent other people from operating the unit Press and hold ENTER and RETURN simultaneously until X HOLD appears on the unit s display If you press a button while the Child Lock is on X HOLD appears on the unit s display and operation is i...

Page 40: ...thod of coding digital signals developed by Dolby Laboratories Apart from stereo 2 channel audio these signals can also be multi channel audio A large amount of audio information can be recorded on one disc using this method Down mixing This is the process of remixing the multi channel audio found on some discs into two channels for stereo output It is useful when you want to listen to the 5 1 cha...

Page 41: ...e type of TV used the above messages may not appear correctly These operations are only available if the unit is connected to a TV featuring the Q Link function VPS Video Programme System PDC Programme Delivery Control VPS or PDC is a very convenient system which records exactly from beginning to end of the TV programmes set in timer recording even if the actual broadcasting time differs from the ...

Page 42: ...onforming to IEC62107 MP3 and still pictures JPEG TIFF Close the session or finalize the disc after recording This unit can recognize up to 99 folders groups and 999 files tracks on a disc with MP3 or still pictures JPEG TIFF You cannot write to a CD R or CD RW with this unit 5 22 Can I record from a commercially purchased video cassette or DVD Most commercially sold video cassettes and DVD are co...

Page 43: ...remove it and check it for scratches or dirt The unit turns off automatically after you open the tray 5 This is a non recordable disc The unit cannot record on the disc you inserted Insert a DVD RAM or unfinalized DVD R DVD RW DVD Video format or R You inserted an unformatted DVD RAM or DVD RW Format the disc with this unit 4 5 32 This disc is not formatted properly 5 The operation is prohibited b...

Page 44: ... the unit is off press and hold g and CH 1 on the main unit at the same time for about 5 seconds Remove the disc Television reception worsens after connecting the unit This can occur because the signals are being divided between the unit and other equipment It can be solved by using a signal booster available from audio visual suppliers Status messages do not appear Select Automatic in On Screen M...

Page 45: ...with DISC MANAGEMENT Some programmes have limitations on the number of times they can be recorded CPRM The disc is full or nearly full Erase un needed titles or use another disc You cannot record on finalized DVD R DVD RW DVD Video format R or DVD RW DVD Video Recording format discs Due to peculiarities of DVD R DVD RW DVD Video format or R you may be unable to record onto them if you either inser...

Page 46: ...t is also canceled when the playlist and title are edited The Video CD picture does not display properly When connecting to Multi system TV select NTSC in TV System in the SETUP menu When connecting to PAL TV the lower part of the picture cannot be displayed correctly during search 38 Time Slip does not work Time Slip does not work when the unit s TV System settings are different from the title re...

Page 47: ...RQT8212 MEMO 47 ...

Page 48: ...at disc 32 FR Flexible Recording Mode 14 16 FUNCTIONS window 25 JPEG 22 40 Language Code list 36 Soundtrack 24 34 Subtitle 24 34 Manual Skip 21 Menu JPEG 22 23 MP3 22 On screen 24 SETUP 33 Mode Recording 14 Still Mode 34 MP3 22 40 Noise reduction NR AV in NR 25 Playback NR 25 On screen Menus 24 Status messages 25 Partial Erase 27 PCM Down Conversion 35 Picture settings 25 34 Playback NR 25 Playlis...

Reviews: