14
•
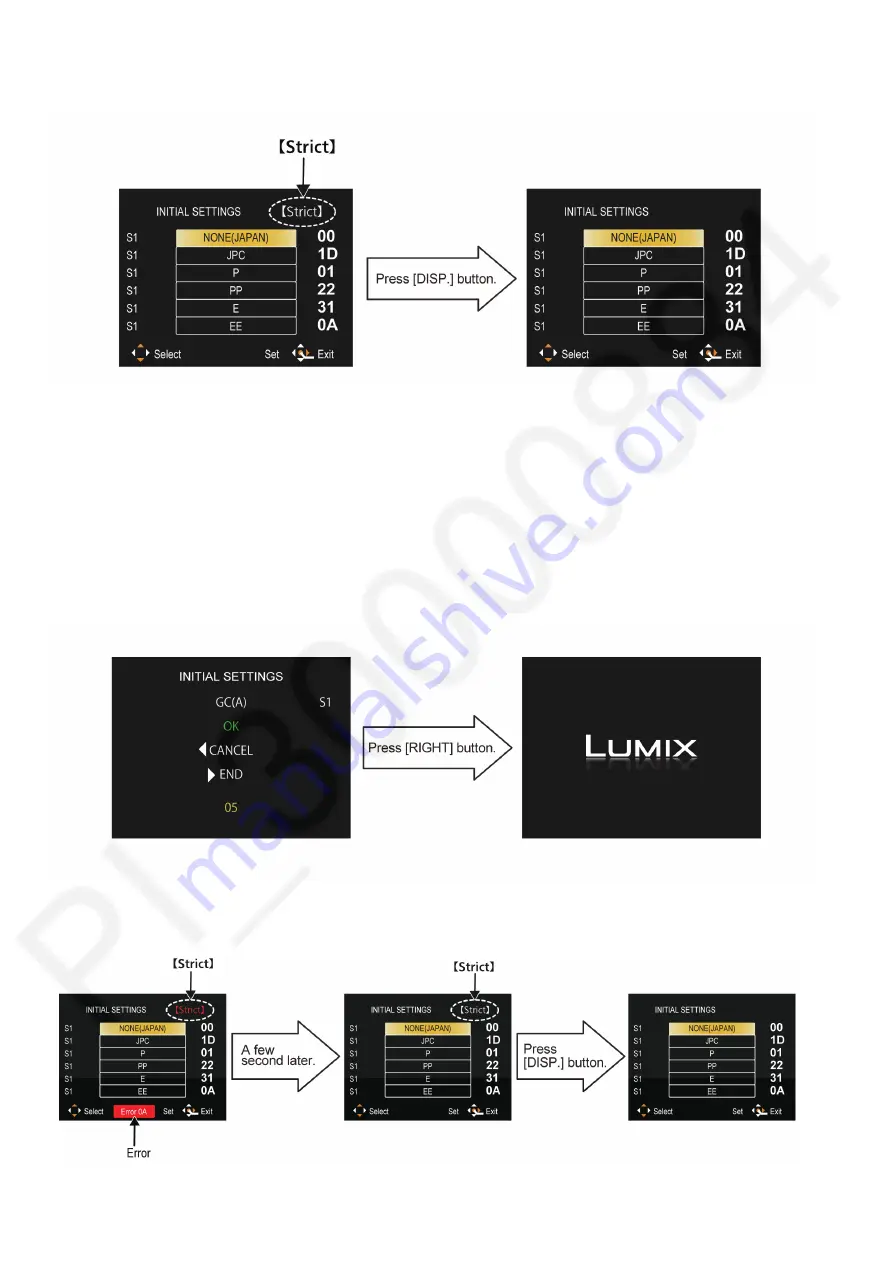
Step 5. Cancel “Strict” mode:
Press the [ DISP. ] button to cancel “Strict” mode. (Confirm the “Strict” is disappeared.)
•
Step 6. Choose the Model Suffix in “Initial Settings”: (Refer to “CAUTION”)
[Caution: After replacing the Main P.C.B. and/or Flash-ROM]
The model suffix can been chosen,
JUST ONE TIME
.
Once one of the model suffix have been chosen, the model suffix lists will not be displayed, thus, it can not be changed.
Therefore, select the area carefully.
Select the area with pressing “[ UP ] / [ DOWN ] of Cursor buttons”.
•
Step 7. Set the Model Suffix in “Initial Settings”:
Press the “[ RIGHT ] of Cursor buttons”.
The only set area is displayed, and then press the “[ RIGHT ] of Cursor buttons” after confirmation.
(The unit is powered off automatically.)
NOTE:
When the error message such as the following is displayed, cancel “Strict” mode.
Press [ DISP. ] button to clear the “Strict” display at the upper right corner of screen.
Summary of Contents for DC-S1P
Page 17: ...17 ...
Page 18: ...18 ...
Page 19: ...19 ...
Page 20: ...20 ...
Page 21: ...21 ...
Page 22: ...22 ...
Page 29: ...29 ...
Page 32: ...32 ...
Page 33: ...33 ...
Page 36: ...36 ...
Page 40: ...40 9 2 P C B Location ...
Page 43: ...43 Fig D2 Fig D3 ...
Page 44: ...44 Fig D4 Fig D5 ...
Page 45: ...45 Fig D6 Fig D7 ...
Page 46: ...46 Fig D8 Fig D9 9 3 3 Removal of the Top 1 Unit Fig D10 ...
Page 47: ...47 Fig D11 Fig D12 9 3 4 Removal of the Main P C B Fig D13 ...
Page 48: ...48 Fig D14 Fig D15 9 3 5 Removal of the EXT MIC HP P C B Fig D16 ...
Page 50: ...50 Fig D20 Fig D21 9 3 9 Removal of the Battery Case Unit Fig D22 ...
Page 51: ...51 Fig D23 9 3 10 Removal of the WIFI BT P C B Fig D24 ...
Page 54: ...54 Fig D29 9 3 15 Removal of the SD Door Unit Fig D30 ...
Page 56: ...56 9 3 18 Removal of the Rear IF P C B Fig D34 9 3 19 Removal of the LCD Unit Fig D35 ...
Page 58: ...58 9 3 23 Removal of the Image Sensor Unit Fig D39 Fig D40 ...


