★
By using AW-
RP50 controller, you can switch the remote camera’s power supply from STANDBY mode (Power OFF)
to POWER ON mode (Power ON), and vice versa.
* Before you use AW-
RP50 controller to control the remote camera’s power supply, you need to set up the connection
with the camera in advance.
For the connection setting-up procedure, please refer to the following Manual
【
Controlling AW-HE40 Camera via
AW-RP50 Controller
】
.
https://eww.pass.panasonic.co.jp/pro-av/support/content/faq/EN/remcam/1_.pdf
<Note>
・
Be careful with the Power ON/OFF operation described in this Manual because it can affect the camera’s pan-tilt
head position at the time of turning the power on. (POWER ON Preset Function)
For details, please refer to the following Manual
【
Booting Up with Pan-Tilt Head in Specified Position
】
.
https://eww.pass.panasonic.co.jp/pro-av/support/content/faq/EN/remcam/7_.pdf
■
Turning ON/OFF Remote Cameras One by One
*
For switching the power supply mode of the remote camera (AW-HE40) which is assigned to [CAM1];
1
.
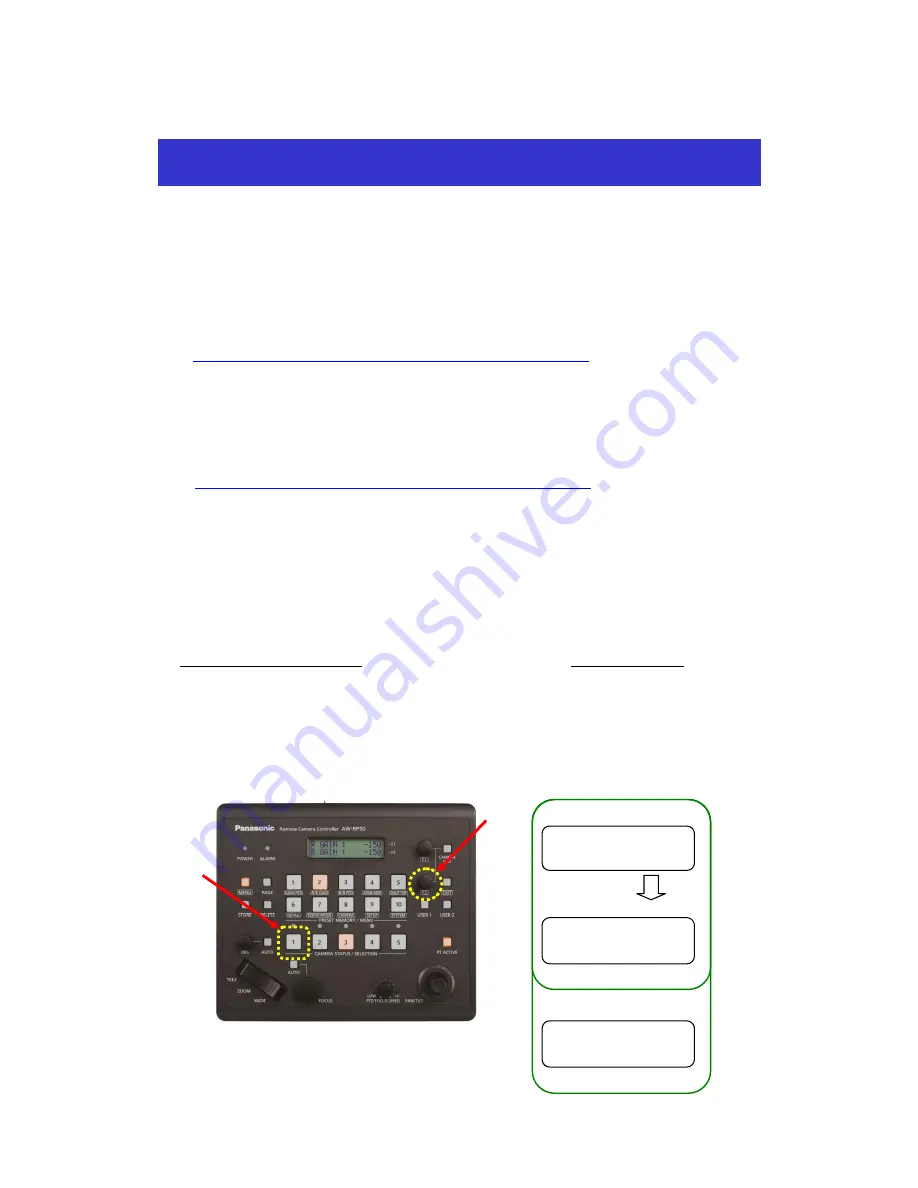
Keep holding down LED button 1 at CAMERA STATUS/SELECTION area
– (Fig.1-A). The selected camera’s name
will be displayed on the upper half, and its power status (POWER ON/POWER OFF) on the lower half of the LCD
panel
– (Fig.2).
2
.
While the LED button 1 is held down at CAMERA STATUS/SELECTION area, turn F2 dial
– (Fig.1-B);
(If you turn ON the camera,)
Select “ON” – (Fig.2), and then press the F2 dial. The camera will switch over to POWER ON mode (Power ON).
(If you turn OFF the camera,)
Select “OFF” – (Fig.2), and then press the F2 dial. The camera will switch over to STANDBY mode (Power OFF).
(Turning ON)
(Turning OFF)
Hold down Button 1
Turn F2
Press F2 to determine
Turning ON/OFF Remote Camera Using AW-RP50
Controller
(Figure 1: AW-RP50 Control Panel)
(
A
)
(
B
)
(Figure 2: AW-RP50 LCD Panel)
CAM
[
1
]
<AW-HE40>
POWER
:
OFF
↓
CAM
[
1
]
<AW-HE40>
POWER
:
ON
↓
Press F2 to determine
CAM
[
1
]
<AW-HE40>
POWER
:
OFF
↓


