64
Web screen configurations
(continued)
Web setup screen [Setup]
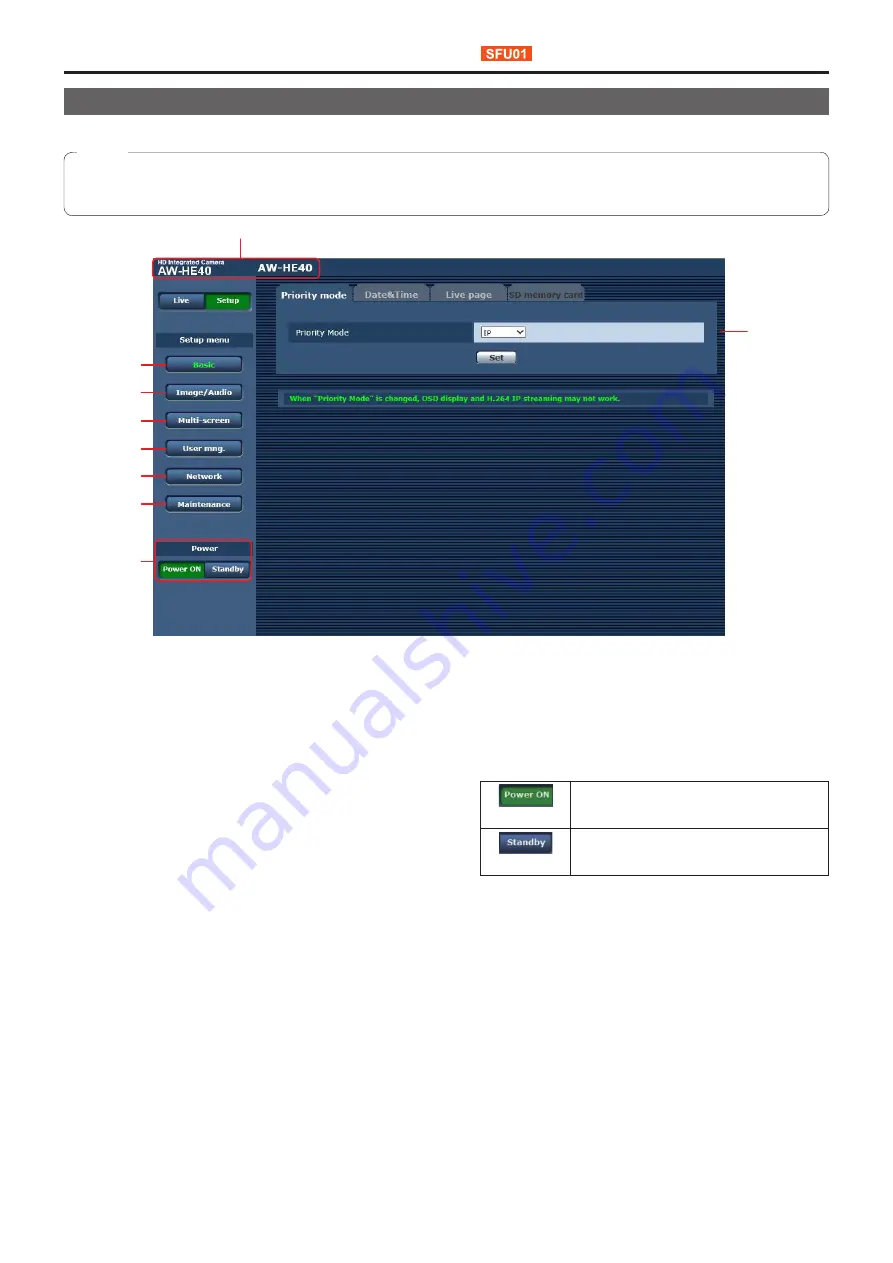
The settings for the unit are selected on this screen.
●
The setting menu operations can be performed only by users whose access level is “1. Administrator”.
For the procedure used to set the access level, refer to page 87.
Note
1
3
5
2
4
6
7
8
9
1.
Basic button [Basic]
When the Basic button is pressed, the Basic screen is
displayed in the main area.
“Basic screen [Basic]” (page 65)
2.
Image/Audio button [Image/Audio]
When the Image/Audio button is pressed, the Image/Audio
screen is displayed in the main area.
“Image screen [Image/Audio]” (page 68)
3.
Multi-Screen button [Multi-Screen]
When the Multi-Screen button is pressed, the Multi-
Screen setup screen is displayed in the main area.
“Multi screen setup screen [Multi-screen setup]”
(page 86)
4.
User mng. button [User mng.]
When the User mng. button is pressed, the User mng.
screen is displayed in the main area.
“User management screen [User mng.]” (page 87)
5.
Network button [Network]
When the Network button is pressed, the Network setup
screen is displayed in the main area.
“Network setup screen [Network]” (page 89)
6.
Maintenance button [Maintenance]
When the Maintenance button is pressed, the
Maintenance screen is displayed in the main area.
“Maintenance screen [Maintenance]” (page 104)
7.
Power ON button [Power ON] /
Standby button [Standby]
[Power ON]
Turn the unit on.
[Standby]
Set the unit to Standby mode.
When you enter Standby mode, the display will
automatically switch to Live mode. In addition, the [Setup]
button in the live screen [Live] will be disabled, and you
cannot operate the web setup screen [Setup].
8.
Main area
The menu screen is displayed.
9.
Camera title display area
The name for the unit configured in the Basic screen
[Basic] (page 66) appears.


