14
15
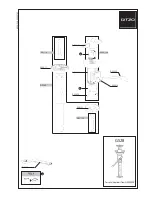
Attaching/detaching the viewfinder
(The viewfinder is an optional accessory.)
Attaching the viewfinder
An HD viewfinder can be used with this unit.
Use the AJ-HVF21KG or AJ-CVF100G (optional accessory).
For details on handling the viewfinder, refer to the operating instructions
of the viewfinder.
1.
Check that the camera’s POWER switch is in the OFF
position.
2.
Pull up the knob on the mounting plate and slide the
plate to attach the viewfinder.
3.
Tighten the stopper screw securely.
Pull up
the knob
Stopper screw
4.
Connect the plug to the viewfinder connector <VF>.
<Note>
When connecting the plug to the viewfinder connector <VF>, check
that the plug is inserted all the way into the connector.
Detaching the viewfinder
1.
Check that the camera’s POWER switch is in the OFF
position.
2.
Remove the plug from the viewfinder connector <VF>.
3.
Loosen the stopper screw, pull up the knob on the
mounting plate, and slide the viewfinder along and off
the plate.
Attaching the rear viewfinder
Use the AK-HVF70G rear viewfinder (optional accessory).
For details on handling the LCD viewfinder, refer to the operating
instructions of the LCD viewfinder.
1.
Check that the camera’s POWER switch is in the OFF
position.
2.
Check that the LCD viewfinder's PAN BRAKE knob and
TILT LOCK dial are locked.
For the operating procedures of the LCD viewfinder's PAN BRAKE
knob and TILT LOCK dial, refer to the operating instructions of the
LCD viewfinder.
3.
Press the lock release button and detach the D-sub
connector cover.
Lock release button
D-sub connector cover
4.
Align the V-shaped protrusion on the LCD viewfinder
with the V-shaped groove on the camera, and slide and
push it until the lock is engaged.
V-groove
V-groove protrusion
Hood
<Note>
When attaching a viewfinder, do not hold the hood of the viewfinder.
Detaching the rear viewfinder
1.
Check that the camera’s POWER switch is in the OFF
position.
2.
Slide the LCD viewfinder while pressing the lock release
button until it is detached
<Note>
When detaching a viewfinder, do not hold the hood of the viewfinder.
3.
Attach the connector cover
Summary of Contents for AK-HC3800G
Page 35: ...35 Memo ...