background image

E-80

Connecting external units (continued)

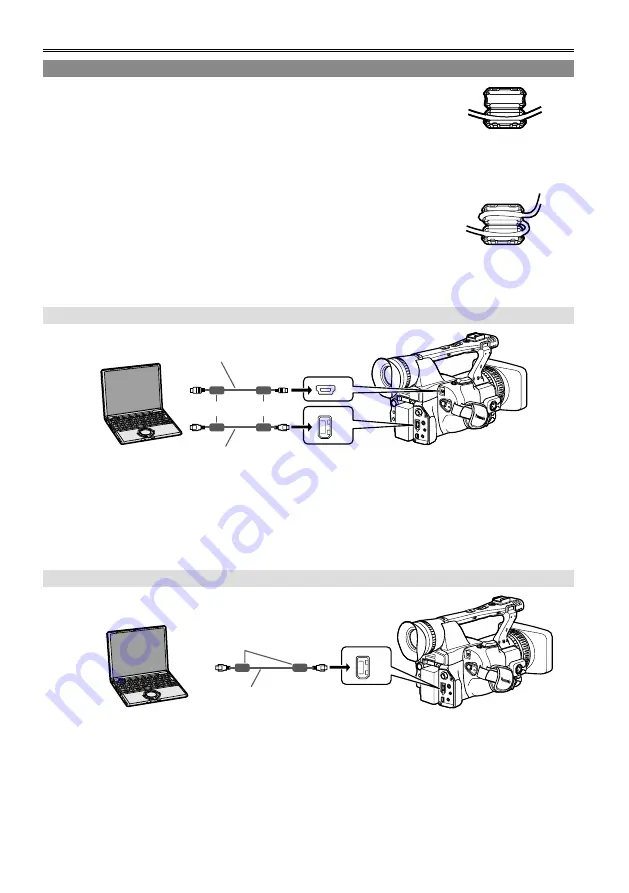
Computer (non-linear editing/file transfer)

When connecting a 139 cable

Attach the provided two ferrite cores (length: 30 mm) to the both ends of 

the cable. After passing the cable as shown in the figure on the right, close 

the ferrite cores until they click into place and lock.

Always take sufficient care when handling the ferrite core, as it can be easily 

damaged when dropped or subjected to other impact.

When connecting a USB cable

Attach the provided two ferrite cores (length: 35 mm) in such a way that the 

whole ferrite cores fit within about 5 cm from both ends of the cable. After 
threading the cable as shown in the figure on the right, close the ferrite 

cores until they click into place and lock.

Always take sufficient care when handling the ferrite core, as it can be easily 

damaged when dropped or subjected to other impact.

File transfer/nonlinear editing

USB 2.0 

1394 

Computer

USB cable (optional) 

• For a Windows computer

Mini-B type

139 cable (optional)

• For an Apple Macintosh computer

6-pin

Ferrite core (included)

When connecting a USB cable, first connect the cable to the PC.
When connecting to a device having 4-pin type 1394 connector, first connect the cable to the 6-pin type 

1394 connector on the camera.
For details on the computer’s conditions and other factors, see Page 84.
Please use a USB connection cable that is double shielded and no more than 3 meters long.

139 AVC transfer/nonlinear editing

1394 

Computer (Windows/Apple Macintosh)

6-pin

139 cable (optional)

Ferrite core (included)

When controlling this camera from a non-linear editor, cancel the thumbnail screen on the camera. 
(Page 69)
No guarantees are given for images and audio signals which are output simultaneously from the 
camerarecorder while data is being transferred from a computer to the camera-recorder.
The model name will appear on the computer screen.

When connecting to a device having 4-pin type 1394 connector, first connect the cable to the 6-pin type 

1394 connector on the camera.


Ferrite core (length: 30 mm)

Ferrite core (length: 30 mm)

Ferrite core (length: 35 mm)

Ferrite core (length: 35 mm)

Summary of Contents for AG-HPX171EJ

Page 1: ...nuel et le conserver pour un usage ultérieur Prima di utilizzare questo prodotto leggere queste istruzioni e conservare questo manuale per consultarlo quando necessario Antes de utilizar este producto lea estas instrucciones de funcionamiento con atención y guárdelas para poder consultarlas en el futuro Operating Instructions Bedienungsanleitung Mode d emploi Istruzioni per l uso Instrucciones de ...

Page 2: ...s plug for your safety and convenience A 5 amp fuse is fitted in this plug Should the fuse need to be replaced please ensure that the replacement fuse has a rating of 5 amps and that it is approved by ASTA or BSI to BS1362 Check for the ASTA mark or the BSI mark on the body of the fuse If the plug contains a removable fuse cover you must ensure that it is refitted when the fuse is replaced If you ...

Page 3: ... a moulded three pin mains plug for your safety and convenience A 13 amp fuse is fitted in this plug Should the fuse need to be replaced please ensure that the replacement fuse has a rating of 13 amps and that it is approved by ASTA or BSI to BS1362 Check for the ASTA mark or the BSI mark on the body of the fuse If the plug contains a removable fuse cover you must ensure that it is refitted when t...

Page 4: ... other confined space To prevent risk of electric shock or fire hazard due to overheating ensure that curtains and any other materials do not obstruct the ventilation CAUTION Do not lift the unit by its handle while the tripod is attached When the tripod is attached its weight will also affect the unit s handle possibly causing the handle to break and hurting the user To carry the unit while the t...

Page 5: ... 75 ohm type high frequency applications are recommended for analog video signals Audio signal connecting cables If your apparatus supports AES EBU serial digital audio signals use cables designed for AES EBU Use shielded cables which provide quality performance for high frequency transmission applications for analog audio signals Other connecting cables IEEE1394 USB Use double shielded cables whi...

Page 6: ...nuine Panasonic battery pack is used Be aware that many batteries sold at extremely cheap prices or in situations where it is difficult to verify the actual products before purchase have proven to be counterfeit Software information for this product 1 Customer advisory This product includes software licensed under the GNU General Public License GPL and GNU Lesser General Public License LGPL custom...

Page 7: ...ranty see enclosed warranty card for warranty coverage 5 The maximum warranty period may be adjusted depending on the number of hours the device has been used Purchase P2 product Register online within 1 month Registration Notice e mail sent Free 5 years of Warranty Repairs Make sure to save the Registration Notice e mail during the warranty period Details about user registration and the extended ...

Page 8: ...cting against a possible erasure 28 Formatting P2 cards 28 Recording times 29 Remove the P2 card 30 Using SD SDHC memory cards 31 Installing and removing the SD memory card 31 Formatting SD memory card 31 Cautions in using SD memory cards 31 Using the zoom function 32 Digital zoom function 32 Variable frame rates VFR 33 Native recording 35 Standard recording 35 Using variable frame rates VFR 36 Sh...

Page 9: ...Clip skip 78 Adjusting the volume 78 Viewing images on a monitor 78 Checking the date and time 78 Editing Connecting external units 79 Headphones 79 External microphone 79 Computer non linear editing file transfer 80 Hard disk drive data copying 81 Digital video equipment Dubbing 82 Video deck Dubbing 83 TV Monitor playback dubbing 83 Nonlinear editing with P2 card PC mode 84 Copying from P2 cards...

Page 10: ...tes Slow quick motion recording Maximum 4 channel uncompressed digital audio recording DV recording 576i 480i For details on how to handle recorded data see Page 125 1 P2 mode shooting and playback Pages 27 and 66 Computer The data file is transferred for nonlinear editing on your computer or other unit 2 PC mode Page 84 External hard disk The unit directly controls the external hard disk drive an...

Page 11: ... to the shooting of certain material even if it is intended for private use Caution regarding laser beams The CCD may be damaged if it is subjected to light from a laser beam When using the camera recorder in locations where laser irradiation equipment is used be careful not to allow the laser beam to shine directly on the lens Notes when connecting a 1394 cable Windows Before connecting turn off ...

Page 12: ...ttery CR2025 The following accessories are attached to the camera recorder Lens hood INPUT terminal cover 2 1 For part numbers for the battery see Optional units see below 2 When using a 1394 cable sold separately or a USB cable sold separately attach ferrite cores to the both ends of the cable Page 80 Optional units XLR microphone AG MC200G Battery CGA D54s 5400 mAh equivalent to accessory batter...

Page 13: ...ndle START STOP button Page 27 9 Built in stereo microphone Page 54 10 Tally lamp Front Page 21 11 Remote control sensor Front Page 20 12 White balance sensor Page 42 13 INPUT 1 2 audio input switch Page 54 14 Zoom ring pin hole Page 32 15 P2 card access lamp x 2 Page 28 16 Viewfinder Page 22 17 P2 card SD memory card slot cover Pages 27 and 31 18 SCENE FILE dial Page 56 19 SLOT SEL button Page 47...

Page 14: ...2 9 FOCUS switch Page 38 10 PUSH AUTO button Page 38 11 AWB button Page 41 12 IRIS dial Page 39 13 ND FILTER switch Page 40 14 IRIS button Page 39 15 GAIN switch Page 40 16 WHITE BAL switch Page 41 17 FUCUS RING FOCUS IRIS switch Page 38 18 DISP MODE CHK button Page 44 19 AUTO MANUAL switch Page 27 20 AUDIO LEVEL knobs CH1 CH2 Page 55 21 LCD monitor Page 23 22 MENU button Page 97 23 THUMBNAIL butt...

Page 15: ...ect a remote control unit to control zoom and start stop of recording 11 Headphone jack 3 5 mm stereo mini jack Page 79 12 Tripod hole Page 11 13 Security Lock opening Use this opening to attach a security cable For details on how to attach the cable see the Operating Instructions supplied with the cable The security lock and security cable are designed to prevent theft but Panasonic will not acce...

Page 16: ...ction as the COUNTER button on the main unit 4 COUNTER RESET button Page 61 Same function as the COUNTER RESET button on the main unit 5 REC button Page 89 Operation buttons 6 PLAY button q Pages 66 and 89 7 REW button t Page 66 8 PAUSE button h Page 66 Like the operation buttons of the camera MENU operations are performed using SET button 9 STILL ADV button Page 20 10 STOP button g Page 66 11 FF ...

Page 17: ... humidity levels Keep metal objects such as necklaces and hairpins away from the battery Shortcircuiting may occur across the terminals causing the battery to heat up and you may seriously burn yourself if you touch the battery in this state The battery becomes hot while it is being used or charged The camera recorder itself also becomes hot during use The recordable time reduces if you repeatedly...

Page 18: ...into the power outlet 2 Slide the DC cord s battery connector to the direction of the arrow until it clicks into place DC cord s battery connector Removal 1 Set the POWER switch to OFF and check that the mode lamp is off 2 Slide the DC cord s battery connector to the direction of the arrow while pressing the battery release button Battery release button 3 Disconnect the AC power supply cord from t...

Page 19: ...houlder strap Attach the shoulder strap and use it as a precaution against dropping the camera 20 mm or more 20 mm or more Detaching and attaching the lens hood Detaching the lens hood Turn the lens hood counterclockwise to detach it Attaching the lens hood Turn the lens hood clockwise until it clicks to secure it in position Be sure to attach the lens hood cap to protect the lens when not in use ...

Page 20: ...oes not operate the wrong camera recorder by mistake Setting Wireless remote control Press the MCR operation buttons STOP g and STILL ADV at the same time to set the remote control unit for use in operation mode 1 Alternatively press the STOP g and STILL ADV buttons at the same time to set the remote control unit for use in operation mode 2 When the battery in the remote control unit is replaced t...

Page 21: ...ils When the operation mode buttons flash in sequence starting with the top one and the power then goes off it means that there is no charge left in the battery Recharge the battery SLOT SEL MODE CAM MCR PC POWER ON OFF Mode button Mode lamp Lock release Tally lamp The tally lamp can be made to light up during shooting by selecting ON as the REC LAMP setting in the OTHER FUNCTIONS screen Page 114 ...

Page 22: ...st the viewfinder s angle so that the screen is positioned where it is easiest to see You can move the view finder out to about 90 degrees perpendicular to the camera 3 Adjust the diopter adjustment lever so that you can see the characters on the viewfinder screen clearly Viewfinder diopter dial Eye piece Do not point the eye piece at the sun or other strong light source Light concentrated by the ...

Page 23: ...V ON OFF INPUT2 ON OFF LCD ZEBRA EVF DTL OIS WFM COUNTER EVF DTL button Press EVF DTL again to return to the original display EVF DTL OFF appears on the screen for about 2 seconds Using the LCD 1 Set the POWER switch to ON 2 Hold down the OPEN button to open the LCD monitor It can open out to 120 degrees Do not try to open it further as this will damage the camera OPEN button 3 Position the LCD mo...

Page 24: ... REMAIN OTHER DISPLAY LCD BACKLIGHT SELF SHOOT 4 Push the Operation lever in the e or r direction to select the item PUSH MENU TO RETURN EVF COLOR LEVEL EVF BRIGHTNESS EVF CONTRAST EVF SET 5 Push the Operation lever in the w or q direction to make adjustment PUSH MENU TO RETURN EVF COLOR LEVEL EVF BRIGHTNESS EVF CONTRAST EVF SET 6 Press MENU three times to exit the menus You can return the setting...

Page 25: ...ts only the image in the viewfinder or on the LCD monitor not the recorded image 1 Select LCD REV under LCD on the setting menu SW MODE screen This assigns LCD REV to the LCD button 2 Press the LCD button This button toggles between the normal and flipped image at each press No screens are displayed when the image is flipped The unit returns to normal image mode the next time it is powered up LCD ...

Page 26: ... OFF 00012H 00012H MIRROR TIME ZONE OPERATION EVF SET POWER SAVE MENU INIT OPERATION SELF SHOOT 5 Push the Operation lever in the w or q direction to set YEAR to 2008 CLOCK SET PUSH MENU TO RETURN YEAR 2008 OCT 01 12 00 MONTH PUSH y t DAY HOUR MIN SEL PUSH q g Choose a year between 2000 and 2030 6 Push the Operation lever in the r direction to move to the MONTH setting CLOCK SET PUSH MENU TO RETUR...

Page 27: ... red 2 Switch the AUTO MANUAL switch to AUTO to select auto mode A appears on the viewfinder and LCD screens The focus gain iris and white balance are adjusted automatically 3 Press the START STOP button Red on the POWER switch to start shooting Press again to return to the camera to the shooting standby mode Use the handle START STOP button to make it easier to shoot from low angles 1 2 3 POWER O...

Page 28: ...te protected Lights orange Slot that is the object of recording Blinks orange Data is now being accessed Blinks orange fast A card is now being recognized Both lamps blink orange Ejection of card during access Off Cards have not been inserted or formatted Insertion of incompatible card PC mode USB DEVICE Blinks orange Data is now being accessed Off A status other than access underway PC mode 1394 ...

Page 29: ...n approx 32 min AJ P2C032RG 32 GB approx 128 min approx 64 min approx 32 min approx 80 min approx 64 min The AJ P2C002SG 2 GB card cannot be used The displayed available space includes the management area and so the space available for recording is smaller than this Concerning the division of clips recorded on P2 cards When using a P2 card of at least 8 GB in this camera if the continuous recordin...

Page 30: ...p If this happens turn the power off and back on again When a card is ejected during formatting Format the card again When a card is ejected while its data is being accessed The clips may be thrown out of order Page 60 Check the clips and repair them For details on repairing clips see Page 71 Immediately after pre recording a P2 card inserted into an empty slot will not be immediately recognized D...

Page 31: ...IL OPERATION PROPERTY META DATA EXIT DELETE FORMAT REPAIR CLIP RE CONNECTION EXCH THUMBNAIL EXIT SLOT1 SLOT2 SD CARD EXIT 5 Select YES on the confirmation screen The selected SD memory card is formatted You can also format from the SD CARD FORMAT option on the CARD FUNCTIONS screen Page 113 With SDHC cards 32 KB of capacity will have been used Cautions in using SD memory cards SD memory cards used...

Page 32: ... OFF is selected under DRS Page 102 on the setting menu SCENE FILE screen While using the zoom function the slow shutter is disabled While using the slow shutter you cannot use the digital zoom function Digital zoom cannot be changed during recording This camera has a 13 x optical zoom function Zoom with the zoom button or the zoom ring Zoom button Set the ZOOM switch to SERVO so that you can use ...

Page 33: ...7 series this unit also provides a recording format that allows frame rate conversion using nonlinear editing Either the 25PN 30PN or 24PN mode must be set for this 25PN mode The camera recorder shoots in the 25 fps native mode The video signals delivering images at a rate of 25 fps are recorded in 25 frames The signals are recorded only in the effective frames so recording is possible for 2 times...

Page 34: ...rates ranging from 12 frames per second fps to 50 60 fps The list of formats that allow recording by the camera recorder Page 127 There may be slight discrepancies between the recording frame rate displayed and the frame rate at which the images are actually recorded Refer to the table below When SYSTEM FREQ is set to 50 Hz Indicated recording frame rate 50 48 45 42 37 34 32 30 28 27 26 25 24 23 2...

Page 35: ...screen select 720P 50P 720P 60P 720P 25P 720P 30P or 720P 24P as the recording format 2 Select the appropriate scene file using the SCENE FILE dial If necessary before doing this perform the camera settings from the setting menu and register the scene file Page 56 3 Using the OPERATION TYPE function Page 101 on the SCENE FILE screen select FILM CAM and set the desired recording frame rate using th...

Page 36: ...made by martial artists If for instance you have shot scenes using the 25P 24P recording format for specifying the playback frames you can double the speed of the quick motion effects by setting the VFR recording frame rate to 12 fps Recording format REC FORMAT Recording frame rate FRAME RATE 720P 25P 720P 25PN Set to 24 fps or lower 720P 24P 720P 24PN Set to 22 fps or lower 720P 30P 720P 30PN Set...

Page 37: ...ode Shoot 24 frames a second in the progressive mode For output and recording the 24 frame persecond signal is converted to 60 field per second interlace using the widely used 2 3 ratio This gives you images similar to a movie shot with film A B C D E F G H AoAeBoBeBoCeCoDeDoDeEoEeFoFeFoGe GoHeHo He 24P 60i 24P advanced mode Shoot 24 frames a second in the progressive mode For output and recording...

Page 38: ...M MANUAL the camera will focus automatically while you press down PUSH AUTO Switching to manual focus assist mode To change from the manual focus mode to the manual focus assist mode set MF ASSIST to ON on the setting menu SW MODE screen You can make coarse adjustments to the focus in manual focus assist mode by turning the focus ring about half the amount you would turn it in manual focus mode Fi...

Page 39: ...oes not work Even when the BOTH mode is set only the GRAPH display is available The FOCUS ASSIST button does not work when the digital zoom function is used To return to the previous screen press the FOCUS ASSIST button again Iris adjustments IRIS dial FOCUS RING FOCUS IRIS switch IRIS button 1 If the camera is in auto mode use the AUTO MANUAL switch to switch to manual mode Page 38 2 Press the IR...

Page 40: ...nu SW MODE screen Page 104 In auto mode auto gain is available regardless of the GAIN switch setting when a setting other than OFF is selected under AGC on the setting menu AUTO SW screen Page 107 When the recording frame rate is less than 23 22 fps and when a slow shutter speed 1 12 1 15 has been set the gain is fixed at 0 dB regardless of the GAIN switch setting Pages 33 and 52 Light intensity a...

Page 41: ... white a white cloth or wall near the subject can be used instead Do not include bright spotlights in your shot 4 Set the WHITE BAL switch to A or B whichever one you want to save the adjustment in 5 Press the AWB button Adjustment takes a few seconds The following messages appear on the screen Message during adjustment AWB Ach ACTIVE Message after adjustment AWB Ach OK An error message appears on...

Page 42: ... normal 50i 60i modes Press the AWB button to automatically adjust the white balance Press and hold the AWB button to adjust the black balance As the white balance is adjusted first when you press the AWB button make the necessary preparations for this You cannot adjust the black balance while you are shooting Message during adjustment ABB ACTIVE Message after adjustment ABB END Hold down the AWB ...

Page 43: ...exposure are shown as a zebra pattern Very bright Reflecting parts You can remove most overexposed parts by adjusting the iris and shutter speed in the manual mode to remove the areas with zebra patterns The display changes as follows each time you press the ZEBRA button ZEBRA 1 ZEBRA 2 OFF MARKER BARS CH1 SELECT RESET TC SET REC CH2 SELECT AUDIO INT L INPUT1 INPUT2 SHUTTER SPEES SELECT INT R INPU...

Page 44: ... CH button in the thumbnail screen Press the button again to return to the thumbnail screen Changing the image size When recording in 576i 480i mode you can change the size aspect ratio of the images that you record Select the aspect ratio in the setup menus CAMERA SETUP screen ASPECT CONV Page 103 For menu operation Page 97 SIDE CROP Recorded in the regular 4 3 aspect ratio The left and right edg...

Page 45: ...eleased Using the USER buttons You can allocate one of sixteen features to each of the three USER buttons Use these buttons to change shooting settings quickly or add effects to the images you are shooting The following features are allocated to the buttons at the time of shipping USER1 WHITEFADE USER2 BACKLIGHT USER3 TEXT MEMO For details see the setup menus SW MODE screen USER1 to 3 Page 105 If ...

Page 46: ...re retained even if you turn the power off So if you use the camera recorder with the settings for backup recording still in effect images on media in any unit that connected may be overwritten After backup recording check the menu item settings before you operate the camera recorder If you use another AG HPX171EJ as the external unit for backup recording select OFF for 1394 CONTROL on the externa...

Page 47: ... you cannot set or release shot marks during playback INVALID appears when you cannot set or release shot marks When the video data of a single shoot using hot swap recording is made up of multiple clips you cannot set or release shot marks unless all the P2 cards that make up the video data are inserted into the slots You cannot set or release shot marks during loop recording Text memo recording ...

Page 48: ... a switch has been made to the MCR or PC mode or the recording format has been changed after completing a recording Then it will not be possible to delete the clip by turning the power off and turning it back on This button cannot be used to delete clips when a P2 card one of two inserted cards has been removed and reinserted after recording nor can it be used to delete clips on a write protected ...

Page 49: ...recording is underway I REC lights up In temporary standby I PAUSE lights up While recording is stopped The I of I PAUSE flashes However if the duration selected in step 3 is less than 2 seconds I REC will flash while recording is underway in accordance with the set time The pre recording function does not work Continued on the next page Pre recording PRE REC This function is used to record pictur...

Page 50: ...ill be contained in one file No guarantees are made for the 1394 output images Operation is not possible even if only one of the inserted cards is DIR ENTRY NG CARD Page 94 When continuous one shot recording is performed there may be delays in acknowledging the recording operation After one shot recording has started a recordable P2 card cannot be used even if it is inserted into an empty slot The...

Page 51: ...ng The pre recording function does not work Operation is not possible even if only one of the inserted cards is DIR ENTRY NG CARD Page 94 Stopping may take some time The following operations are not acknowledged until the P2 card access lamps change from blinking to fully lit up The slots for recording in this mode are indicated by the orange P2 card access lamps Text memos cannot be added ...

Page 52: ...ess SPEED SELECT to select the shutter speed The shutter speed changes as follows each time you press SPEED SELECT The order is reversed for the SHUTTER SELECT button Adjusting the shutter speed When SYSTEM FREQ is set to 50 Hz With the 1080i 50i 720P 50P and 576i 50i formats Standard Off 1 50 SYNCRO SCAN 1 12 1 25 1 60 1 120 1 2000 1 1000 1 500 1 250 With the 1080i 25P 720P 25P 576i 25P and 720P ...

Page 53: ...SCAN Page 101 Adjust the shutter speed to match the frequency of the television or computer monitor to minimize the horizontal noise that appears when shooting such subjects When SYSTEM FREQ is set to 59 94 Hz by switching to progressive mode you can also shoot PAL system television screens When the OPERATION TYPE option in the SCENE FILE screen Page 101 is set to FILM CAM the shutter opening angl...

Page 54: ...RDING SETUP screen BARS CH1 SELECT RESET TC SET REC CH2 SELECT AUDIO INT L INPUT1 INPUT2 SHUTTER SPEES SELECT INT R INPUT2 INPUT1 MIC POWER 48V ON OFF INPUT2 ON OFF LCD ZEBRA EVF DTL OIS WFM COUNTER CH2 SELECT switch CH1 SELECT switch INPUT 1 2 switches INPUT 1 2 MIC POWER 48V Switch Using the built in microphone 1 Switch the CH1 SELECT switch to INT L Audio from the built in microphone Lch is rec...

Page 55: ... level AUDIO LEVEL knob Use the AUDIO LEVEL knob to adjust the recording level of the built in microphone or of audio signals input through the INPUT 1 2 XLR 3 pin terminal To adjust the volume of the sound for monitoring Page 46 To adjust the recording level of the audio signals turn the AUDIO LEVEL knob while referring to the audio level meter at the bottom left of the viewfinder and LCD monitor...

Page 56: ...ORDING SETUP screen Page 107 F6 SCENE CINE D File suitable for shooting movie like scenes where the dynamic range is to be emphasized The recording format remains unchanged even when the scene file is changed It must be set using the REC FORMAT option on the RECORDING SETUP screen Page 107 Changing scene file settings The setting value of the scene file can be changed Also you can save the changed...

Page 57: ...ect LOAD SAVE INIT SCENE FILE F1 PUSH MENU TO RETURN LOAD SAVE INIT VIDEO CAM DEFAULT 1 48 0 0 0 0 0 OPERATION TYPE V DETAIL LEVEL DETAIL CORING FRAME RATE SYNCRO SCAN DETAIL LEVEL CHROMA LEVEL 9 Press the Operation lever push it in the r direction to select SAVE and press it again SCENE FILE F1 PUSH MENU TO RETURN LOAD SAVE INIT LOAD SAVE INITIAL 0 0 0 0 OPERATION TYPE V DETAIL LEVEL DETAIL CORIN...

Page 58: ...ver in the w or q direction to select a file number 1 to 4 SCENE FILE SD CARD PUSH MENU TO RETURN FILE SELECT 1 NO FILE NO FILE NO FILE NO FILE READ FILE 3 FILE 4 WRITE FILE 1 FILE 2 TITLE RELOAD 4 Push the Operation lever in the e or r direction to select WRITE and press it again SCENE FILE SD CARD PUSH MENU TO RETURN FILE SELECT 1 YES NO FILE NO FILE NO FILE NO FILE READ FILE 3 FILE 4 WRITE FILE...

Page 59: ...ES SELECT INT R INPUT2 INPUT1 MIC POWER 48V ON OFF INPUT2 ON OFF LCD ZEBRA EVF DTL OIS WFM OSD COUNTER RESET TITLE VOL MULTI P IN P REC A DUB PLAY REW FF ZOOM DATE TIME PHOTO SHOT START STOP COUNTER 3 When all characters have been entered push the Operation lever in the w direction at the left end or in q direction at the right end of the characters Then press the Operation lever To reload a file ...

Page 60: ...as been deleted Use a P2 viewer or other program to check all the data You can add the video and audio systems name of the videographer shooting location text memos and other information to the video data you have recorded on the P2 card This data is called the clip metadata Display method Page 72 There are two kinds of clip metadata the data that is recorded automatically during shooting and the ...

Page 61: ...code frame digits are converted into 30 frames for display Pages 101 and 107 UB XX XX XX XX User information FR Frame rate 25P 30P 24P 24PA and frame sequence in progressive mode shooting No display Data is not displayed Resetting the counter Press the COUNTER RESET button while the counter is displayed 1394TC preset mode When shooting using a multi camera you can synchronously set the initial val...

Page 62: ...REGEN is ON you cannot change the items shown above Specifying the time code TC PRESET Set TC PRESET so you can record a value of your choice as the initial setting for the time code to be used at the start of recording 1 Set the POWER switch to ON 2 On the setting menu RECORDING SETUP screen push the Operation lever in the e or r direction to move to TC PRESET and press it again RECORDING SETUP P...

Page 63: ...ou have finished setting the time code MENU 6 Push the Operation lever in the e direction to move to YES and press it again TC PRESET PRESET OK YES PUSH STILL NO 7 Press MENU twice to exit the menus MENU With this unit the time code value is adjusted in accordance with the format and frame rate For this reason bear in mind that making a change in the format or frame rate may result in discontinuit...

Page 64: ...n RECORDING SETUP PUSH MENU TO RETURN MIC GAIN2 50dB 2CH DF REC RUN USER YES 25M REC CH SEL UB MODE UB PRESET TC MODE TCG TC PRESET TIME STANP 5 Set the user information Push the Operation lever in the e or r direction to select user information characters You can use numbers from 0 to 9 and letters from A to F UB PRESET PUSH MENU TO RETURN MONTH PUSH q g 0 0 0 0 0 0 0 0 SEL PUSH t y Push the Oper...

Page 65: ...ENGLISH Shooting E 65 7 Push the Operation lever in the e direction to move to YES and press it again UB PRESET PRESET OK YES PUSH STILL NO 8 Press MENU twice to exit the menus MENU ...

Page 66: ...AY INDEX STOP V REW FF Fast forward y Use this button during playback to fast forward the selected clip 4 x speed When the thumbnail screen is cancelled you can also perform this operation while the camera is stopped When this button is held down the playback speed becomes faster 32x speed When pressed during a pause playback advances one clip INDEX STOP INDEX STILL ADV PAUSE STILL ADV PLAY INDEX ...

Page 67: ...ration lever or push it in the w direction To release the menu mode press MENU To select a clip Push the Operation lever in the w or q direction to move the yellow frame to the clip you want to select and press it again The frame changes to blue Pressing the Operation lever a second time deselects the thumbnail To scroll the pages press the PAGE or button To Play back clips Select a thumbnail and ...

Page 68: ...d these clips cannot be played back even when the MCR FORMAT item has been set 5 Menu display This is where the menu items are displayed Select EXIT and press the Operation lever to close the menu and return to the original screen 6 Recording mode format display This is where the recording mode and format of the recorded images are displayed 7 Indicators M Shot mark This indicates that a clip has ...

Page 69: ...gle shot is recorded in multiple P2 cards you cannot set or release shot marks unless all the P2 cards that make up the video data are inserted into slots Clearing the thumbnail screen Before performing setting menu operations Page 97 you must clear the thumbnail screen Release this in the same way when the camera recorder is to be controlled from a nonlinear editor 1 Press the THUMBNAIL button TH...

Page 70: ...he current order of the clips are displayed To delete a text memo 1 Move the yellow frame to the clip whose text memo is to be deleted and press the Operation lever A thumbnail of the text memo now appears 2 Select the thumbnail of the text memo to be deleted 3 Press the MENU button to display the menu and select OPERATION DELETE SLOT CLIPS The clips on the P2 card in the specified slot are displa...

Page 71: ...lip indicated by the yellow frame is a format playable by this unit the playback format changes to enable playback of the clip with the yellow frame Deleting clips and formatting cards OPERATION You can perform any of the following operations If necessary make preparations prior to undertaking the operations Deleting clips Select the clip to be deleted Formatting P2 cards or SD memory cards Insert...

Page 72: ...be released by downloading the latest version of the P2 viewer from the web site given below installing it in your computer and copying the clips again http pro av panasonic net Checking the clip or card information PROPERTY You can perform any of the following operations If necessary make preparations prior to undertaking the operations Checking and repairing clip information Move the yellow fram...

Page 73: ... rate REC RATE Recording frame rate This display appears when recording using a setting for the FRAME RATE item on the SCENE FILE screen other than the default during 720P 25PN 720P 24PN or 720P 30PN recording operations 5 Clip metadata The video and audio formats videographer information and other detailed data are displayed here Select the desired item using the Operation lever and press the Ope...

Page 74: ...ount displayed by the slot total will be larger than the actual amount and when PROPERTY SETUP REMAIN is selected the remaining amount displayed by the slot total will be smaller than the actual amount Page 50 SD memory card information screen SD STANDARD This indicates whether the SD memory card was formatted in compliance with the SD or SDHC standard SUPPORTED NOT SUPPORTED USED Space used BLANK...

Page 75: ...again THUMBNAIL OPERATION PROPERTY META DATA EXIT 3 Push the Operation lever in the e or r direction to make a selection and press it again THUMBNAIL OPERATION PROPERTY META DATA EXIT LOAD RECORD USER CLIP NAME INITIALIZE PROPERTY EXIT LOAD Select this to load the metadata recorded on the SD memory card into the unit When the Operation lever is pressed with operation moved to LOAD the metadata on ...

Page 76: ... lever in the e or r direction select PROPERTY and push the Operation lever to view the desired data The Operation lever also allows you to change the data Changing method is the same as described in Editing the recorded clip metadata Page 74 EXIT Select this to return to the last screen 4 Press the MENU button to release the menu mode ...

Page 77: ...n on the remote control Slow playback 1 During play press one of the STILL ADV or buttons on the remote control unit INDEX STOP INDEX STILL ADV PAUSE STILL ADV PLAY INDEX STOP V REW FF To return to normal playback push the Operation lever in the q playback direction Fast forward rewind playback 1 During playback push the Operation lever in the t rewind or y fast forward direction This performs fas...

Page 78: ...ER RESET TITLE VOL MULTI P IN P REC A DUB PLAY REW FF ZOOM DATE TIME PHOTO SHOT START STOP Viewing images on a monitor You can view the images on a monitor if you connect the unit to a monitor using a BNC cable not included an AV cable not included or component video cable included 1 Connect the camera recorder to the TV set Page 83 2 Start playback To show the information that appears on the view...

Page 79: ...Microphone optional AG MC200G INPUT1 or INPUT2 Microphone holder Microphone holder adapter 6 mm 12 mm When attaching an external microphone to the microphone shoe use the supplied microphone holder and microphone holder adapter When attaching the microphone holder and the microphone holder adapter be sure to tighten the screws firmly even though you might hear a squeaking sound ...

Page 80: ...dows computer Mini B type 1394 cable optional For an Apple Macintosh computer 6 pin Ferrite core included When connecting a USB cable first connect the cable to the PC When connecting to a device having 4 pin type 1394 connector first connect the cable to the 6 pin type 1394 connector on the camera For details on the computer s conditions and other factors see Page 84 Please use a USB connection c...

Page 81: ...t the P2 card and insert it again If the unit is still not mounted disconnect the 1394 cable and then re connect it Hard disk drive data copying 1394 Hard disk drive 6 pin 1394 cable optional Ferrite core included Before proceeding to connect or disconnect 1394 cable be absolutely sure to turn off the power of the units Before proceeding to connect the unit which uses a 6 pin type 1394 connector c...

Page 82: ...cable to the camera When recording signals from an external unit first check that video signals are supplied While signals from an external unit are being recorded do not stop output on the external unit side or disconnect any of cables This may lead to a failure to recognize the signals when you do recording again While signals from an external unit are being recorded do not change the format of ...

Page 83: ...C function When recording is started or stopped on this camera recording start stop information can be output through the SDI HD connector to control external device The external device should support this function TV Monitor playback dubbing SDI OUT COMPONENT OUT BNC cable optional Component video cable included Video cable optional Audio cable optional White CH1 left channel sound Red CH2 right ...

Page 84: ... the 1394 cable is to be used to make the connection Your computer must run Apple MacOSX 10 3 or later Your computer must support 1394 a SBP2 protocol Operation is not guaranteed in Windows operating systems Insert the P2 card into the unit Page 27 1 Set the unit s POWER switch to ON 2 Select PC MODE on the setting menu OTHER FUNCTIONS screen and press the Operation lever or push it in the q direc...

Page 85: ...m that 1394 DEVICE DISCONNECT is displayed on the camera recorder before disconnecting the cable In the case of a USB connection USB DEVICE CONNECT will remain displayed so check that the card is not being accessed before disconnecting the cable 7 Switch OFF the camera When turning the power off proceed with Safely Remove Hardware on the computer In the case of a 1394 connection first confirm that...

Page 86: ...then hold the button down for 2 or more seconds The PC lamp now lights and PC mode is established MODE CAM MCR PC 5 Only when the hard disk drive is not formatted Push the Operation lever in the e or r direction to select FORMAT HDD and press it again Then push the Operation lever in the e or r direction to select YES and press it again Formatting now starts Formatting is completed in about 2 to 3...

Page 87: ...hard disk drive within the guaranteed operating range humidity and other environmental conditions Do not place the hard disk drive in an unstable locations or locations subjected to vibrations Some HDD may not operate correctly During formatting or copying do not remove any cables eject the P2 card or turn off the power for the unit or hard disk drive The power will need to be turned on again No g...

Page 88: ...RD The card cannot be accessed MISMATCH COMPONENT There is a mismatch with the connection destination UNKNOWN DEVICE CONNECTED A device other than an HDD has been connected P2 CARD IS UNFORMATTED The P2 card is still unformatted CARD IS EMPTY CANNOT COPY There is no data on the P2 card and so it cannot be copied VERIFICATION FAILED A mismatch was discovered by verification TURN POWER OFF Turn off ...

Page 89: ...P IN P REC A DUB PLAY REW FF ZOOM RESET TC SET REC AUDIO INPUT2 MIC POWER 48V OFF OFF LCD ZEBRA EVF DTL OIS WFM COUNTER 5 Stop recording in the recorder If the unit is used as the recorder push the Operation lever to the g stop direction 6 Stop playback on the other unit If the unit is used as the player push the Operation lever to the g stop direction The DV format is converted into 48K 2CH or 4C...

Page 90: ...he frame digits are displayed in 24 frames When the time code value could not be read correctly from the P2 card tc is displayed When it acts in drop frame mode the colon between seconds and frames become UB User information When user information could not be read correctly from the P2 card UB is displayed FR Frame rate information for recording FR 50I 50i interlace mode 50 fields sec FR 50P 50P p...

Page 91: ...ntrol Appears when in the setup menus RECORDING SETUP screen MIC ALC you have selected ON 10 AWB error LOWLIGHT Appears when the brightness level adjusted by the auto white balance is too low C TEMP Appears when the WHITE BAL switch position is changed the power is turned on and COLOR TEMP Ach COLOR TEMP Bch are set to a value other than 0 on the setting menu SCENE FILE screen while in the auto wh...

Page 92: ...he USER button again deletes the shot mark and MARK OFF appears INVALID appears when text memo could not be recorded or when a shot mark could not be added or deleted 23 Recommended ND filter The recommended ND filter under the current shooting conditions is displayed here 24 ND filter display ND filter selected is displayed 25 Gain display In CAM mode displays the gain value of the image amplifie...

Page 93: ... Frame by frame Variable speed search Reverse variable speed search 35 Media information display The card slot where the P2 card was inserted and the basic information of the media are displayed here 1 2 lights P2 card on which data can be recorded 1 2 lights green P2 card on which data is to be recorded 1 2 flashes Card recognition underway No card inserted P Write protected F Full memory X Canno...

Page 94: ...have enough free space for recording WRITE PROTECTED The P2 card or SD memory card is writeprotected NO CARD A P2 card or SD memory card has not been inserted NO FILE There are no files version upgrade files etc Error displays These are displayed when an error occurs in the unit P2 card or other component If the problem is not fixed by turning the power off and then on again either replace the car...

Page 95: ...normal focus operation PSD NG Abnormal vibration detected GYRO NG Abnormal Optical Image Stabilizer control 1394 This is displayed when trouble has occurred in the 1394 connections or signals 1394 INITIAL ERROR connection error 1394 INPUT ERROR input error 1394 INPUT ERROR OTHER FORMAT wrong input format ...

Page 96: ...rol display ü ü ü ü x 19 IRIS display ü ü ü ü x 20 Zoom position display ü ü 21 Focus control display ü ü 23 Recommended ND filter display ü ü ü ü x 24 ND filter display ü ü ü x x 25 Gain display ü ü ü ü 2 x 27 AWB information display ü ü ü ü 3 x 28 Digital zoom display ü ü 30 Optical Image Stabilizer display ü ü ü ü x 31 Scene file name ü ü ü x x 32 Remaining battery display ü ü 33 Media remainin...

Page 97: ...CORDING SETUP 2 PLAYBACK FUNCTIONS 3 AV IN OUT SETUP 4 DISPLAY SETUP 5 OTHER FUNCTIONS 2 Push the Operation lever in the e or r direction to move the highlight to the setting you want 3 Press the Operation lever or push it in the q direction to display the items Example AUTO SW PUSH MENU TO RETURN A IRIS ON 6dB ON ON AGC ATW AF 4 Push the Operation lever in the e or r direction to move to the sett...

Page 98: ... to the factory settings To initialize the scene file From the 6 scene files select the one you want to initialize with the scene dial Then in the SCENE FILE screen LOAD SAVE INIT select INITIAL The settings for only the selected scene file are returned to the factory settings This does not effect the other scene files To simultaneously initialize the user file and the scene files Select YES under...

Page 99: ...IME NAME EDIT INTERVAL TIME CMPNT SDI SEL PREREC MODE SDI OUT MIC ALC SDI METADATA MIC GAIN 1 AV IN OUT SETUP SDI EDH MIC GAIN 2 Pages 110 111 DOWNCON MODE 25M REC CH SEL HP MODE TC MODE TEST TONE TCG INT MIC TC PRESET UB MODE UB PRESET ZEBRA DETECT 1 TIME STAMP ZEBRA DETECT 2 MARKER DISPLAY SETUP SAFETY ZONE Pages 111 113 FOCUS BAR USER FILE VIDEO OUT OSD SCENE FILE REMOTE DATE TIME CARD FUNCTION...

Page 100: ... Pages 110 111 SDI OUT UB MODE SDI METADATA UB PRESET SDI EDH 1394 IN PRESET DOWNCON MODE DISPLAY SETUP VIDEO OUT OSD Pages 111 113 DATE TIME LEVEL METER OTHER FUNCTIONS USER FILE CARD BATT Pages 113 115 REMOTE P2CARD REMAIN PC MODE OTHER DISPLAY ACCESS LED CAMERA DATA CLOCK SET LCD BACKLIGHT TIME ZONE LCD SET SYSTEM FREQ EVF SET MENU INIT DISPLAY ASPECT OPERATION EVF COLOR OPTION MENU 1394 STATUS...

Page 101: ... for shooting images on a TV screen etc Pushing the Operation lever the e or r direction and holding it down will cause the values to change at a faster rate When VIDEO CAM is selected as the OPERATION TYPE option setting 50P 50i 1 50 0 1 248 9 25P 25PN 1 25 0 1 48 0 1 248 9 60P 60i 1 60 0 1 249 8 30P 30PN 1 30 0 1 48 0 1 249 8 24P 24PA 24PN 1 24 0 1 48 0 1 249 8 When FILM CAM is selected as the O...

Page 102: ...shooting LOW LOW Makes a mellow image using the gamma curve which has a gentle incline in low brightness curve The contrast sharpens SD NORM This is the normal video setting carried over from the DVX100 series HIGH Expands the tone of dark parts and makes a brighter image using the gamma curve which has a sharp incline in low brightness curve The contrast softens B PRESS Makes the contrast shaper ...

Page 103: ... horizontal lines and almost horizontal oblique lines When playing back images in the progressive mode or when editing images or performing other postprocessing images with a higher resolution will be obtained with the THIN or MID setting than with the THICK setting NAME EDIT Camera Edits the name of the selected scene file you have selected with the scene file dial CAMERA SETUP screen Item Displa...

Page 104: ...W function when the WHITE BAL switch is set to B PRST Activates the ATW function when the WHITE BAL switch is set to PRST OFF Deactivates the ATW function HANDLE ZOOM Camera Sets the zoom speed assigned to each setting position of the HANDLE ZOOM switch L OFF H Sets LOW low speed OFF HIGH high speed to the 1 2 3 position Zoom is disabled when set to OFF L M H Sets LOW low speed MID medium speed HI...

Page 105: ...er value the image can be disordered for a moment If the unit is being used in the MANUAL mode or AUTO mode set the AGC item on the AUTO SW screen of the setting menu to OFF to use this function D ZOOM Changes the ratio of the DIGITAL ZOOM function Each press of the button changes the ratio in the following order OFF x1 x2 x5 x10 OFF x1 Page 32 TEXT MEMO Records text memos with P2 cards Page 47 SH...

Page 106: ... pressed WAVE Displays a waveform VECTOR Opens a vector display WAVE VECT Each press of the button switches the settings in the following order OFF WAVE waveform VECTOR vector OFF LCD Camera Allocates a function to the LCD button LCD REV Flips the LCD image vertically and horizontally OVERSCAN Switches between overscan and underscan of the LCD viewfinder image This button toggles between the overs...

Page 107: ...H AUTO button RECORDING SETUP screen Item Display mode Description of settings REC FORMAT Camera Selects the recording format When SYSTEM FREQ is set to 50 Hz 1080i 50i 1080i 25P 720P 50P 720P 25P 720P 25PN 576i 50i 576i 25P When SYSTEM FREQ is set to 59 94 Hz 1080i 60i 1080i 30P 1080i 24P 1080i 24PA 720P 60P 720P 30P 720P 24P 720P 30PN 720P 24PN 480i 60i 480i 30P 480i 24P 480i 24PA MCR FORMAT MCR...

Page 108: ...F Records using the time code set in TC MODE TCG If you select ON here this has priority over the settings in TC MODE TCG If there is no input to the 1394 terminal the camera follows the settings in TC MODE TCG TC MODE Only when set to 59 94 Hz Camera MCR Selects the correction mode of the internal time code generator DF Uses the drop frame mode NDF Uses the non drop frame mode The non drop frame ...

Page 109: ...or frame conversion a b c d a Checking information for user information b Frame sequence No When SYSTEM FREQ is set to 50 Hz F is displayed When SYSTEM FREQ is set to 59 94 Hz 0 to 4 are displayed in the 24P 24P advanced mode F is displayed in the 60i 30P mode c Frame rates Frame rate 50 25 60 30 24 I P ID Conversion data Frame rate coefficient d Recording management data Frame update information ...

Page 110: ...lects the type of component terminal or SDI connector When SYSTEM FREQ is set to 50 Hz AUTO Monitor with D4 terminal 720P 1080i 576i output 1080i Monitor with D3 terminal 1080i 576i output 576i Monitor with D1 terminal 576i output When SYSTEM FREQ is set to 59 94 Hz AUTO Monitor with D4 terminal 720P 1080i 480i output 1080i Monitor with D3 terminal 1080i 480i output 480i Monitor with D1 terminal 4...

Page 111: ...1 2 3 and 4 OFF Does not output a test tone INT MIC Camera Determines whether or not input from the internal microphone is used during recording ON Uses internal microphone input OFF Does not use internal microphone input DISPLAY SETUP screen Item Display mode Description of settings ZEBRA DETECT 1 Camera Selects the brightness level of the left leaning zebra patterns on the screen 50 55 60 65 70 ...

Page 112: ...order data image stabilizer aperture gain value made during shooting is displayed in playback of clips recorded in the DV format ON OFF Note Appears only when 576i 480i REC MODE Page 107 is set to DV LCD BACKLIGHT Camera MCR Adjusts the backlight of the LCD monitor Select HIGH for brighter backlight HIGH NORMAL LOW LCD SET Camera MCR Adjusts the display level of the images on the LCD monitor Page ...

Page 113: ...written READ You can read the setting values of the user files 1 to 4 from the SD memory card by specifying the file number WRITE Saves the current setting values of the user files 1 to 4 to the SD memory card TITLE RELOAD Updates the title list SD CARD FORMAT Camera Formats the SD memory cards OTHER FUNCTIONS screen Item Display mode Description of settings USER FILE Camera MCR LOAD Loads the set...

Page 114: ...unction select STOP PC MODE Camera MCR Selects the terminal for data transfer You cannot select USB and 1394 at the same time USB DEVICE Mode for sending files using the USB connector 1394 DEVICE Mode for sending files using the 1394 connector 1394 HOST Mode for copying files from the P2 card onto an external hard disk drive using the 1394 connector ACCESS LED Camera MCR Sets the access lamp to ON...

Page 115: ...Abu Dhabi 01 30 03 00 Moscow 00 30 02 00 Eastern Europe 12 45 Chatham Islands 01 00 Central Europe POWER SAVE Camera Selects the power saving mode when the Operation lever MENU button THUMBNAIL button PAGE AUDIO MON VAR button DISP MODE CHK button USER1 3 buttons and EVF DTL button have not been operated for 5 minutes or so ON The camera recorder s power is set to OFF OFF The unit remains stopped ...

Page 116: ...nals which are input or output RATE Transfer rate of the signals which are input or output 60 50 System of the signals which are input or output CH Value of the channels in which the signals are input or output SPEED Transfer speed of the signals which are input or output STATUS Status of the signals which are input or output using the 1394 digital interface VIDEO Status of the video signals which...

Page 117: ...n out The same is true if when the power is turned on the CAM MCR and PC la mps flash in this sequence and then the power goes off Either recharge the battery or replace the discharged battery with a fully charged one P17 Battery The battery runs down quickly Make sure the battery is fully charged Keep charging until the battery charger s CHARGE lamp goes out P17 Are you using the battery in a col...

Page 118: ...n the P2 card If so save the data onto another media and delete the data you no longer need alternatively replace the card with a new one The P2 card may be formatted incorrectly Alternatively the card you are using may not be formatted for use with the unit If so format the card in the unit P28 2 GB P2 cards cannot be used The media information display may be indicating E If so format the card in...

Page 119: ...rst and upon completing the replacement resume it P89 Other Cannot read the data on the SD memory card Make sure the SD memory card is formatted correctly If it is not format the card in the unit P31 The remote control does not work The battery in the remote control may have run out If the remote control fails to work even if it is operated close to the remote control sensor of the camera recorder...

Page 120: ...even when the battery temperature is normal there may be something wrong with the battery or battery charger Contact your dealer The battery takes longer to charge when it is warm The battery charger can interfere with radio reception so keep radios at least 1 meter away from it The battery charger may make some noise when you are using it but this is normal Take precautions not to drop the camera...

Page 121: ...t burned onto the screen of the LCD or viewfinder if they are displayed for a long time but you can fix this by leaving the camera off for several hours The liquid crystal parts are highly precise with 99 99 of the pixels effective This leaves less than 0 01 of pixels that may not light or may remain on all the time These phenomena are normal and will have no effect on the images you shoot Condens...

Page 122: ... to the site given above and download the driver as necessary The updating procedure is completed when the downloaded file has been loaded into the camera recorder via the SD memory card For further details on this procedure go the site given above For installation you must connect the AC adaptor If you are going to use SD memory cards with this camera recorder use only cards which are in complian...

Page 123: ...er and then use a dry cloth to take up the remaining moisture Cleaning the Viewfinder If there is dust inside the view finder remove the eye cup holder and get rid of the dust The interior of the eye cup holder is specially finished so do not ever wipe it If there is dust on it blow it off with an air blower Remove the eye cup holder with the eye cup attached by rotating it counterclockwise It wil...

Page 124: ...rn yourself if you touch the battery in this state Discharge the battery before storing it When storing it for an extended time charge it at least once a year use up its charge in the camerarecorder and then store it again P2 cards After ejecting a P2 card from the unit be absolutely sure to attach its special cap to keep sand and dust away from the connector area Stow the P2 cards in their own ca...

Page 125: ...ell http pro av panasonic net When using regular IT tools such as Microsoft Windows Explorer or Apple Finder to transfer data to a PC follow the instructions below However be sure to use the P2 Viewer when returning data to a P2 card Transfer the corresponding CONTENTS folder and LASTCLIP TXT file together as a set Do not transfer individual files from the CONTENTS folder When copying copy the LAS...

Page 126: ... Cards you cannot use All memory cards except the ones pictured on the left MultiMediaCard We recommend using SD SDHC memory cards and miniSD miniSDHC cards that are made by Panasonic For the latest information on the unit and on the memory cards which can be used by this unit go to the P2 support page at the following web site http pro av panasonic net The SDHC card conforms to a new standard for...

Page 127: ...0i When SYSTEM FREQ is set to 59 94 Hz Frame rate 60 30P 24P 24PA Video format DVCPRO HD 1080i 60i 1080i 60i 1080i 30P over 60i 1080i 24P over 60i 1080i 24PA over 60i 720P 60P 720P 60P 720P 30P over 60P 720P 24P over 60P 720P 30PN 720P 60P Native recording 720P 30PN 720P 24P Native recording 720P 24PN 720P 60P Native recording 720P 30P Native recording 720P 24PN DVCPRO50 DVCPRO DV 480i 60i 480i 60...

Page 128: ...vice the thumbnail and COUNT value of clip 1 will be displayed Selecting the USER CLIP NAME recording method Press the MENU button and select META DATA PROPERTY USER CLIP NAMEto select the recording method Two options are available TYPE1and TYPE2 TYPE1 USER CLIP NAME to be recorded If clip metadata has been read in Uploaded data If no clip metadata has been read in or if the setting for recording ...

Page 129: ...N mode 1 25 1 50 OFF 1 60 1 120 1 250 1 500 1 1000 sec 60i 60P mode 1 60 OFF 1 100 1 120 1 250 1 500 1 1000 1 2000 sec 30P 30PN mode 1 30 1 50 OFF 1 60 1 120 1 250 1 500 1 1000 sec 24P 24PA 24PN mode 1 24 1 50 OFF 1 60 1 120 1 250 1 500 1 1000 sec Synchro scan 50i 50P mode 1 50 0 to 1 248 9 sec 25P 25PN mode 1 25 to 1 248 9 sec 60i 60P mode 1 60 0 to 1 249 8 sec 30P 30PN mode 1 30 0 to 1 249 8 sec...

Page 130: ...cording time represents one shot continuously recorded on a P2 card The recording time may be shorter depending on the number of shots recorded The 720P 25PN 720P 30PN and 720P 24PN formats are not included in the DVCPRO HD recording format VIDEO OUT SDI output BNC x 1 0 8 V p p 75 Ω HD complies with SMPTE 292M 296M and 299M SD complies with SMPTE 259M C 272M A and ITU R BT 656 4 Analog component ...

Page 131: ... BATTERY CHARGER Power Source 100 V 240 V AC 50 Hz 60 Hz 0 4 A Power Output 8 4 V DC 1 2 A indicates safety information Weight 160 g Dimensions W x H x D 70 mm 35 mm 115 mm excluding the projection part Weight and dimensions are approximate Specifications are subject to change without notice Inrush current measured according to European standard EN55103 1 6 5 A AC adaptor 6 4 A Battery charger ...

Page 132: ...ste handling For more information about collection and recycling of old products and batteries please contact your local municipality your waste disposal service or the point of sale where you purchased the items Penalties may be applicable for incorrect disposal of this waste in accordance with national legislation For business users in the European Union If you wish to discard electrical and ele...

Reviews: