background image

Viewing TV Programs

15

Your LCD TV can memorise and store all of the available channels. After the available channels are memorised, use

/-

 to scan through the available stations.
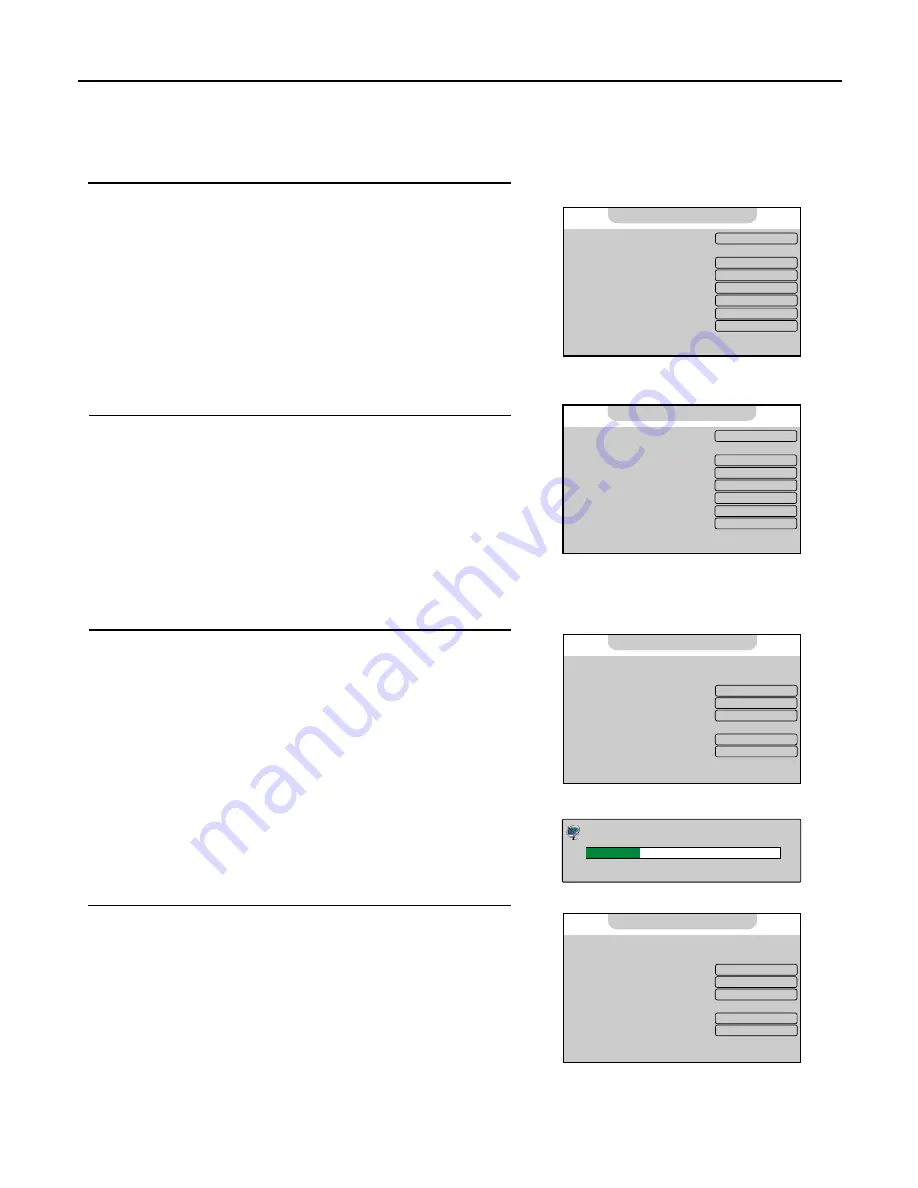
Select a Region

Before you start automatic search, it is necessary to select a region firstly.

Press 

MENU

 to display the menu main page.

Push 

ENTER

 (Up/Down)  repeatedly to display 

Option

 menu page.

Press 

ENTER

 to access.

Push 

ENTER

 (Down) repeatedly to select 

Program Area

 item.

Push 

ENTER

 (Left/Right) to select a proper region according to your

area.

Press 

MENU

 repeatedly to exit.

Setting APS Function On or Off

Repeat steps 1~3 in [

Select a Region

].

Push 

ENTER

 (Down) repeatedly to select the 

APS

 item.

Push 

ENTER

 (Left/Right) to select 

On

 or 

Off

.

Press 

MENU

 repeatedly to exit.

After auto searching, the channels will be ranged automatically according to VPS (Video Program System) information
when this item is set to 

On

 in advance.

Auto Search

Press MENU to display the menu main page.

Push 

ENTER

 (Up/Down) repeatedly to display 

Program

 menu

page.

Press 

ENTER

 to access.

Push 

ENTER

 (Down) repeatedly to select 

Auto Search

 item.

Press 

ENTER

 to start auto search.

The unit will begin memorising all of the available channels.

Manual Fine Tuning

Repeat steps 1~3 in [

Auto Search

].

Push 

ENTER

 (Down) repeatedly to select 

Fine Tuning

 item.

Push 

ENTER

 (Left/Right) to fine tune till the best possible picture

and sound are obtained.

Press 

MENU

 to exit.

1
2
3
4
5

6

1
2
3
4

3
4
5

1
2

Note:

The process of auto search will be stopped if you press the 

MENU

 button

1
2
3

323.25MHz

VHF-H

Auto Search Program...                    7

Off

Off

Off

1. Child Lock:
2. Change Password
3. WSS:

4. APS:

5. Program Area:
6. Menu Language:
7. Menu Background:
8. Blue Screen:

Option

On

Opaque

English

Others...

Off

Off

Off

1. Child Lock:
2. Change Password
3. WSS:
4. APS:

5. Program Area:

6. Menu Language:
7. Menu Background:
8. Blue Screen:

Option

On

Opaque

English

Others...

19

Off
Off
Off

0

AUTO

D/K

320.25 MHz

1. Program No:
2. Program Name:
3. Locked:
4. Favourite:
5. Skip:
6. Fine Tuning:
7. Colour System
8. Sound System:

9. Auto Search:

0. Manual Search:

Program

19

Off
Off
Off

0

AUTO

D/K

320.25 MHz

1. Program No:
2. Program Name:
3. Locked:
4. Favourite:
5. Skip:

6. Fine Tuning:

7. Colour System
8. Sound System:
9. Auto Search:
0. Manual Search:

Program

4

Summary of Contents for TFTV815S

Page 1: ...YNTON AVENUE WATERLOO NSW 2017 AUSTRALIA TEL 02 9313 7111 FAX 02 9313 7555 www palsonic com au PALSONIC CUSTOMER SERVICE TELEPHONE AUSTRALIA 1300 657 888 81CM CORDLESS REMOTE LCD TELEVISION MONITOR MO...

Page 2: ...the Menus and Displays Viewing TV Programs Select a Region Setting APS Function On and Off Auto Search Manual Fine Tuning Manual Search Skipping Channel Editing Channels Setting Favourite Channel Edit...

Page 3: ...ing Timer Setting On Program and On Volume Changing Screen Layout Selecting Screen Layout PIP Operations Viewing the Picture in Picture Using PIP POS button Using ACT WIN Button Swap the Contents of t...

Page 4: ...ert an object into the product through vents or openings High voltage flows in the product and inserting an object can cause electric shock and or short internal parts For the same reason do not spill...

Page 5: ...nvironment as this causes condensation which may result in fire electric shock or other hazards 20 Ventilation Do not block any ventilation openings Install in accordance with the manufacturer instruc...

Page 6: ...use of batteries can result in a leakage of chemicals and or explosion Be sure to follow the instructions below Place batteries with their terminals corresponding to the and indications Different typ...

Page 7: ...pe and position of the aerial will depend upon your particular area Note It is recommended that the 75 ohm coaxial cable be used to eliminate interference and noise which may occur due to radio wave c...

Page 8: ...SOURCE To access signal source select menu 5 CH Press these two buttons to directly change the TV channel 6 Power Indicator 7 Power Switch Note Functions of VOL CH MENU and SOURCE are also provided t...

Page 9: ...nly The user cannot operate the unit through the UPDATE interface 6 Component inputs Y Pb Pr Audio L R Connect to the component and audio output sockets of a DVD player or Set Top Box 7 Aerial input A...

Page 10: ...menu DSP CAPS To display current channel status To switch between uppercase and lowercase input mode when editing channel label RETURN To quickly jump between current channel and last selected channel...

Page 11: ...de CHANNEL Use to switch channels TEXT To enter exit teletext mode Teletext HOLD To hold the current teletext page temporarily Teletext UPDATE To view update teletext page Teletext ZOOM To select Scre...

Page 12: ...T interface on the unit and the unit receives CVBS VIDEO signal only Carefully check the terminals for position and type before making any connections The illustration of the external equipment may be...

Page 13: ...EO signal and Y C S VIDEO signal from SCART2 interface When receiving Y C signal you need to select Scart 2 Y C instead of Scart 2 AV in the source select menu Therefore if you find that the colour is...

Page 14: ...tter video you can use the S Video terminal if your source supports it If you are going to use S Video terminal please select S Video instead of Video in source menu The Video input terminal on the AV...

Page 15: ...yer To play DVD 1 Turn on your LCD TV press SOURCE button on the remote control 2 Press ENTER Up Down to select YPbPr 3 Press ENTER to confirm 4 Turn on your DVD player insert a DVD disc and press the...

Page 16: ...our product Connect a PC How to connect Connect a D Sub cable between the S Sub interface on the PC the D Sub interface on the unit Connect an Audio cable between the AUDIO output on the PC and AUDIO...

Page 17: ...system On screen menu will disappear from the screen automatically after some seconds or you can press the MENU button repeatedly to exit the menu system Note In Menu operations you may push ENTER Up...

Page 18: ...enu page Press ENTER to access Push ENTER Down repeatedly to select Auto Search item Press ENTER to start auto search The unit will begin memorising all of the available channels Manual Fine Tuning Re...

Page 19: ...kipping Channel Repeat steps 1 4 in Manual Search Push ENTER Down repeatedly to select Skip item Push ENTER Left Right to select On or Off Press MENU repeatedly to exit When the item is set to on the...

Page 20: ...epeat steps 1 4 in Manual Search Push ENTER Down to select Program Name item Press ENTER to edit program name Push ENTER Left Right to move cursor right or left Use 0 9 number buttons to input charact...

Page 21: ...ll locked channels If the Child Lock item is set to On the unit asks you to input password if you want to access the Program menu page If you set the Child Lock item to On next time if you want to set...

Page 22: ...TV 2 Video 3 S Video 4 SCART 1 5 SCART 2 AV 6 SCART 2 Y C 7 YPbPr 8 D Sub 9 HDMI Select Main Source Adjusting the Volume Using the volume buttons VOLUME Press the VOLUME or VOLUME to increase or decr...

Page 23: ...value of the item Press MENU repeatedly to exit The Hue item is for NTSC only Reducing Picture Noise Repeat steps 1 2 in Using the Preset Picture Mode Push ENTER Down repeatedly to select the DNR item...

Page 24: ...Picture Mode Push ENTER Down repeatedly to select APL item Press ENTER Left Right to select On or Off Press MENU repeatedly to exit You can use this function to adjust the level automatically so as to...

Page 25: ...ferent situations or customise the sound effect by yourself Repeat steps 1 3 in Adjusting the Volume Push ENTER Down repeatedly to select Equalizer item Push ENTER Left Right to select There are three...

Page 26: ...ving a bilingual program press the STEREO button to select NICAM Dual1 NICAM Dual2 or Force Mono IGR German stereo system Broadcasts This enables the selection of the reception mode when receiving an...

Page 27: ...4 3 For 4 3 signal format This mode displays a 4 3 picture at its standard 4 3 size without any stretching Panorama In this mode the picture is progressively stretched towards each side of the screen...

Page 28: ...atedly to select Current Time Off Time or On Time Press ENTER to start setting time Push ENTER Left Right to toggle between hour and minute push ENTER Up Down to adjust Press MENU to return back to th...

Page 29: ...a double window that allows you to watch two programs at the same time Note You may use the POP button to quickly turn on or off the POP feature POP Full When this item is selected one main window and...

Page 30: ...the PIP window on centre of the screen Press MENU repeatedly to exit Note You may use the PIP button to quickly turn on or off the PIP feature Using the PIP POS button Press the PIP POS button to quic...

Page 31: ...Automatically Repeat steps 1 3 in Adjusting Image Horizontal Size Push ENTER Down repeatedly to select Auto Sync item Press ENTER to confirm and press MENU repeatedly to exit You may quickly adjust th...

Page 32: ...You can select a group or block of pages displayed in the coloured brackets at the bottom of the screen by pressing the corresponding colour RED GREEN YELLOW BLUE on the remote control unit 0 9 Direct...

Page 33: ...This may be caused by electrical interference e g hair dryer nearby neon lights etc Turn off the equipment Television not responding to remote control Check whether the batteries are working Replace...

Page 34: ...s type of irreversible LCD panel deterioration can be limited by observing the following steps A Reduce the brightness contrast setting to a minimum viewing level B Do not display the fixed image for...

Page 35: ...3 57 21 69 21 69 21 69 21 69 CATV Z1 Z37 X Z 2 S1 S41 X Z 2 S1 S41 TV System PAL SECAM BG DK PAL I NTSC AV Supported Display Format D Sub YPbPr HDMI DVI 640 x 480 60Hz 72Hz 75Hz 85Hz 720 x 400 70Hz 80...

Page 36: ...ONIC CORPORATION PTY LTD 1 JOYNTON AVENUE WATERLOO NSW 2017 AUSTRALIA TEL 02 9313 7111 FAX 02 9313 7555 www palsonic com au PALSONIC CUSTOMER SERVICE TELEPHONE AUSTRALIA 1300 657 888 604 L32W25S3 03 V...

Reviews: