background image

Location of controls

Front view/Side view/Back view

3

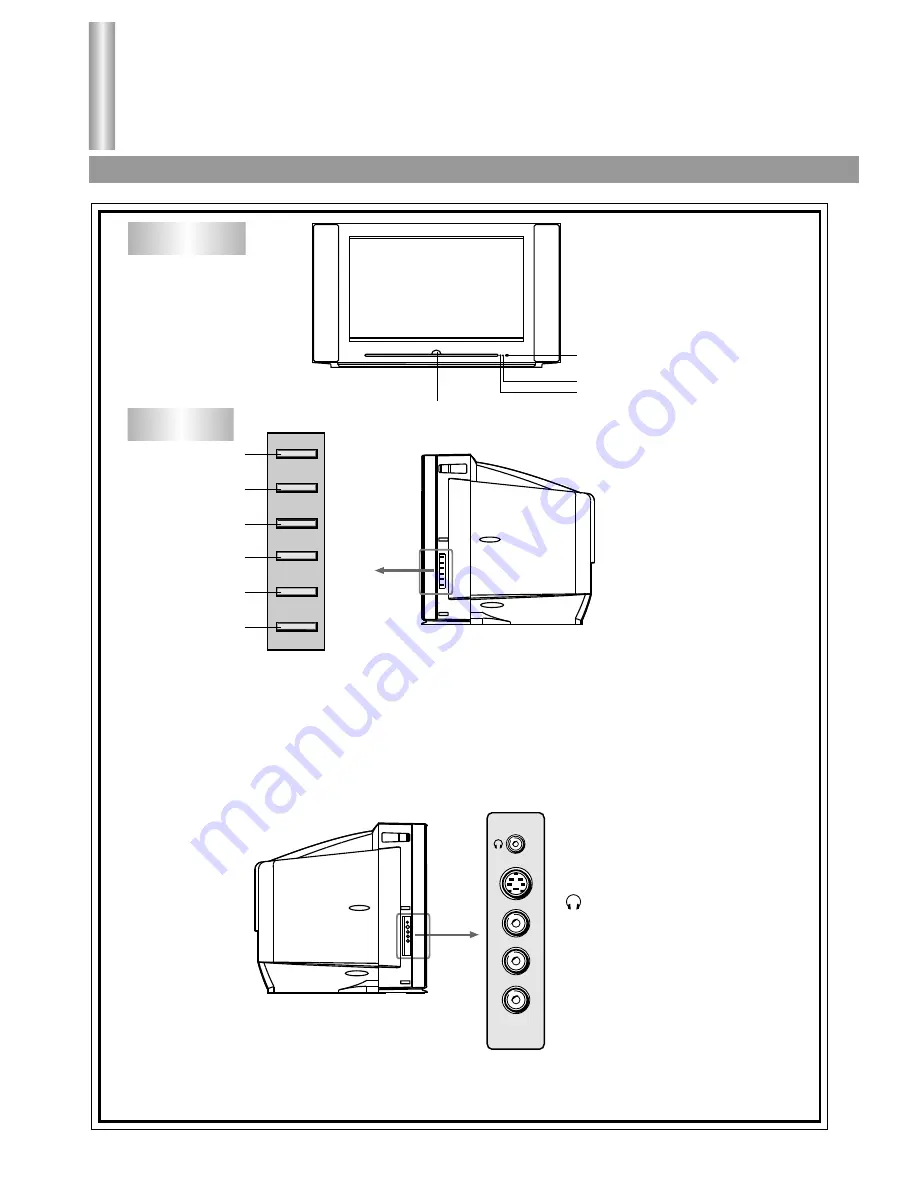
Front view

POWER SWITCH

INDICATOR

INDICATOR

REMOTE SENSOR 

Side view

1. 

TV/AV

 button: Open the signal source selection menu.

2. 

CH-

 button: Select a lower position number.

3. 

CH+

 button: Select a higher position number.

4. 

MENU

 button: Enter into the menu.

5. 

VOL-

 button: Lower the volume 

6. 

VOL+

 button: Raise the volume.

TV/AV

CH-

CH+

MENU

VOL-

VOL+

1

2

3

4

5

6

S-VIDEO

VIDEO

L/MONO

R

AV3 IN

: Headphone jack

AV3 input terminals
{S-VIDEO, VIDEO,
AUDIO L/MONO, R} 

Summary of Contents for 76WSHDA

Page 1: ...LIA TEL 02 9313 7111 FAX 02 9313 7555 www palsonic com au PALSONIC CUSTOMER SERVICE TELEPHONE AUSTRALIA 1300 657 888 76CM 86CM WIDE SCREEN HDTV READY MODEL 76WSHDA 86WSHDA OWNER S MANUAL Type Tested Electrical Safety AS NZS 3250 Lic 4166 Standards Australia APP No N18748 ...

Page 2: ...lays and illustrations in this manual may differ from the actual ones for better visibility Contents Cautions for safety Locations of controls Remote controller Installation Basic operation Operation in RF mode Channel presetting Channel selection Picture adjustment Sound adjustment Timer setting System setup Operation in VIDEO mode Operation in HDTV mode 1 YPbPr 2 XGA mode Display mode setting Tr...

Page 3: ...lean the surface with a soft dry cloth while the TV is turned off Never use any detergent cleaners to clean the surface The screen surface may be scratched if a hard cloth is used Avoid exposing the set to direct sunlight and other sources of heat to prevent damage to the cabinet and components Do not expose the TV set to rain or excessive moisture Avoid using the set in very warm or damp places a...

Page 4: ...t cover the ventilating hole in the cabinet Keep a space of more than 10cm from the walls to the TV set to ensure adequate ventilation If the power cord or the plug is damaged contact a qualified service department for service When the TV set is to be left unattended for a long period of time turn off the power supply and remove the plug from the wall outlet Don t try to push anything into the cab...

Page 5: ...the signal source selection menu 2 CH button Select a lower position number 3 CH button Select a higher position number 4 MENU button Enter into the menu 5 VOL button Lower the volume 6 VOL button Raise the volume TV AV CH CH MENU VOL VOL 1 2 3 4 5 6 S VIDEO VIDEO L MONO R AV3 IN Headphone jack AV3 input terminals S VIDEO VIDEO AUDIO L MONO R ...

Page 6: ... DVD IN VIDEO 1 4 1 Antenna input 2 DVD input terminals VIDEO Y CB CR AUDIO L MONO R 3 AV1 input terminals S VIDEO VIDEO AUDIO L MONO R 4 AV2 input terminals S VIDEO VIDEO AUDIO L MONO R 5 AV output terminals VIDEO AUDIO L MONO R 6 HDTV input Y PB PR XGA AUDIO L MOMO R Back view 2 ...

Page 7: ...enu operation used to move the cursor upward or downward Text image mode switch over Screen aspect ratio selection Retain on screen display Sleep timer Surround sound control Direct channel selector Previous channel One digit two digit three digit channel selector Sound mute Volume up down Menu item adjust Selectable picture Selectable sound STEREO FM Mono selection ...

Page 8: ...o not mix different types of batteries together or old batteries with fresh ones When the remote control will not be used for a long period of time or when the batteries are worn out remove the batteries Do not throw the batteries into a fire Dispose of used batteries in the specified manner Do not drop dampen or disassemble the remote control When there is an obstacle between the TV and the trans...

Page 9: ...r picture use an outdoor antenna or CATV cable In case of using the Twin lead aerial feeder 300 for UHF VHF aerial use a 300 75 ohm adaptor not supplied When using the coaxial cable 75 for UHF VHF aerial connect the plug into the 75 ohm aerial socket directly 1 When you connect the outdoor antenna cable to the antenna terminal on the set turn off the power supply to the set first 2 In thunder and ...

Page 10: ...ideo equipments such as a VTR and video camera to this TV and enjoy the high quality picture and sound If your video equipment has a S VIDEO output terminal connect it to the S VIDEO input terminal special S VIDEO type of the unit If not connect it to the VIDEO terminal phono type To select the input press AV TV button to display the signal source selection menu and press the CH or CH button to se...

Page 11: ...enjoy a high quality sound from the stereo system You can also connect AV output terminals to VTR to record programs being displayed on the screen Note Only when the signal source is input through RF or AV1 IN or AV2 IN or AV3 IN there is signal for AV OUT terminals to output Note Y Y XGA CB PB CR PR S VIDEO L MONO R RF AV1 IN AV2 IN AV OUT HDTV IN DVD IN VIDEO Y L MONO R CB CR THE SET S REAR Sign...

Page 12: ...box to HDTV IN L R sound inputs note that L to Land R to R If your set top box is incorporated with XGA interface please connect according to To connect XGA input interface which is shown above Press AV TV button to display the signal source selection menu and then select YPbPr mode Now you can view programs play backed by the set top box Y Y XGA CB PB CR PR S VIDEO L MONO R RF AV1 IN AV2 IN AV OU...

Page 13: ...the TV will directly be in Power On mode Even if you set Power Restore to OFF while you quickly switch off on the TV the TV will also be in Power ON mode directly Press the AV TV button to display signal source selection menu Press the CH or CH button to select one of RF AV1 SAV1 AV1 SAV2 AV3 SAV3 YCbCr XGA YPbPr Press VOL or VOL button to confirm your choice If you select XGA or YPbPr as signal s...

Page 14: ... VOL or VOL to select menu icon Press CH to enter into the menu In menu operation use CH to select and VOL to adjust To exit menu mode press MENU button Timer Off Timer On Timer Pr Prog No Timer Alarm OPTION System Sound Search Auto Search Fine tune AFC Skip VCR English Chinese Blue Screen Background Auto Off Power Restore 2 1 4 3 5 Contrast Bright Colour Peaking Adjust Advanced Rotate Degauss PIC...

Page 15: ...search can not preset the desired channels or you want to preset the desired channels one by one with the preferred channel number please make use of Search Use channel select buttons to select a channel number Enter into the PRESET menu press CH button to select Search Press VOL or VOL button to start searching When a channel is located the searching stops this channel is then memorised with the ...

Page 16: ...AM PAL N NTSC N443 PAL60 and PAL M will appear cyclically In normal circumstances please set the colour system to AUTO and the set can automatically select the proper colour system If colour is still abnormal then select the proper colour system manually When the sound is abnormal Enter into PRESET menu Press CH to select Sound menu item Press VOL to select the correct sound system M B G I D K wil...

Page 17: ...ffects after the AFC you can shut down AFC and make use of FINETUNE until you get satisfied effect Select the channel you want to fine tune Enter into the PRESET menu Press CH button to select Finetune Press and hold VOL button to begin fine tune until the optimum picture and sound is achieved Note if some channel s colour or sound is still abnormal it may be that the setting of the colour or the ...

Page 18: ...ou want to restore with the number buttons enter into the PRESET menu to set SKIP to OFF When receiving VCR type programs there may occur a jump of the picture or bend of upper picture You can solve this problem by activating VCR function Please do the following steps Enter into PRESET menu Press CH to select VCR menu item Press VOL to set VCR to ON If you do not meet this problem or the program i...

Page 19: ...mber buttons to select a channel To select a three digit channel Press button to display on the top right screen Press 0 9 number buttons to select a channel Press CH to select higher channel numbers CH to select lower ones Press the button on the remote controller can swap the current viewed channel with the previous one Pressing the button can also switch between programs from RF AV1 AV2 AV3 DVD...

Page 20: ...am type The picture quality you have set in PICTURE menu will be stored into Personal Press MENU button Press CH to select the desired adjustment item Press VOL or VOL to adjust Option Function Operation Range Contrast Adjusts image contrast 0 100 Adjusts screen brightness for easier viewing of dark picture such as night scenes and black hair Color Adjusts colour saturation 0 100 Adjusts image sha...

Page 21: ...te the picture leftward or rightward until you rectify it If there occurs magnetisation please do the following to degauss the set Enter into PICTURE menu and select Adjust menu item Press VOL or VOL to enter into the sub menu Press CH to select Degauss Press VOL or VOL button the degaussing circuit begins to work If still can not degauss thoroughly please repeat the above operation after 15 20 mi...

Page 22: ...se turn on FilmMode On or Off Internal Signal Off 0 1 2 Picture noise reduction demonstration When watching moving pictures do not set NR to MID or HIGH otherwise the receiving effects will be affected There is no COMB item when in YCbCr or S VIDEO input mode 2 1 3 4 Press CH to select Advanced menu item 5 Note Off On MENU Quit Set Ent HEnhance NR DCDI CTI Matrix On Auto On On Norm Advanced MENU Q...

Page 23: ... sides or when picture s upper and lower part s brightness differs greatly there is tilt on picture s sides these are normal phenomena it is not necessary to worry about them PANORAMA mode expands the conventional 4 3 picture into a full 16 9 picture and at the same time still maintains a good aspect ratio at the centre of the screen This will minimise distortion and produce a remarkable panoramic...

Page 24: ...lume is lower Surround Adjusts surround sound effect Balance Adjusts left and right volumes The benefits of surround sound are enormous You can be completely enveloped in sound just as if you were at a concert hall or cinema You can make use of Sound menu to select surround sound setting or directly press SURRD button Off Low High can be selected Surround High Sound mute Sound adjustment 2 1 3 4 S...

Page 25: ...If the program is an ordinary one without stereo pressing this button has no effect Press the S M button to quickly select sound mode There are four preset sound modes Standard News Hall and Music and one user set sound mode Personal Each preset mode has its own sound setting Standard standard sound News suitable for listening to news dialogue Hall likeaconcerthallfilledwitharichwarmsound Music su...

Page 26: ...MER menu icon press CH to enter into TIMER menu Press CH to select item Press VOL or VOL to set Function Remarks Timer Off To turn off the TV automatically at a preset time Timer On To turn on the TV automatically at a preset time To switch to a preset channel automatically at a preset time Prog No To set a program number for Timer Pr To alarm automatically at a preset time Once you set the ON tim...

Page 27: ...hen no signal is being received Otherwise it will display snowy picture Enter into OPTION sub menu Press CH to select Blue Screen menu item Press VOL or VOL to change the blue screen setting On or Off Use this function to set the menu background to either blue or transparent Enter into OPTION sub menu Press CH to select Background menu item Press VOL or VOL to change the menu background setting On...

Page 28: ...select Power Restore menu item Press VOL or VOL to set On or Off If you set Power Restore to OFF then you turn off the TV by Power Switch next when you press the Power Switch the TV will be in Standby mode If you set Power Restore to ON then you turn off the TV by Power Switch next when you press the Power Switch the TV will be in Power On mode directly Power Restore function 2 1 3 Off On MENU Qui...

Page 29: ...the video equipment Press the AV TV button to display the signal source selection menu and then select corresponding video mode As regards to the menu operation and menu item adjustment in video mode please refer to Operation in RF mode Note In video mode it is unnecessary to preset some menu items so these unnecessary menu items are not displayed ...

Page 30: ... adjustment in YPbPr mode please refer to Operation in RF mode In YPbPr mode it is unnecessary to preset some menu items so these unnecessary menu items are not displayed In YPbPr mode the Adjust sub menu in PICTURE menu is different Below we will introduce this sub menu Enter into PICTURE menu Press CH to select item Press VOL or VOL to adjust Option Rotate Degauss H Phase Function Operation Rang...

Page 31: ...PbPr mode in previous page If XGA input signal is in other format for its operation please see the following instructions from page 29 to page 33 Moreover there is only one group of audio input terminals in HDTV mode therefore you can only select to connect either XGA or YPbPr audio terminals MENU on the set or MENU on the remote controller It is used to call up OSD menu or to enter or exit from t...

Page 32: ...IT 6500 9300 H SIZE 9300K 6500K H PHASE V SIZE V PHASE PIN BALANCE PINCUSHION TRAPEZOID PARALLELOGRAM H MOIRE V MOIRE RECALL ENGLISH EXIT SELECTED ITEM NAME ADJUSTMENT ITEM S RANGE POSITION ROTATION DEGAUSS R G Fh 3 5 1 KHz Fv 5 6 1 Hz SCREEN ADJUST PUSH TO MENU The selected icon s colour will change and twinkle EXIT 6500 9300 V SIZE 120 Fh 35 1 KHz Fv 5 6 1 Hz R G ...

Page 33: ...t the picture s vertical size V PHASE Adjust the vertical position of the picture PIN BALANCE PINCUSHION Pincushion correction TRAPEZOID Correct the trapezoid distortion PARALLELOGRAM Adjust the angle between horizontal and vertical H MOIRE Eliminate horizontal moire V MOIR Eliminate vertical moire ROTATION Rotate the current picture RECALL To restore to original factory preset mode ENGLISH CHINES...

Page 34: ... main menu or you can wait for some time and the menu will automatically disappear Press TEXT IMAGE button can switch between Text mode and Image mode In either mode the contrast and brightness are different Press MENU button to exit Or you can wait for some time and the OSD will automatically disappear If you are not satisfied with current status contrast and brightness you can adjust them in the...

Page 35: ...tton to adjust the level until you are satisfied Press MENU button to exit this item s adjustment Repeat the above 3 6 steps to adjust other items After completion of adjustment select EXIT icon or press TEXT IMAGE button to exit the SCREEN ADJUST menu Or you can wait for some time and the OSD will automatically disappear RECALL It s used to restore parameters of the current display mode to factor...

Page 36: ...quency V frequency 1 2 3 4 5 6 7 8 9 10 11 12 13 14 15 16 17 4 3 4 3 16 9 16 9 16 9 4 3 4 3 4 3 4 3 4 3 4 3 4 3 16 9 4 3 16 9 16 9 16 9 16 9 16 9 MODE 720x586i 720x480i 1920x1080i 1920x1080i 1280x720P 640x480P 640x480P 720x400P 800x600P 800x600P 1024x768P 640x480P 720x576P 1280x720P 1920x1080i 1920x1080i 1280x720P TV AV YCbCr YPbPr Display mode setting 34 In factory the set has been set with multi...

Page 37: ...ey bus neon lamps etc Double images or ghosts This may be caused by reflections from nearly mountains or buildings Check the antenna direction Snowy picture It is possible that the aerial lead in is damaged or comes off Check the antenna direction The remote controller does not work The batteries may be worn out The batteries may be installed with their polarity reversed TV cabinet creaks Even if ...

Page 38: ...r RF IN Additional functions One Three groups DVD IN AV OUT Power supply AC 240V 50Hz One group One group Power consumption Sound output 8W x 2 CRT External control mode I2C bus control 76 cm 76WSHDA 86 cm 86WSHDA Surround sound Full function remote control Working Temperature Yes Yes Dimensions mm Weight Stored Temperature Accessories 968 W x 564 H x 570 D 76WSHDA 1060 W x 660 H x 620 D 86WSHDA 6...

Page 39: ...PALSONIC CORPORATION PTY LTD 1 JOYNTON AVENUE WATERLOO NSW 2017 AUSTRALIA TEL 02 9313 7111 FAX 02 9313 7555 www palsonic com au PALSONIC CUSTOMER SERVICE TELEPHONE AUSTRALIA 1300 657 888 604 32613 02 ...

Reviews: