background image

10

11

GB

PRECAUTION:

If the food is too damp (e.g. frozen chips) a lot of foam may appear, which sometimes may make the oil boil over. 

USE

1  Make sure that the appliance is turned off and unplugged (the lights are off).

2  Take the deep fryer-s lid off.

3  Take the basket out and fill the container with oil or grease (maximum 3 litres). The filling level should be between 

the minimum and maximum levels. 

4  Plug it into a 230 V, 50 Hz socket. The red pilot light turns on. Select the required temperature turning the temperature 

control.

5  The red pilot light turns on. When it has reached the required temperature, the green pilot turns off. Carefully 

introduce the basket with the food you want to fry into the hot oil. 

6  The green pilot light will turn on and off several times while the food is frying. This is normal; it only indicates that 

the thermostat is controlling and conserving the temperature. After the foreseen time has passed (look at the food’s 

packaging or recipe), hang the basket off the deep fryer-s body.

7  Leave the oil to drain.

8  To turn the deep fryer off, turn the temperature regulator to the “O” position and always unplug the appliance. Coil 

the cord inside the compartment designed for this purpose.

WARNING:

Always unplug the appliance before cleaning it and leave it to cool down.

PRECAUTION:

-  Never use a hard brush or other abrasive objects. 

-  Do not use abrasive or acid detergents. 

-  Under no circumstances put this appliance underneath water.

Oil container (7)

-  To change the oil, take the container out of the deep fryer and throw the oil away.

-  Clean the deep fryer’s container, lid and casing with a damp cloth and a domestic detergent if necessary. Never put 

it into water. 

-  The basket can be cleaned in the normal way in soapy water.

Casing (5)

After using the deep fryer, clean the casing with a slightly damp cloth. 

Lid filter changing

The filter in the deep fryer-s lid can be changed. 

-  Loosen the filter from inside the lid lifting up the pins. You can use tweezers if necessary.

-  Take the inside lid out. 

-  Change the filter. 

-  Put the lid back on. Look at where the holes are. The inner lid’s holes should be correctly positioned on top of the 

holes in the filter lid, and then close the pins.

TROUBLESHOOTING

The deep fryer does not work: 

-  Check that it is plugged into the mains 

-  Check the position of the thermostat.

Other possible reasons: 

The appliance has a safety switch. 

This prevents the resistor from accidentally turning on. 

Check that the control element is properly fitted. 

Protection against overheating

-  If the deep fryer is accidentally turned on without any oil or grease inside it, the overheating protection is activated 

immediately. You cannot use the deep fryer now. Unplug it.

-  Wait until the deep fryer has totally cooled down. You can then activate the RESET switch, on the back of the control 

panel, to use it again. You should use a plastic or wooden object at least 4 cm long to do so.

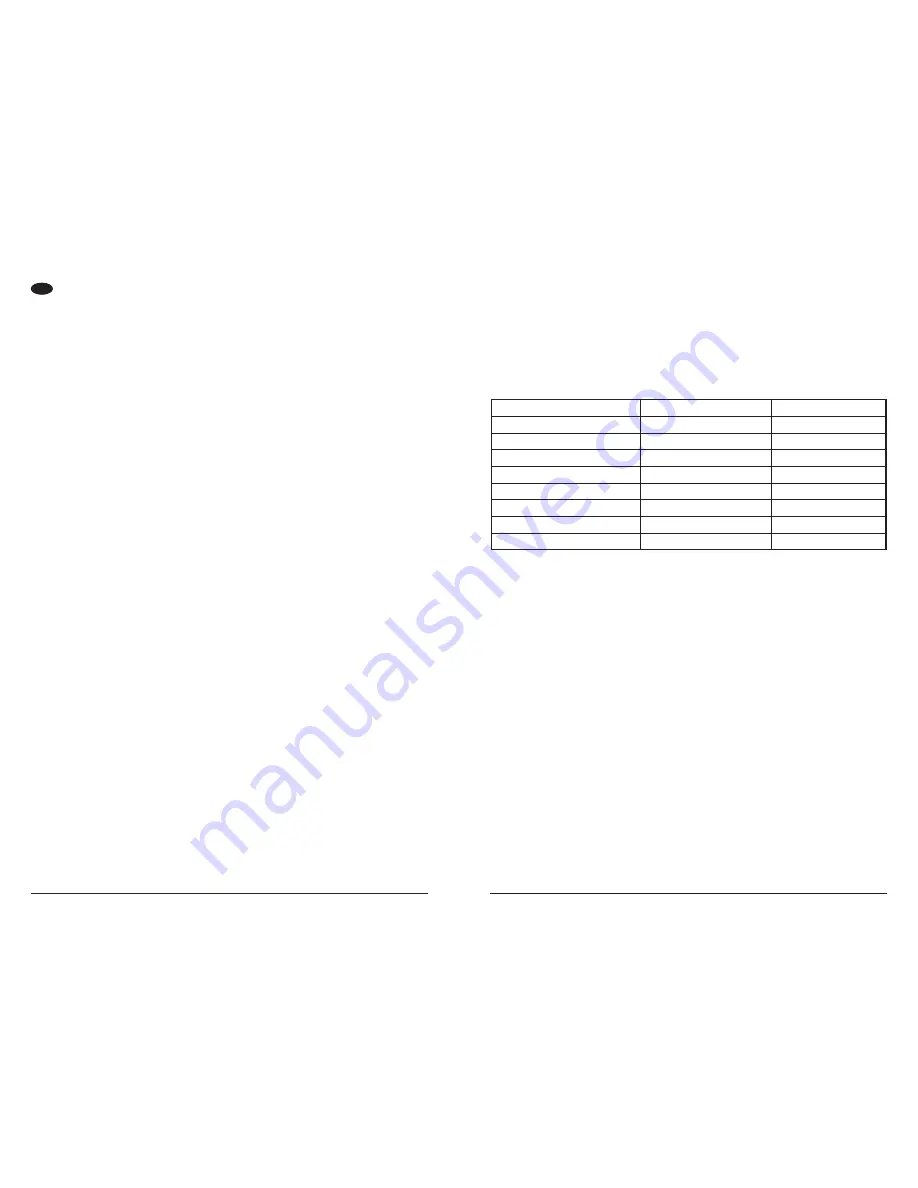
REFERENCE MENU

Frying times in this table are only useful for reference.

TYPE OF FOOD

TEMPERATURE (°C)

TIME (min)

Prawns

130 ºC

2-4

Mushrooms

150 ºC

3-5

Chicken coated in breadcrumbs

170 ºC

12-14

Fish cake

170 ºC

3-5

Steaks

170 ºC

5

Onion

190 ºC

2-4

Long chips

190 ºC

8-10

Round chips

190 ºC

10-15

PROTECTING THE ENVIRONMENT

Electric products should not be thrown away with domestic rubbish. This appliance should be taken to a local recycling 

centre for safe treatment.

Thank you for choosing one of our products.

Summary of Contents for ROYAL

Page 1: ...ING INSTRUCTIONS MODE D EMPLOI MODO DE EMPR GO GEBRAUCHSANLEITUNG ISTRUZIONI GEBRUIKSAANWIJZING TROPOS CRHSHS HASZN LATI UTAS T S KULLANMA WEKLI BG Royal COD 30546 Freidora Deep fryer Friteuse Fritade...

Page 2: ...etriebsanzeige 2 Leuchtanzeige Vorheizen 3 Temperaturregler 4 Frittiereinsatz 5 Ger tek rper der Fritteuse 6 Deckel mit Filter und Sichtfenster 7 lbeh lter 8 Aufh ngung Frittiereinsatz 9 Sicherheitssc...

Page 3: ...el embalaje bolsas de pl stico cajas poliestireno fuera del alcance de los ni os para garantizar su seguridad Este dispositivo no est dise ado para su uso por parte de personas incluidos ni os con def...

Page 4: ...de limpiarse del modo habitual en agua jabonosa Carcasa 5 Despu s de usar la freidora limpie la carcasa con un pa o ligeramente humedecido Cambiar el filtro de la tapa Se puede cambiar el filtro situa...

Page 5: ...eep the packaging plastic bags boxes polystyrene out of the reach of children to guarantee their safety This appliance is not designed to be used by people including children with physical sensory or...

Page 6: ...ith a damp cloth and a domestic detergent if necessary Never put it into water The basket can be cleaned in the normal way in soapy water Casing 5 After using the deep fryer clean the casing with a sl...

Page 7: ...quement des pi ces de rechange originales Lisez attentivement les instructions sp ciales concernant la s curit suivantes Enfants et personnes handicap es Pour leur s curit conservez toujours l emballa...

Page 8: ...yez la cuve le couvercle et la carcasse de la friteuse avec un chiffon humide et un d tergeant domestique si n cessaire Ne les plongez pas dans l eau Vous pouvez nettoyer le panier de la fa on habitue...

Page 9: ...penas pe as de substitui o originais Preste especial aten o s seguintes Instru es especiais de seguran a Crian as e pessoas incapacitadas Mantenha sempre a embalagem bolsas de pl stico caixas poliesti...

Page 10: ...e um detergente dom stico caso seja necess rio N o os introduza em gua O cesto pode ser limpo da forma habitual com gua e detergente Corpo 5 Depois de usar a fritadeira limpe o corpo da mesma com um...

Page 11: ...n Sie einen Schaden d rfen Sie das Ger t nicht benutzen Versuchen Sie nicht das Ger t selbst zu reparieren Wenden Sie sich stets an einen autorisierten technischen Kundendienst Ein defektes Kabel darf...

Page 12: ...WARNUNG Ziehen Sie vor der Reinigung den Netzstecker aus der Steckdose und warten Sie bis das Ger t abgek hlt ist VORSICHT Benutzen Sie keine hartborstige B rste oder andere kratzende Objekte Verwend...

Page 13: ...entro di assistenza tecnica o da una persona qualificata il cavo dovr essere sempre sostituito con uno dello stesso tipo Utilizzare solo pezzi di ricambio originali Prestare particolare attenzione all...

Page 14: ...n acqua in nessuna circostanza Vaschetta dell olio 7 Per cambiare l olio estrarre la vaschetta dalla friggitrice e gettare l olio Pulire la vaschetta il coperchio e il corpo della friggitrice con un p...

Page 15: ...epareren Maak altijd gebruik van de diensten van een erkend vakman Om gevaar te voorkomen dienen alleen de fabrikant of zijn bevoegde servicedienst of een vakman een defect snoer te vervangen en altij...

Page 16: ...n LET OP Geen harde borstel gebruiken of andere ruwe voorwerpen Geen schuurmiddelen of bijtende middelen gebruiken Onder geen enkele omstandigheid dit apparaat in water onderdompelen Bak voor olie 7 O...

Page 17: ...32 33 GR ROYAL de PALSON 1 2 3 4 5 6 7 8 9 10 11 12 13 14 15 230 V 50 Hz 2 000 W 10 A 1 5 mm UPS 1 2...

Page 18: ...34 35 GR 3 170 C 175 C 4 5 6 7 8 9 2 3 10 1 2 3 3 4 230 V 50 Hz 5 6 7 8 O 7 5 RESET 4 cm C min 130 C 2 4 150 C 3 5 170 C 12 14 170 C 3 5 170 C 5 190 C 2 4 190 C 8 10 190 C 10 15...

Page 19: ...36 37 RU ROYAL PALSON 1 2 3 4 5 6 7 8 9 10 11 12 13 14 15 230 50 2000 10 1 5 1 2...

Page 20: ...38 39 RU 3 170 C 175 C 4 5 6 7 8 9 2 3 10 1 2 3 3 4 230 50 5 6 7 8 O 7 5 RESET 4 C 130 C 2 4 150 C 3 5 170 C 12 14 170 C 3 5 170 C 5 190 C 2 4 190 C 8 10 190 C 10 15...

Page 21: ...40 41 AR...

Page 22: ...42 43 AR...

Page 23: ...elyettes tve Kiz r lag eredeti alkatr szeket haszn ljon K rj k kezelje k l nleges figyelemmel az al bbi K l nleges biztns gi utasit sokat Gyermekek s cs kkent k pess g szem lyek Tartsa a csomagol anya...

Page 24: ...j kicser l s hez vegye ki a s t olajtart j t s ntse ki a haszn lt olajat Tiszt tsa meg az olajtart t a tet t s a k ls borit st egy nedves ruh val s egy kev s h ztart si mos szerrel amennyiben ez sz ks...

Page 25: ...Onlar n g venli i i in ambalaj plastik torbalar kutular strafor ocuklardan uzakta tutun Bu alet onun emniyetinden sorumlu bir ki i g zetimi olmad k a ya da bu aletin kullanma ekli hakk nda talimatlar...

Page 26: ...e temizleyin stteki kapak filtreyi de i tirin Frit z n st ndeki kapak filtreyi de i tirebilirsiniz Pimleri kald rarak kapa n i k sm ndaki filtreyi serbest b rak n Gerekti inde c mb z kullanabilirsiniz...

Page 27: ...52 53 BG ROYAL PALSON 1 2 3 4 5 6 7 8 9 10 11 12 13 14 15 230 V 50 Hz 2000 W 10 A 1 5 1 2 3 170 C 175 C 4 5...

Page 28: ...54 55 BG 6 7 8 9 2 3 10 1 2 3 3 4 230 V 50 Hz 5 6 7 8 7 5 RESET 4 C 130 C 2 4 150 C 3 5 170 C 12 14 170 C 3 5 170 C 5 190 C 2 4 190 C 8 10 190 C 10 15...

Page 29: ...Recyclen dieses Produktes kontaktieren Sie bitte Ihr lokales B rgerb ro lhren Hausm ll Abholservice oder das Gesch ft in dem Sie dieses Produkt gekauft haben Smaltimento dei rifiuti elettrici ed elett...

Reviews: