Packard Bell EasyNote MX Series Repair Instructions Download Page 7

6 - Packard Bell Easy Repair

Your digital playground

Packard Bell Easy Repair - 7

Your digital playground

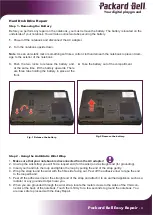
Step 5 - Placing the Battery Back

Now that you have installed the new hard disk drive, 

you have to place the battery back.
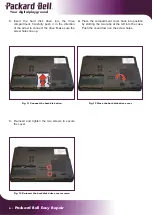
1.

  Place the battery into position by slotting the three 

tabs  into  the  case.  Push  the  battery  down  until 

you hear it click into place.

Fig. 14 Place the battery back.

Step 6 - Software Recovery Configuration

Call  the  Easy  Repair  line  and  ask  to  guide  you 

through  the  software  recovery  procedure.  Please 

have your Recovery CDs / DVDs to hand when you 

call the Easy Repair line.

Step 7 - Re-Installing Your Software

Once  you  have  completed  the  software  recovery 

procedure,  you  will  need  to  re-install  Windows  XP 

and other software supplied with your Packard Bell 

notebook. To do this, follow the steps below:

1.

  Insert the 

Packard Bell Master CD 1 / DVD

 in the 

CD / DVD drive and restart your notebook.

2.

 The disc will load and you will see the following 

message:

Please  refer  to  the  section  headed  Packard 

Bell  Recovery  Program  in  your  user’s  guide 

for instructions on this utility. Press OK if you 

want to continue or Cancel to return to DOS.

3. 

Press  the  letter  <O>  on  your  keyboard  to  con-

tinue.

4.

  You will see a menu with options. Please select 

option 

1 “Standard System Restore”

 by pressing 

the <1> key on the keyboard.

5.

  A warning message about data loss will be dis-

played; press the letter <O> to continue.

6.

  The process will take around 40 minutes. Once 

this  is  done,  remove  any  media  from  the  CD  / 

DVD drive and restart your notebook.

7.

  If  your  notebook  came  with  a  Software  Library 

DVD, insert this DVD into the DVD drive and fol-

low  the  instructions  presented  on  the  screen  to 

install the extra software that was supplied with 

your notebook.

Summary of Contents for EasyNote MX Series

Page 1: ...www packardbell com Your digital playground Packard Bell Easy Repair EasyNote MX Series Hard Disk Drive Repair Instructions ...

Page 2: ...tions could lead to personal injury and or may damage your notebook Make sure your hands are dry and clean before you begin work Please be aware that the notebook casing may contain sharp edges You must exercise caution at all times The components inside your notebook are sensitive to electrostatic discharge You must use the supplied anti static wrist strap to earth yourself while you work Failure...

Page 3: ...1 Release the battery Fig 2 Remove the battery Hard Disk Drive Repair Step 2 Using the Anti Static Wrist Wrap 1 Make sure that your notebook is disconnected from the AC adapter 2 Unwrap the wrist strap you will find a looped end for the wrist and a straight end for grounding 3 Insert your hand into the loop and tighten the loop by pulling the end of the strap gently 4 Wrap the strap round the wris...

Page 4: ...re are two tabs holding the cover in place on the left Raise the cover until you can remove it from the casing Fig 3 Remove the hard disk drive cover screws Fig 4 Remove the hard disk drive cover 3 Gently pull the plastic tab on the hard disk drive towards you to disconnect the drive 4 Now you can lift the drive out of the compart ment Fig 5 Disconnect the hard disk drive Fig 6 Remove the hard dis...

Page 5: ...cket Fig 7 Remove the screws holding the hard disk drive Fig 8 Separate the drive from the bracket Step 4 Installing the New Hard Disk Drive 2 Slide the new drive into the bracket in the same position as the replaced drive and secure it with the four screws 1 Check the jumper setting on the new drive make sure you set the jumper to the same position Master Slave or Cable Select as on the re placed...

Page 6: ... the drive Make sure the screw holes line up 4 Place the compartment cover back into position by slotting the two tabs at the left into the case Push the cover down on the screw holes Fig 11 Connect the hard disk drive Fig 12 Close the hard disk drive cover 3 Re insert and tighten the two screws to secure the cover Fig 13 Re insert the hard disk drive cover screws ...

Page 7: ...follow the steps below 1 Insert the Packard Bell Master CD 1 DVD in the CD DVD drive and restart your notebook 2 The disc will load and you will see the following message Please refer to the section headed Packard Bell Recovery Program in your user s guide for instructions on this utility Press OK if you want to continue or Cancel to return to DOS 3 Press the letter O on your keyboard to con tinue...

Page 8: ...Your digital playground Packard Bell B V P O Box 337 6600 AH Wijchen The Netherlands Document Version 0 4 7420220001 7420220001 ...

Reviews: