background image

Page 12

For Pump technical questions, please call 1-888-866-5797. 

For Engine technical questions, please call 1-800-520-0882.

ITEM 69747 


SAFETY

O

PERA

TION

M

AINTENANCE

SETUP

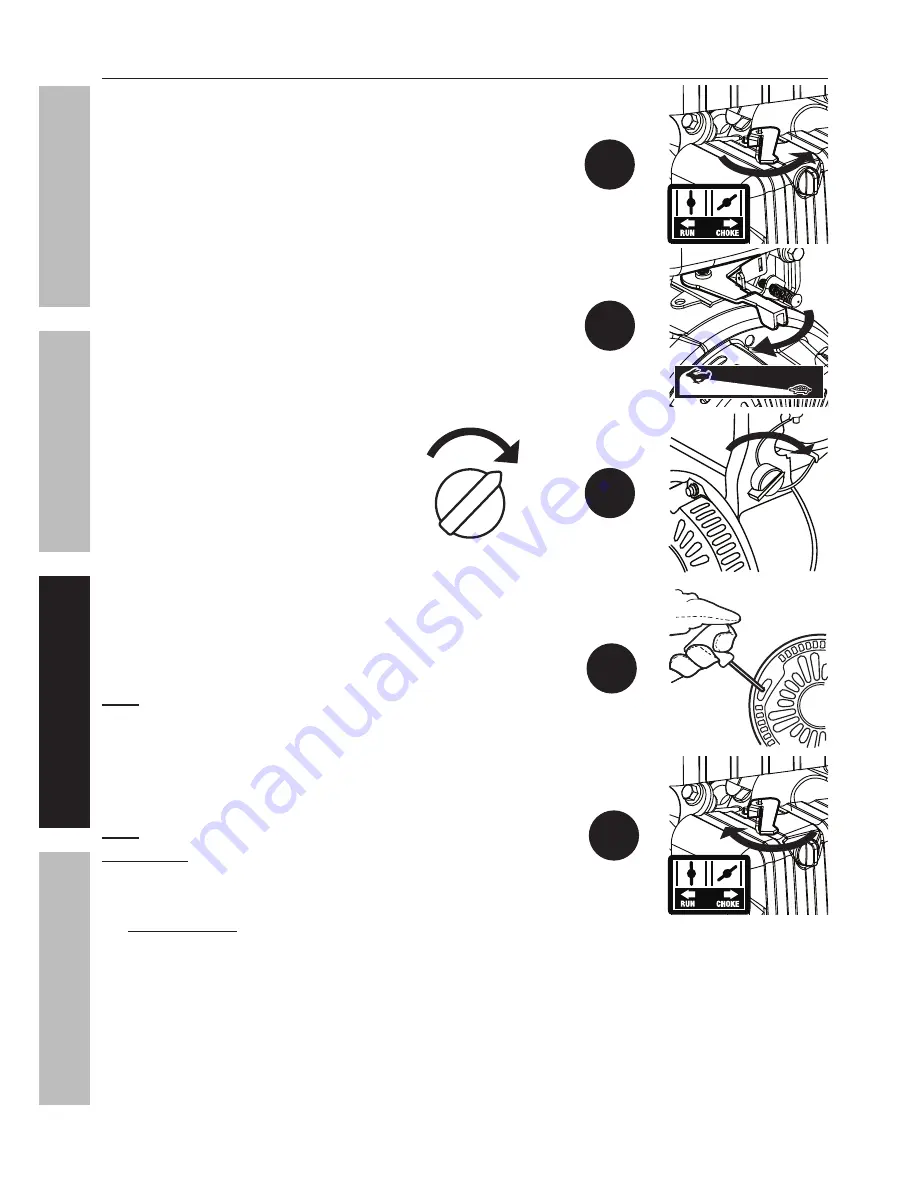
Manual Start

1.  To start a cold engine, move the Choke to the 

CHOKE position.  

To restart a warm engine, leave the 

Choke in the RUN position.

2.  Slide the Throttle or Speed Control Lever to 1/3 away 

from the SLOW position (the “turtle”).  

3.  Turn the Engine Switch on. 

4.  Grip the Starter Handle of the Engine loosely and pull 

it slowly several times to allow the gasoline to flow into 

the Engine’s carburetor. Then pull the Starter Handle 

gently until resistance is felt. Allow Cable to retract fully 

and then pull it quickly. Repeat until the engine starts.

Note:

 Do not let the Starter Handle snap back against the engine.  

Hold it as it recoils so it doesn't hit the engine. 

5.  Allow the Engine to run for several seconds.  

Then, if the Choke lever is in the CHOKE position, 

move the Choke Lever very slowly to its RUN position. 

Note:

 Moving the Choke Lever too fast could stall the engine.

IMPORTANT:

  Allow the engine to run at no load for five minutes with no 

load after each start-up so that the engine can stabilize.
6.  Adjust the Throttle as needed.

7. 

Break-in Period:

a.  Breaking-in the engine will help to ensure proper equipment and engine operation.
b.  The operational break-in period will last about 3 hours of use.  During this period:

•   Do not apply a heavy load to the equipment.
•   Do not operate the engine at its maximum speed.

c.  The maintenance break-in period will last about 20 hours of use.  After this period:

•   Change the engine oil.

Under normal operating conditions subsequent maintenance follows the schedule 

explained in the MAINTENANCE AND SERVICING section.

 1 

2

ON

OFF

O

I

ON

3

5

Summary of Contents for 69747

Page 1: ......

Page 2: ...s Spark Plug Wrench Engine Displacement 79cc Engine Type Horizontal Single Cylinder 4 stroke OHV EPA phase III compliant Cooling System Forced air cooled Fuel Type 87 octane unleaded gasoline Capacity...

Page 3: ...rning Risk of Eye Injury Wear ANSI approved safety goggles with side shields Read the manual before set up and or use WARNING marking concerning Risk of Hearing Loss Wear hearing protection Symbol Pro...

Page 4: ...t bearing capacity when transporting the Engine 8 Secure the Engine on transport vehicles to prevent the tool from rolling slipping and tilting 9 Industrial applications must follow OSHA requirements...

Page 5: ...not intended Service Precautions 1 Before service maintenance or cleaning a Turn the engine switch to its OFF position b Allow the engine to completely cool c Then remove the spark plug cap from the s...

Page 6: ...e engine may experience decreased performance even with the proper main jet Operating this engine without the proper altitude kit installed may increase the engine s emissions and decrease fuel econom...

Page 7: ...t included that has been driven at least 24 inches deep into the earth The grounding rod must be an earth driven copper or brass rod electrode which can adequately ground the Generator CAUTION This ge...

Page 8: ...the Hose Couplers a then place a Gasket on the end of the Hose Coupler b 2 Gasket Hose Coupler Hose Coupling Ring a b Thread the Hose Coupling Ring onto the Intake Port a and turn clockwise until fas...

Page 9: ...st Pump performance place the Pump near the water level and use hoses that are no longer than necessary This will allow the Pump to produce the greatest output with the least self priming time See dia...

Page 10: ...in place to keep it from moving once the Pump is turned on The Intake Hose should be as short as possible for more efficient operation 5 Route the discharge hose to the desired discharge location If...

Page 11: ...s other viscosities to use in different average temperatures 6 Thread the dipstick back in clockwise NOTICE Do not run the engine with too little oil The engine will be permanently damaged Checking an...

Page 12: ...he engine Hold it as it recoils so it doesn t hit the engine 5 Allow the Engine to run for several seconds Then if the Choke lever is in the CHOKE position move the Choke Lever very slowly to its RUN...

Page 13: ...800 520 0882 ITEM 69747 SAFETY OPERATION MAINTENANCE SETUP Stopping the Engine 1 To stop the engine in an emergency turn the Engine Switch off 2 Under normal conditions use the following procedure a S...

Page 14: ...nician service the equipment instead Cleaning Maintenance and Lubrication Schedule Note This maintenance schedule is intended solely as a general guide If performance decreases or if equipment operate...

Page 15: ...hanging oil 1 Make sure the engine is stopped and is level 2 Close the Fuel Valve 3 Place a drain pan not included underneath the crankcase s drain plug 4 Remove the drain plug and if possible tilt th...

Page 16: ...ater The water will gradually enter the engine and cause rust damage Apply a thin coat of rust preventive oil to all metal parts 2 FUEL WARNING TO PREVENT SERIOUS INJURY FROM FIRE Drain the fuel tank...

Page 17: ...Pump does not pump water 1 Pump is not primed 2 Intake Strainer clogged 3 Air leak at intake connector 4 Hose leaks 5 Suction hose has collapsing wall 6 Hose has too small diameter 7 Pump is too high...

Page 18: ...d securely 2 Spark plug electrode wet or dirty 3 Incorrect spark plug gap 4 Spark plug cap broken 5 Circuit breaker tripped electric start models only 6 Incorrect spark timing or faulty ignition syste...

Page 19: ...85 etc 2 Do not exceed equipment s load rating 3 Have qualified technician diagnose and service engine Engine backfires 1 Impure or low quality gasoline 2 Engine too cold 3 Intake valve stuck or overh...

Page 20: ...roud 1 52 Bolt 4 53 Deflector Crankcase Air 1 54 Bolt 1 55 Shroud Cylinder Body 1 56 Bolt 1 57 Shroud Shield 1 58 Plug End 1 59 Gasket Carburetor 2 60 Plate Carburetor Insulator 1 61 Gasket Air Cleane...

Page 21: ...ed and shown for illustration purposes only and are not available individually as replacement parts Assembly Diagram 30 32 33 31 34 31 35 36 25 64 64 63 59 59 61 60 62 38 40 42 43 44 45 46 47 42 43 45...

Page 22: ...9747 SAFETY OPERATION MAINTENANCE SETUP Assembly Diagram cont 17 13 16 15 14 20 19 18 21 88 87 87 86 83 82 85 84 55 54 53 56 51 52 52 52 52 57 58 49 50 50 50 76 77 78 79 80 80 81 70 72 73 74 74 68 69...

Page 23: ...Tools herein HFT are pleased to explain the emission control system warranty on your 2014 2015 Small Off Road Engine herein engine Within the United States new off road spark ignition engines certifi...

Page 24: ...ot authorized by HFT b Improper installation adjustment or repair of the engine or of any warranted part unless performed by an authorized warranty center c Failure to follow recommendations on fuel u...

Reviews: