background image

5

SAFETY INFORMATION (cont.)

Ventilation

Slots and openings in the casing of your set-top box are provided for 
ventilation, to ensure reliable operation of your set-top box and to protect it 
from overheating.

•  Never block the ventilation openings 

by placing your set-top box on 
a bed, sofa, rug, or other similar 
surface. Place it on a hard, flat 
surface.

•  Never cover the ventilation openings 

with items such as newspapers, 
table-cloths, or curtains.

•  You can place your set-top box 

near other consumer electronics 
devices, such as stereo amplifiers or 
televisions, but you must not place 
it directly on top or underneath them.

•  Do not place your set-top box in a built-in installation such as a bookcase 

or rack unless proper ventilation is provided and you have adhered to the 
manufacturer’s instructions.
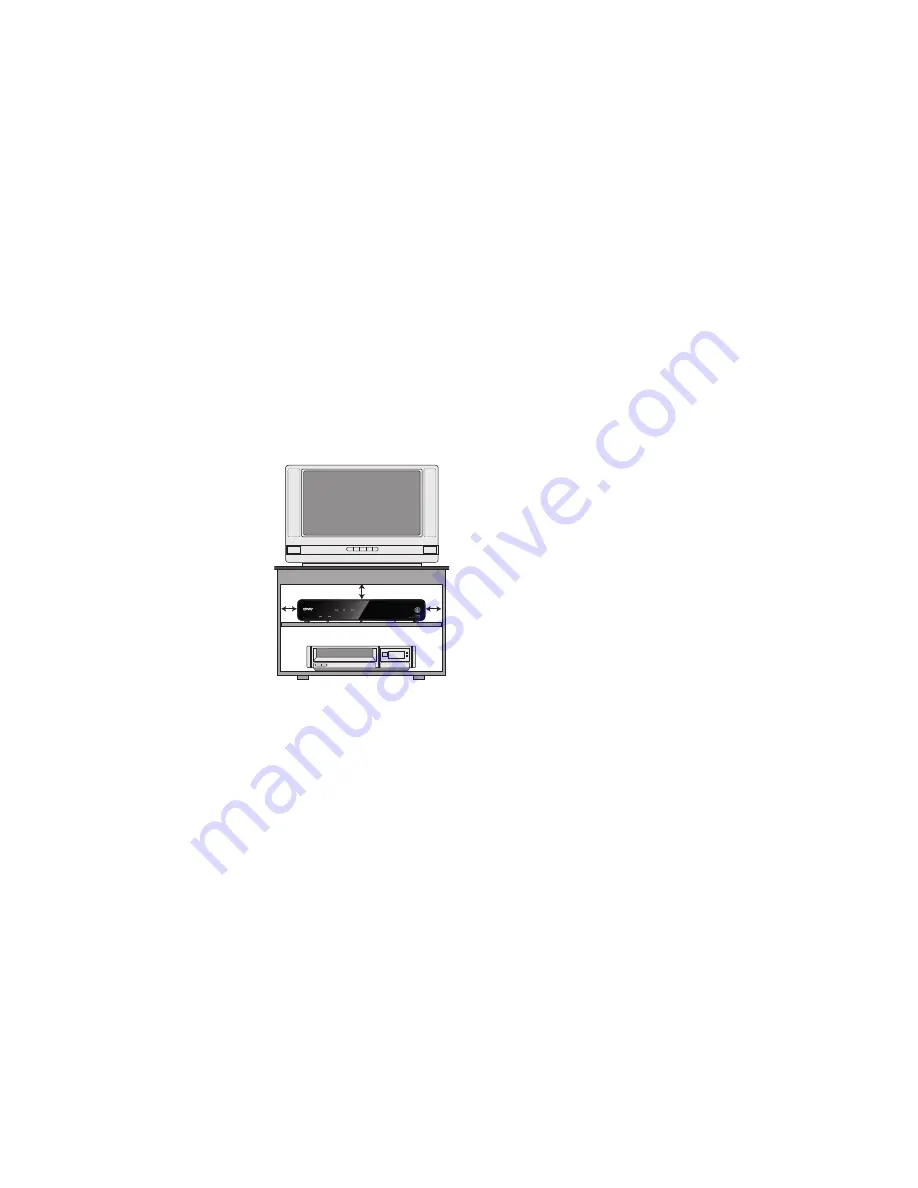
• 

Maintain a minimum distance of three inches around your 
set-top box for sufficient ventilation.

See also item 7 in the Important Safety Instructions.

Water and moisture

Do not expose your set-top box to rain or moisture, dripping or splashing, 
and ensure that no objects filled with liquids, such as vases, are placed on 
your set-top box. See also item 5 in the Important Safety Instructions.

Entry of objects and liquids

Never push objects of any kind into your set-top box through openings as 
they may touch dangerous voltage points or short-out parts that could result 
in fire or electric shock. Never spill liquid of any kind on your set-top box.

Replacement parts

When replacement parts are required, be sure that the service technician has 
used replacement parts specified by the manufacturer or that have the same 
characteristics as the original part. Unauthorized substitutions may result in 
fire, electric shock or other hazards. See also item 14 in the Important Safety 
Instructions.

Safety check

Upon completion of any servicing or repairs to your set-top box, ask the 
service technician to perform safety checks to determine that your set-top 
box is in its proper operating condition. See also item 14 in the Important 
Safety Instructions.

SAVE THIS INFORMATION FOR FUTURE REFERENCE

3 in.

3 in.

3 in.

Summary of Contents for xfinity X1

Page 1: ...BRINGING TECHNOLOGY HOME www pace com USER GUIDE Pace X1...

Page 2: ......

Page 3: ...Pr connection 11 Connecting the power supply unit to your set top box 14 Connecting equipment to the wall AC outlets 14 Lightning storms 15 Turning your set top box on and off 15 Pairing your RF remot...

Page 4: ...date your warranty Installation The installation of your set top box should be carried out by a qualified installer and should conform to local codes Note to the installer This reminder is provided to...

Page 5: ...or the third prong are provided for your safety If the provided plug does not fit into the outlet consult an electrician for replacement of the obsolete outlet 10 Protect the power cord from being wal...

Page 6: ...sources such as lighted candles on or adjacent to your set top box Lightning For added protection for your set top box during a lightning storm or when it is left unattended and unused for long period...

Page 7: ...r and moisture Do not expose your set top box to rain or moisture dripping or splashing and ensure that no objects filled with liquids such as vases are placed on your set top box See also item 5 in t...

Page 8: ...outlet Disconnecting To disconnect power from your set top box always detach the power supply unit from the wall AC outlet rather than remove the 15 volt cord from your set top box Therefore you must...

Page 9: ...to the following two conditions 1 this device may not cause harmful interference and 2 this device must accept any interference received including interference that may cause undesired operation This...

Page 10: ...Make this connection last of all Digital Audio Optical S PDIF audio output Ethernet For connection to a home network HDMI Out HDMITM video and audio outputs USB For connection to USB device CableCARD...

Page 11: ...your set top box s power supply unit here Make this connection last of all Ethernet Connect your set top box into an Ethernet home network optional HDMI In 1 and HDMI In 2 Connect another optional HDM...

Page 12: ...theater s loudspeakers You can take advantage of the digital audio output from your set top box by connecting a suitable cable between your home theater receiver and the Digital Audio connector as sh...

Page 13: ...a particular video input Consult your home theater user guide for further details NOTE Copy protection via an HDMITM secure link The HDMITM link between your set top box and your HDTV should be a sec...

Page 14: ...AL AUDIO IN COAXIAL AUDIO IN DIGITAL AUDIO IN HOME THEATER RECEIVER LEFT AUDIO RIGHT AUDIO VIDEO LEFT AUDIO IN VCR IN RIGHT AUDIO IN VIDEO IN ANTENNA RF IN HDMI PB IN PR IN Y IN COMPONENT VIDEO IN LEF...

Page 15: ...L AUDIO IN HOME THEATER RECEIVER LEFT AUDIO RIGHT AUDIO VIDEO LEFT AUDIO IN VCR IN RIGHT AUDIO IN VIDEO IN ANTENNA RF IN HDMI PB IN PR IN Y IN COMPONENT VIDEO IN LEFT AUDIO IN RIGHT AUDIO IN VIDEO IN...

Page 16: ...ng The wide blade or the third prong are provided for your safety Connecting the power supply unit to your set top box Before you insert the power supply unit into the wall AC outlet connect the 15 vo...

Page 17: ...it on The Power light around the Power button should light up green to show that your set top box is on To turn your set top box on or off at any time press the Power button on the front panel or remo...

Page 18: ...and hold the two buttons on your remote control as instructed on your TV screen You ll see a message on your TV confirming that your remote control has been paired with your set top box NOTE If you do...

Page 19: ...he current channel number and the setting when you make user settings USB port Select buttons To perform RF remote control pairing Remote light Lights when you press a button on your remote control gr...

Page 20: ...itle or any ownership rights in the Software to you 7 All title and intellectual property rights in and to the Software and all modifications updates enhancements and derivative works of the Software...

Page 21: ...EPT AS SET FORTH IN ANY WRITTEN AGREEMENT BETWEEN YOU AND PACE IN NO CIRCUMSTANCE WILL PACE BE LIABLE FOR ANY DIRECT INDIRECT CONSEQUENTIAL SPECIAL PUNITIVE OR INCIDENTAL DAMAGE INCLUDING LOSS OF PROF...

Page 22: ...501 3384000 Pace and are trademarks and or registered trademarks of Pace plc www pace com...

Reviews: