background image

13

RNG110 OPERATOR’S MANUAL (501-3438000)

Further information about the TV Display Capability

The TV Display Capability settings relate to equipment that is connected to the HDMI and COMPONENT 
VIDEO OUT connectors because the settings control the output at those connectors. If equipment is connected 
via an HDMI cable, that equipment may also pass information back to your set-top, which may affect what 
settings are available.

Generally, the TV Display Capability settings do not affect equipment connected to the VIDEO OUT connector, 
because the output at this connector will always be the standard definition 480i.

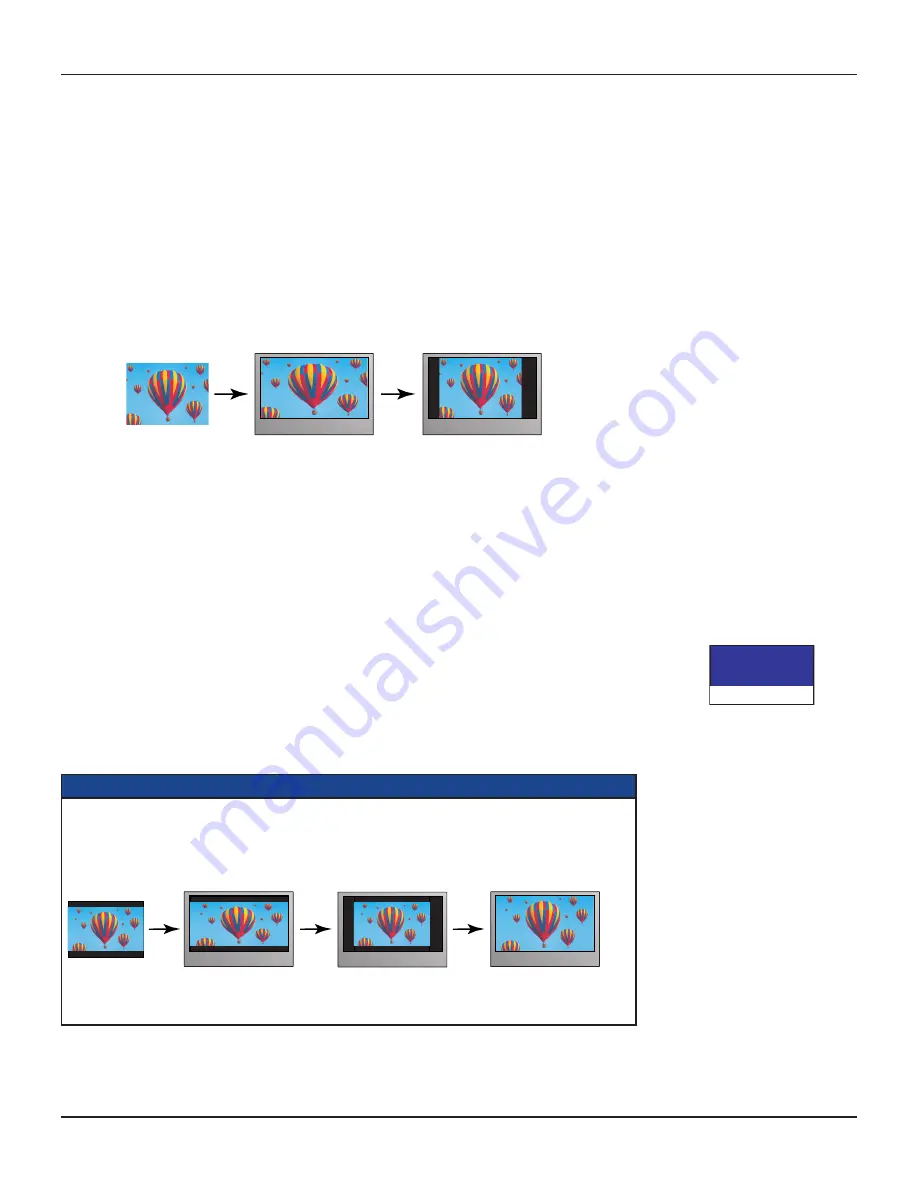
Setting Auto Pillarbox

If your TV is a 16:9 TV that does not automatically detect 4:3 transmissions (and therefore does not add black 
bars to the sides of the picture), then 4:3 transmissions 

may

 display “stretched” to fit the 16:9 screen. If you 

do not want this effect, you can set your set-top to add black bars to the 4:3 picture, so that it is transmitted to 
your TV at a 16:9 aspect ratio. See the example below.

MAKING USER SETTINGS (cont.)

4:3 transmission

16:9 TV with no automatic 

detection of 4:3,

Auto-pillarbox switched off

16:9 TV with no automatic 

detection of 4:3,

Auto-pillarbox switched on

Changing the Auto Pillarbox setting

If you have not done so already, put your set-top into User Settings mode, as described on page 11.

1.  Press the 

U

 or 

D

 button on your remote control and highlight Auto Pillarbox on the PACE USER 

SETTINGS menu.

2.  Press the 

R

 button. The Auto Pillarbox menu appears on your TV screen.

3.  If you want to change the setting, press 

U

 or 

D

. Press the 

OK/Select

 button to confirm the choice and 

change to the new setting.

4.  Press the 

L

 button. The PACE USER SETTINGS menu reappears.

NOTE

16:9 picture in a 4:3 transmission

Sometimes, 4:3 transmissions may contain a 16:9 picture, with black borders at the top and bottom. On a 

16:9 TV, this may display with black borders all the way around the picture. To remove these borders, you 

can use the “Zoom function” button on your remote control (could be labeled ZOOM or ASPECT).  

See the example below. For more information about using “Zoom”, see page 17.

4:3 transmission

16:9 TV with no automatic 

detection of 4:3,

Auto-pillarbox switched off

16:9 TV with no automatic 

detection of 4:3,

Auto-pillarbox switched on

Use 'Zoom' to increase the picture size.

(Note: the picture may lose some

definition due to the expansion)

Auto Pillarbox


YES

>NO

> shows current setting

Summary of Contents for RNG110

Page 1: ...BRINGING TECHNOLOGY HOME www pace com OPERATOR S MANUAL Pace RNG110...

Page 2: ...ein are the property of their respective owners SAFETY INFORMATION 3 REAR PANEL 6 CONNECTING THE EQUIPMENT 7 Setup A Home theater system with HDTV HDMI connection 7 Setup B Home theater system with HD...

Page 3: ...ore you install or use the apparatus you must read and understand these Important Safety Instructions At all times when using the apparatus you must follow these Important Safety Instructions to reduc...

Page 4: ...h them Do not place your set top in a built in installation such as a bookcase or rack unless proper ventilation is provided and you have adhered to the manufacturer s instructions Maintain a minimum...

Page 5: ...this input POWER INPUT The model number serial number and electrical rating of this set top are on a label on its base Regulatory information CAUTION Do not attempt to modify your set top without wri...

Page 6: ...al digital audio input on optional digital audio equipment HDMI High Definition Multimedia Interface If your HDTV has an HDMI connect it here for a digital audio video connection instead of using the...

Page 7: ...ater s loudspeakers You can take advantage of the digital audio output from your set top by connecting a suitable cable between your home theater receiver and the OPTICAL AUDIO OUT connector as shown...

Page 8: ...protection systems which can cause picture distortion on your TV Do not therefore use a path through a VCR to watch your set top programs Use the component video path or an alternate direct video pat...

Page 9: ...is receiving a signal from your remote control HD light Lights blue when your set top is receiving High Definition Television HDTV content DATA light Lights yellow when your set top is receiving data...

Page 10: ...d in the preferred language only when subtitles in that language are transmitted with a program For example if you set subtitles to be on and in Spanish but only French subtitles are transmitted with...

Page 11: ...ewing About the TV Aspect Ratio The TV that you have connected to your set top has an aspect ratio width to height ratio of 4 3 basic standard or 16 9 widescreen You must set the appropriate TV Aspect...

Page 12: ...l then be stored with the ID You can restore your set top s TV Display Capability settings to their factory values as described on page 16 You can also restore your set top to the settings that your H...

Page 13: ...Auto pillarbox switched off 16 9 TV with no automatic detection of 4 3 Auto pillarbox switched on Changing the Auto Pillarbox setting If you have not done so already put your set top into User Setting...

Page 14: ...next section Changing the closed captions appearance If you want to change the closed captions appearance you can see the effect of your settings by looking at the example below the menu 1 In the Clos...

Page 15: ...choose an Audio Output Mode and to enable or disable automatic detection of a newly connected HDTV when using an HDMIcable If you have not done so already put your set top into User Settings mode as d...

Page 16: ...ssage Restore Default Press OK to confirm appears on your TV screen If at this stage you no longer wish to restore the factory settings press the L button 3 To confirm and restore the factory settings...

Page 17: ...ormation provided by your service provider There may also be on screen information to explain these menus However certain settings may affect how your set top and TV work See the table below for infor...

Page 18: ...our TV HDMI component video YPbPr or composite video depending on how your system is connected up If you are using the HDMI connection make sure the connection goes directly from your set top to your...

Page 19: ...speakers or home theater connected to your stereo VCR or set top Can you see and hear a DVD that you are trying to play YES D NO R Check that all the audio and video cables are securely and correctly...

Page 20: ...st You are free to use modify and distribute the Linux software and any modifications as long as you comply with the terms of the GPL or LGPL referred to above The License terms applicable to i to iii...

Page 21: ...501 3438000 Pace and are trademarks and or registered trademarks of Pace plc www pace com...

Reviews: