background image

CAUTION

Dirt in the fuel system can lead to significant damage to the fuel system. Failure to comply may result in equipment or property dam-
age.

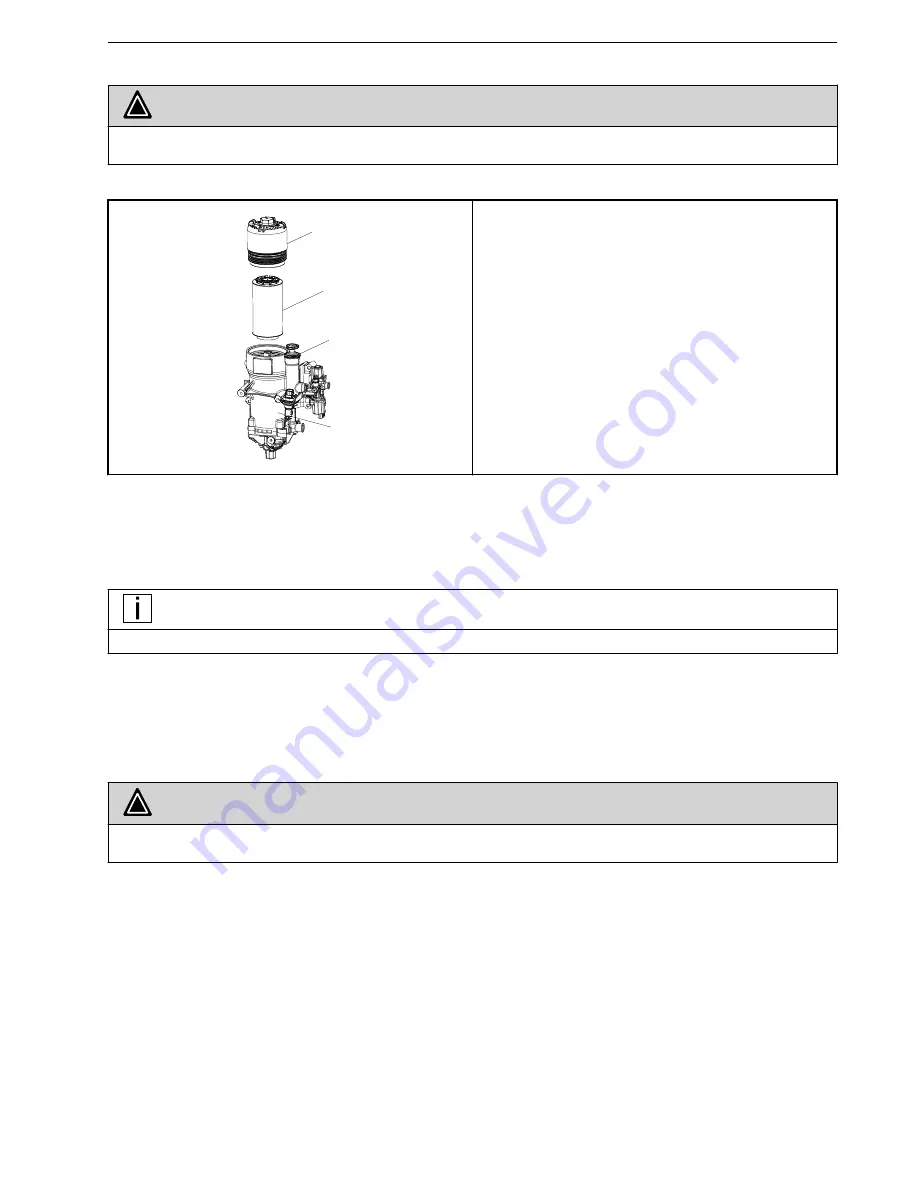
Figure 4: Fuel Filter Module

4

1

2

3

1.

Fuel Filter Cap

2.

Fuel Filter

3.

Manual Priming Pump

4.

Fuel Filter Housing

4.

Remove the fuel filter cap (1) by rotating it counterclockwise with a 32mm hexagonal socket or box wrench.
Automatic draining of fuel will be initiated. Wait 5 minutes for complete fuel draining before fully removing the filter
screw cap.

5.

After the module has drained, fully remove the filter screw cap (1).

6.

Carefully pull the fuel filter element (2) straight off from the fuel filter screw cap (1).

7.

Remove the O-ring (2) from the fuel filter screw cap and discard the filter cartridge and O-ring.

NOTE

The fuel filter cartridge is a disposable filter and must not be cleaned and reused. Dispose of the filter as chemical waste.

8.

Clean the O-ring groove and threads.

9.

Clean the fuel bowl and filter housing of any sediment or debris.

Engine Mounted Fuel Filter Installation

Follow the steps below to install new fuel filters:

CAUTION

Failure to prime any new (dry) fuel filter can cause severe engine damage due to dry starting the engine. Please refer to the priming
procedure and follow it carefully after installing new filter cartridges and before starting the engine.

Engine Mounted Fuel Filter Installation - CHAPTER 2: FUEL FILTER

SM044-004 (01/2021)

13

Summary of Contents for MX-13 EPA 2017

Page 1: ...Service Manual Fuel Filter Maintenance MX 13 EPA 2017 Fuel Filter SM044 004 01 2021...

Page 2: ......

Page 3: ...ls 10 Chassis Mounted Fuel Filter Replacement 10 Engine Mounted Fuel Filter Removal 11 Engine Mounted Fuel Filter Installation 13 Priming the Fuel System 15 Chapter 3 Fuel Recommendations 19 Warranty...

Page 4: ...on this vehicle Please disregard any illustrations or descriptions relating to features or equipment which are not on this vehicle PACCAR reserves the right to discontinue change specifications or cha...

Page 5: ...Chapter 1 GENERAL INFORMATION Safety Alerts 6 Illustrations 6 General Safety Instructions 7 SM044 004 01 2021 5...

Page 6: ...inst operating procedures which could cause equipment or property damage The alert will identify the hazard how to avoid it and the probable consequence of not avoiding the hazard Example CAUTION Cont...

Page 7: ...tem WARNING Removing the fill cap on a hot engine can cause scalding coolant to spray out and burn you badly If the engine has been in opera tion within the previous 30 minutes be very careful in remo...

Page 8: ...contact with used engine oil DO NOT connect the jump starting or battery charging cables to any ignition or governor control wiring This can cause electrical damage to the ignition or governor Coolan...

Page 9: ...L FILTER Fuel Filter Recommended Tools 10 Chassis Mounted Fuel Filter Replacement 10 Engine Mounted Fuel Filter Removal 11 Engine Mounted Fuel Filter Installation 13 Priming the Fuel System 15 SM044 0...

Page 10: ...the fuel filters at the same interval as the oil and oil filter are changed If the oil drain interval being used is greater than 15 000 mi 24 000 km as determined by the Engine Lubrication and Filter...

Page 11: ...f the filter appropriately 7 Clean the filter bowl 8 Lubricate the new filter seals with clean diesel fuel and install the seals with the new filter 9 To aid in priming pre fill the filter bowl with c...

Page 12: ...stall it 1 Clean the fuel tank filler cap and the surrounding area Remove the fuel tank filler cap to prevent overpressure in the fuel system 2 If equipped with a fuel blender turn the blender 90 coun...

Page 13: ...t 2 straight off from the fuel filter screw cap 1 7 Remove the O ring 2 from the fuel filter screw cap and discard the filter cartridge and O ring NOTE The fuel filter cartridge is a disposable filter...

Page 14: ...lm If using fuel filter part number 1852006 2133096 or 2164463 ensure that seal 1 is lubricated with clean engine oil or clean diesel fuel 2 Insert the fuel filter element 2 into the fuel filtration m...

Page 15: ...return port for 7 minutes then reconnect the return line NOTE Do not operate the engine with a vacuum pump attached or with the return line disconnected Injector damage could occur 8 Prime the fuel s...

Page 16: ...ckwise 2 If your vehicle is equipped with a PACCAR fuel blending valve rotate the blending valve 90 counterclockwise to the PRIME closed position see PACCAR Fuel Blending Valve Position before startin...

Page 17: ...and starter engagement will be restricted for 10 minutes NOTE Allowing the engine to idle for several minutes with the PACCAR fuel blending valve in the prime closed position assists in purging air fr...

Page 18: ...CHAPTER 2 FUEL FILTER Priming the Fuel System 18 SM044 004 01 2021...

Page 19: ...pter 3 FUEL RECOMMENDATIONS Warranty and the Use of Renewable and Other Paraffinic Diesel Fuels 21 Warranty and the Use of Biodiesel Fuel 21 Recommendations to Avoid Fuel Gelling 21 SM044 004 01 2021...

Page 20: ...fuel Failure to comply may result in equipment or property damage CAUTION If ultra low sulfur diesel ULSD fuel is not used the engine may not meet emission regulations and damage may occur to the en g...

Page 21: ...of the ASTM Standard D975 up to B5 blend or D7467 B6 to B20 blend If using B6 B20 the engine oil and oil filter are changed per the modified schedule See the Preventative Maintenance Schedule If using...

Page 22: ...o ensure it is compatible with ultra low sulfur diesel fuel and aftertreatment systems Only use the additive for the minimum time needed Follow the additive manufacturer s instructions exactly CHAPTER...

Page 23: ...ions 7 I Illustrations 6 Install Fuel Filter 13 P Priming the Fuel System 15 R Recommendations to avoid fuel gelling in cold temperatures 21 Remove Fuel Filter 11 Run Out of Fuel 15 S Safety Alerts 6...

Page 24: ...Index...

Reviews: