


2. SET UP AND ADJUSTMENTS
Setting up for sharpening
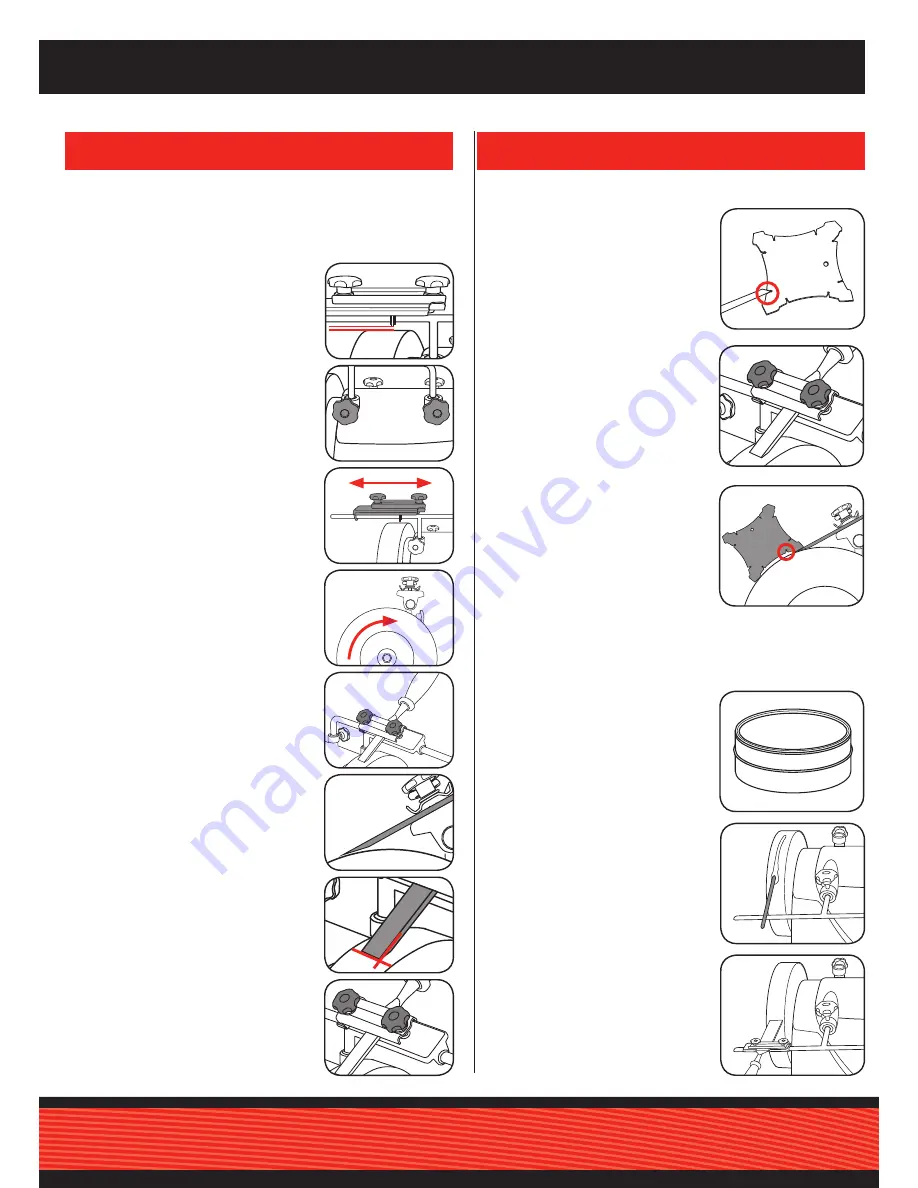
When sharpening, position the tool support bar in the top
mounting holes.
Note.
Sharpening is performed
against
the direction of rotation.
1. Fit the adjustable tool holder to the
tool support bar (See “
Fitting the
tool holder
” section). Loosen the tool
support clamps. Adjust the height of the
tool support until there is a small gap
between the surface of the sharpening
wheel and the lower guides of the
adjustable tool holder.
2. Tighten the tool support clamps.
3. To ensure that no part of the adjustable
tool holder comes into contact with the
sharpening wheel, complete these two
checks:
a. Slide the adjustable tool holder back
and forth along the tool support bar.
b. With the bottom of the adjustable tool
holder positioned directly above the
wheel, rotate the sharpening wheel
one full rotation by hand.
4. Loosen the two clamps on the
adjustable tool holder enough to insert
the blade to be sharpened. Manoeuvre
the blade until it touches the sharpening
wheel at the desired sharpening angle.
5. Manoeuvre the blade within the
adjustable tool holder until the angle
of the blade sits flat on the face of the
sharpening wheel.
6. Ensure that the blade is square across
the full width of the sharpening wheel.
7. When you are satisfied that the blade is
correctly positioned, tighten the clamps
knobs on the adjustable tool holder.
Setting up with the angle gauge
1. The angle gauge is used to determine
the cutting edge angle of a tool. You can
determine what is the appropriate angle
required for your blade by reading the
label on the angle gauge. Alternatively,
you can test and select the blade angle
by inserting the blade into the notches
on the sides of the gauge.
2. After determining which notch best
suits the blade angle required, set
the support bar and adjustable tool
holder. Insert the blade within the
tool holder, so that it touches the
sharpening wheel. (See “
Setting up
for sharpening
”). Rotate the clamp
knobs on the adjustable tool holder
until the blade is secure, but can still
be moved.
3. Position the gauge on the sharpening
wheel, with the selected notch closest
to the tool tip. Manoeuvre the blade
within the tool holder until the back
face of the blade aligns with the angle
gauge.
4. Check that the blade is square across
the width of the sharpening wheel and tighten the adjustable clamp
knobs. Remove the angle gauge.
Setting up for honing
1. Fit the tool support to the rear of the
unit (see “
Fitting the tool support
for honing
”)
Note:
Initially you will need to condition
the honing wheel. Apply mineral oil (not
supplied) to bring the leather honing
wheel to a darker slightly wet colour on all
it’s surface. Following this apply an initial
layer of honing paste covering the entire
surface and work it into the wheel.
2. Apply mineral oil to the leather honing
wheel, followed by some of the honing
past.
3. Switch on the machine. While the
honing wheel is rotating, evenly
distribute the honing paste into the
leather with a flat object such as a
ruler or spatula.
4. Set the adjustable tool holder
(see “
Setting up for sharpening
”).


