background image

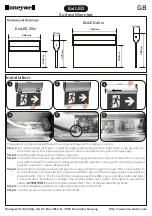
2.  FITTING THE BATTERY

Battery Charge Indicator

The purchased battery is equipped with a 
battery charge indicator to show the state of 
the battery charge.
Press the charge indicator button and look to 
see which LED lights.

Battery requires 
immediate charging

Low state of charge, requires charging soon.

Mid state of charge

Full state of charge.

Note:

 The battery needs to be removed from the tool to check the state of charge. 

1    Connect the charger into a mains power outlet.

4  The charger LED will illuminate red signifying that the battery is charging.

3   With the battery sitting on a flat 

surface, align the raised ribs on the 

battery with the recess in the charger 

and slide onto the battery ensuring a 

firm connection.

2   The charger LED will flash green 

showing power is being supplied 

to the charger.

5  When removing the charger from the 

battery, first press the battery release 

tab, then slide the charger from its 

position.

Charging your lithium ion battery - Eco Charger

Charger LED Indicator 

LED Indicator 

Situation

GREEN (Flashing) 

Stand By (no battery pack is inserted) 

RED (Illuminated)

Battery is charging (low charge)

GREEN (Illuminated)

Battery is charged and ready for use

RED (Flashing)

Battery or Charger fault

RED & GREEN (Flashing)

Battery pack is too hot or too cold (remove battery from 
charger and store at room temperature 20ºC. Insert 
battery again when at correct charging temperature). If 
this happens again, the battery is defective and needs 
to be replaced.

Inserting & Removing the Battery (not included)

1   Align the ribs of the battery with the recess at the base of the light and 

push in until it clicks into place.

2   To remove, press and hold the battery release tab and pull the battery 

away from light.

a

b

Battery protection system

The tool is equipped with the battery protection system, which helps to ensure a long service 

life.
The output power automatically cuts off during operation when the tool and/or battery are 

placed under the following situations: 

•   When the tool is overloaded:    

   If this occurs, release the trigger switch and remove causes of overload, then pull the 

switch trigger again to restart. 

•   When the remaining battery capacity becomes low: 

  Recharge the battery pack.

Note:


 The battery protection system does not in any way damage the tool.

Note:

  The indicated capacity may be lower than the actual level during use or immediately 

after using the tool.

Summary of Contents for Power Xchange PXWLS-800U

Page 1: ...ncorrect installation a failure to follow the operating instructions for example connecting it to an incorrect mains voltage or current type or a failure to follow the maintenance and safety instructions or by exposing the device to abnormal environmental conditions or by lack of care and maintenance Damage to the device caused by abuse or incorrect use for example overloading the device or the us...

Page 2: ...y with the recess in the charger and slide onto the charger ensuring a firm connection 2 The charger LED will flash green showing power is being supplied to the charger 5 The charger LED will illuminate green once the battery is charged Charging your lithium ion battery Fast Charger Charger LED Indicator LED Indicator Situation GREEN Flashing Stand By no battery pack is inserted RED Flashing Batte...

Page 3: ...ed Battery is charging low charge GREEN Illuminated Battery is charged and ready for use RED Flashing Battery or Charger fault RED GREEN Flashing Battery pack is too hot or too cold remove battery from charger and store at room temperature 20ºC Insert battery again when at correct charging temperature If this happens again the battery is defective and needs to be replaced Inserting Removing the Ba...

Page 4: ...ea and a wide setting to illuminate a large area The worklight can be tilted through 7 positions to aim the light at the desired area 2 For a wide beam rotate the beam setting dial clockwise 2 To turn the light off press the on off switch again 2 To aim the light away from the ground tilt the light backward 1 For a narrow beam rotate the beam setting dial anti clockwise 1 To turn the light on pres...

Page 5: ...k the battery is firmly connected to the charging cradle Check that the charging jack is securely connected to the charging cradle Note Ozito Industries will not be responsible for any damage or injuries caused by the repair of the worklight by an unauthorised person or by mishandling of the worklight Spare parts can be ordered from the Special Orders Desk at your local Bunnings Warehouse or Homeb...

Page 6: ...ders away while operating a power tool Distractions can cause you to lose control 2 Electrical safety a Power tool plugs must match the outlet Never modify the plug in any way Do not use any adapter plugs with earthed grounded power tools Unmodified plugs and matching outlets will reduce risk of electric shock b Avoid body contact with earthed or grounded surfaces such as pipes radiators ranges an...

Page 7: ...tions and actions Red LED Green LED Off Flashing Ready for use The charger is connected to the mains and is ready for use there is no battery pack in the charger On Off Charging The charger is charging the battery pack in quick charge mode Off On The battery is 85 100 charged and ready for use Charging time for 1 5 Ah battery 30 min Charging time for 2 0 Ah battery 40 min Charging time for 3 0 Ah ...

Page 8: ... Our warranty will be voided if the machine is used in commercial trade or industrial businesses or for equivalent purposes Technical data Power supply 18 V DC Number of LEDs 3 Lumens 270 lm Weight 0 27 kg For EU countries only Never place any electric power tools in your household refuse To comply with European Directive 2012 19 EC concerning old electric and electronic equipment and its implemen...

Reviews: