background image

9

OPERATION

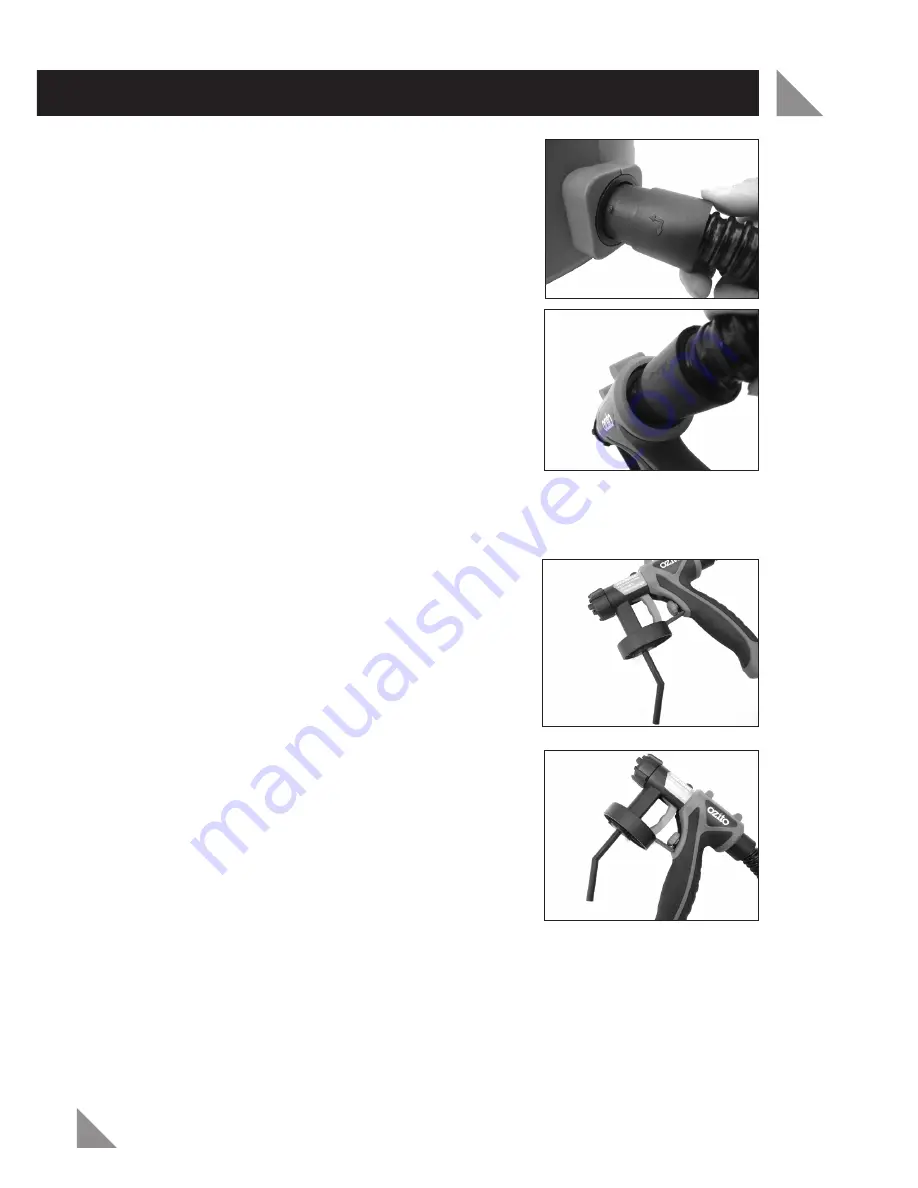
1. Attach air hose (10) to mobile base end (Fig. 2).

Align the lug with the groove in the mobile base.
Secure by turning anti-clockwise.

2. Attach the other end of the air hose (10) to the

spray gun (3) (Fig. 3). Align the lug with the
groove in the spray gun (3). Secure by turning
anti-clockwise.

3. Unscrew the paint pot (11) from the spray gun.

4. Adjust the suction tube accordingly. It should be possible to spray the contents of

the paint pot leaving hardly any paint left in the paint pot (11).

5.

Spraying with horizontal objects

Turn suction tube forwards as the suction tube 

should be pointing toward the front of the spray 
gun (Fig. 4).

6.

Spraying overhead objects

Turn suction tube to point backwards as the  

suction tube should be pointing toward the rear of
the spray gun (Fig. 5).

By pointing the suction tube in the proper 
direction you will not have to refill the paint pot (11)
as often.

7.

Filling the paint pot

While filling the pot with paint, filter the paint through a piece of nylon stocking 
or a funnel which incorporates a filter to remove any lumps or particles. DO NOT 
OVERFILL. Screw the pot into the spray gun ensuring it is secure.

8. Place the spray gun in the mobile base spray gun holder for transporting to the job.

9. Unwind mains cable (7). Insert the plug into mains power socket and switch On.

Fig. 2

Fig. 3

Fig. 4

Fig. 5


Summary of Contents for MPS-700

Page 1: ......

Page 2: ...und Pressure Level 81 3 db A k 3 0 db A Air Hose Length 3m Pot Capacity 800ml Nozzle ø2 5mm Weight tool only 4 5kgs 1 Air Cap 2 Nozzle 3 Spray Gun 4 On Off Switch 5 Handle Lock 6 Handle 7 Power Cord 8 Knob 9 Wheels 10 Air Hose 11 Paint Pot 12 Trigger 13 Spray regulator dial 2 12 1 SPECIFICATIONS MODEL NO MPS 700 1 8 9 KNOW YOUR PRODUCT 3 11 4 10 7 6 5 13 ...

Page 3: ... GENERAL POWER TOOL SAFETY WARNINGS SPRAY GUN SAFETY WARNINGS PREPARATION OPERATION MAINTENANCE TROUBLE SHOOTING SPARE PARTS DESCRIPTION OF SYMBOLS PACK CONTENTS WARRANTY Page 1 Page 3 Page 3 Page 4 Page 6 Page 7 Page 9 Page 13 Page 14 Page 15 Page 15 Page 16 Page 17 ...

Page 4: ...oltage on the rating plate Note The supply of 230V and 240V on Ozito tools are interchangeable for Australia and New Zealand This tool is double insulated in accordance with AS NZS 60745 1 therefore no earth wire is required If the supply cord is damaged it must be replaced by a qualified electrician or a power tool repairer in order to avoid a hazard If operating a power tool in a damp location i...

Page 5: ... or wet conditions Water entering a power tool will increase the risk of electric shock d Do not abuse the cord Never use the cord for carrying pulling or unplugging the power tool Keep cord away from heat oil sharp edges or moving parts Damaged or entangled cords increase the risk of electric shock e When operating a power tool outdoors use an extension cord suitable for outdoor use Use of a cord...

Page 6: ...making any adjustments changing accessories or storing power tools Such preventive safety measures reduce the risk of starting the power tool accidentally d Store idle power tools out of the reach of children and do not allow persons unfamiliar with the power tool or these instructions to operate the power tool Power tools are dangerous in the hands of untrained users e Maintain power tools Check ...

Page 7: ...mmended that the extension lead is a maximum of 25m in length Do Not use multiple extension leads NEVER under any circumstances aim the nozzle at another person or animal In the event of an injury occurring seek medical advice immediately The spray gun must not be used for spraying flammable paints and solvents with a flash point of less than 21ºC Always ensure there is adequate ventilation when s...

Page 8: ...he coating material at the nozzle and also pressurizes the container This pressure pushes the coating material up the ascending pipe to the nozzle The air and pressure setting can be adjusted progressively Note For obtaining the best results from your spray gun surface preparation and paint thinning are the two most important areas with which to be concerned Ensure all surfaces are free from dust ...

Page 9: ...ree spraying It helps thin your paint however also reduces wear and replacement cost of parts within the spray gun It also reduces tip clogging avoiding freeze up in the trigger which gives you a professional finish Floetrol is available from Bunnings Warehouse Determining Viscosity Information regarding dilution is normally found on the material tin Use the viscosity table to determine the thickn...

Page 10: ...tion tube should be pointing toward the front of the spray gun Fig 4 6 Spraying overhead objects Turn suction tube to point backwards as the suction tube should be pointing toward the rear of the spray gun Fig 5 By pointing the suction tube in the proper direction you will not have to refill the paint pot 11 as often 7 Filling the paint pot While filling the pot with paint filter the paint through...

Page 11: ...tical surfaces C round fan for corners edges and other hard to access places Adjusting the required spray pattern Fig 8 With the air cap nut loosened turn air cap 1 to the required spray pattern Caution Never open trigger 12 when making adjustments on the air cap Spraying Technique The spraying result depends considerably on now smooth and clean the surface is before spraying is begun For this rea...

Page 12: ...int head Clean the nozzle 2 and remove any paint build up Be careful not to damage the nozzle 2 as this will affect the spray gun performance Helpful Hints 1 Do not spray outdoors on a windy day as the results may be unsatisfactory 2 Evenly control the speed of movement of the spray gun A fast speed will give a thin coat and a slow speed will give a heavy coat 3 Only apply one coat at a time If a ...

Page 13: ...ed it will result in uneven and inconsistent spraying 5 Thoroughly clean the suction tube using clear solvent or water before reassembling 6 Re fit suction tube and fill container with solvent or water 7 Screw container back in place Turn on device and spray the solvent or water into a container 8 Repeat the above procedure until clear solvent or water comes out of the nozzle 9 Turn off device 10 ...

Page 14: ...erformance 1 If attached remove the air hose 10 from the spray gun Using a 8mm socket not provided carefully unscrew and remove the spray gun plunger assemble from the rear of the spray gun Fig 15 2 Clean the spray gun plunger assembly and spray gun remove any paint using clear solvent or water 3 After cleaning reassemble the plunger assembly in the correct order Fig 16 and refit to the rear of th...

Page 15: ...rse Coating material has a too high viscosity Dilute Too much material spray regulator dial turned too far to Turn spray regulator dial to Nozzle dirty Clean Air filter very dirty Change Not enough pressure built up in paint pot Tighten paint pot The spray jet pulses Coating material in paint pot is running out Refill The small hole in the suction tube is blocked Clean Air filter very dirty Change...

Page 16: ...ing Regulator compliance mark min Revolutions or reciprocation per minute ºC Degrees Celsius SPARE PARTS Limited spare parts are available subject to availability Please contact your local Bunnings Special Orders Desk to order the required spare parts Most common spare parts listed below Spare Part Part No Air Hose SPMPS700 12 Gun Set SPMPS700 13 DESCRIPTION OF SYMBOLS ...

Page 17: ... com au Power tools that are no longer usable should not be disposed of with household waste but in an environmentally friendly way Please recycle where facilities exist Check with your local council authority for recycling advice Recycling packaging reduces the need for landfill and raw materials Reuse of recycled material decreases pollution in the environment Please recycle packaging where faci...

Page 18: ...cy use If the tool has been operated on a supply voltage other than that specified on the tool If the tool shows signs of damage or defects caused by or resulting from abuse accidents or alterations If the tool is disassembled or tampered with in any way Note Warranty excludes consumable parts such as brushes atomiser valves spray nozzles pistons discs drill bits collets and router bits YOUR WARRA...

Reviews: