


ONLINE MANUAL
Scan this QR Code with your
mobile device to take you to
the online manual.
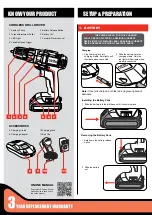
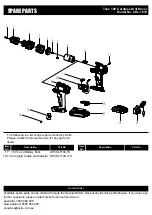
KNOW YOUR PRODUCT
SETUP & PREPARATION
1. BATTERY
1 Keyless Chuck
2 Torque Adjustment Collar
3 LED Light
4 Variable Speed Trigger
5 Battery Release Button
6 Battery 18V
7 Forward/ Reverse Lever
CORDLESS DRILL DRIVER
1 2 3 4
5
8
6
9
7
10
8 Charging Cradle
9 Charging Adaptor
10 Charging Jack
11 Belt Clip
Charging
Installing the Battery Pack
1 Plug charging jack into
charging cradle. Both lights will
illuminate when connected.
1 Slide the battery into the drill base until it clicks into place.
2 Slide the battery onto the
charging cradle. Only the
red light will illuminate when
properly connected.
Note:
Once fully charged, both the red and green lights will
illuminate.
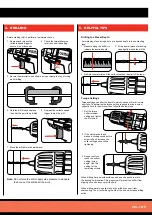
Removing the Battery Pack
1 Hold down the battery release
button.
2 Slide the battery
out.
WARNING!
THE POWER SUPPLY FOR THIS CHARGER
SHOULD BE PROTECTED BY A RESIDUAL CURRENT
DEVICE (RATED AT 30MA OR LESS). A RESIDUAL CURRENT
DEVICE REDUCES THE RISK OF ELECTRIC SHOCK.
11
ACCESSORIES


