


FWD
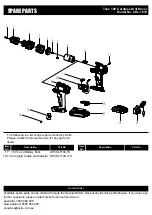
2. KEYLESS CHUCK
3. CONTROLS
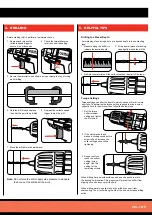
OPERATION
Forward/ Reverse Lever
Adjusting Torque
Variable Speed Trigger
1 For forward rotation, push the fwd/rev lever towards the left side of
the drill. For reverse rotation push fwd/rev lever to the right.
1 Rotate the torque collar to the desired setting.
1 To start drilling squeeze the
variable speed trigger.
2 To stop drilling release the
trigger.
Installing a Drill Bit
Removing a Drill Bit
1 Rotate the chuck collar anti-
clockwise to open the chuck
1 Open the chuck by rotating the
chuck collar and remove the
frill bit.
3 Tighten the chuck by turning
clockwise.
2 Insert the drill bit,
making sure it
is centred in the
chuck.
4 Pull on the bit to
ensure it is firmly
secured.
Note:
The more the variable speed trigger is depressed, the
faster the drill bit will rotate.
Note:
Selecting a higher torque setting will allow the drill to
use more torque to drive the screw in or out. To prevent
damaging the screw head, it is recommended to start at
a low torque setting and increase when necessary.
CAUTION:
TO REDUCE THE RISK OF INjURY WE
RECOMMEND THE USE OF GLOVES WHEN HANDLING
DRILL BITS.
WARNING!
Ensure the tool is turned off & disconnected from the
power supply before performing any of the following operations.