


9
NOTE: Opener MUST be mounted to garage framing material. DO NOT install to particle board or
drywall.
The instructions above are provided using standard wood framing and bracing. Additional bracing may be
required for this installation.
Hardware for masonry or steel construction is not provided.
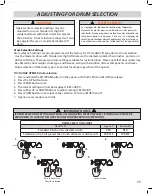
Level &
Square
Opener
6) Mount opener to wall.
Level and square opener. NOTE: Vertical lift openers will not be level.
Mark mounting bracket hole position, pre-drill a 3/16” pilot hole and install lag screw and fully tighten.
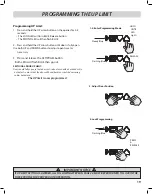
Add 1 full turn to hollow tube or 1/2 turn for solid shaft on each coupler set screw in 1/4 turn increments after
contacting door and opener shaft surfaces. DO NOT tighten set screws into an empty keyway.
Leave at least a 1/4” gap between coupler and door shaft bearing.
Tighten mounting bracket bolt to opener.
Pull emergency release cable and manually operate door to inspect for binding.
Tie RED emergency release cord to cable loop and tie release handle to cord approximately 5 feet from floor.
INSTALLING THE OPENER
(CONT’)
At least
1/4” Gap
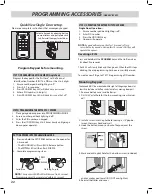
7/16”
WRENCH
PRO TIP: Use 3/8” - 8 point socket and
ratchet to secure square coupler bolts in
tight clearance situations.
7/16”
SOCKET
3/16”
Bit
NOTE:
Ensure all COUPLER BOLTS are secured prior to tightening mounting bracket bolt.


