E-25-7-E
2
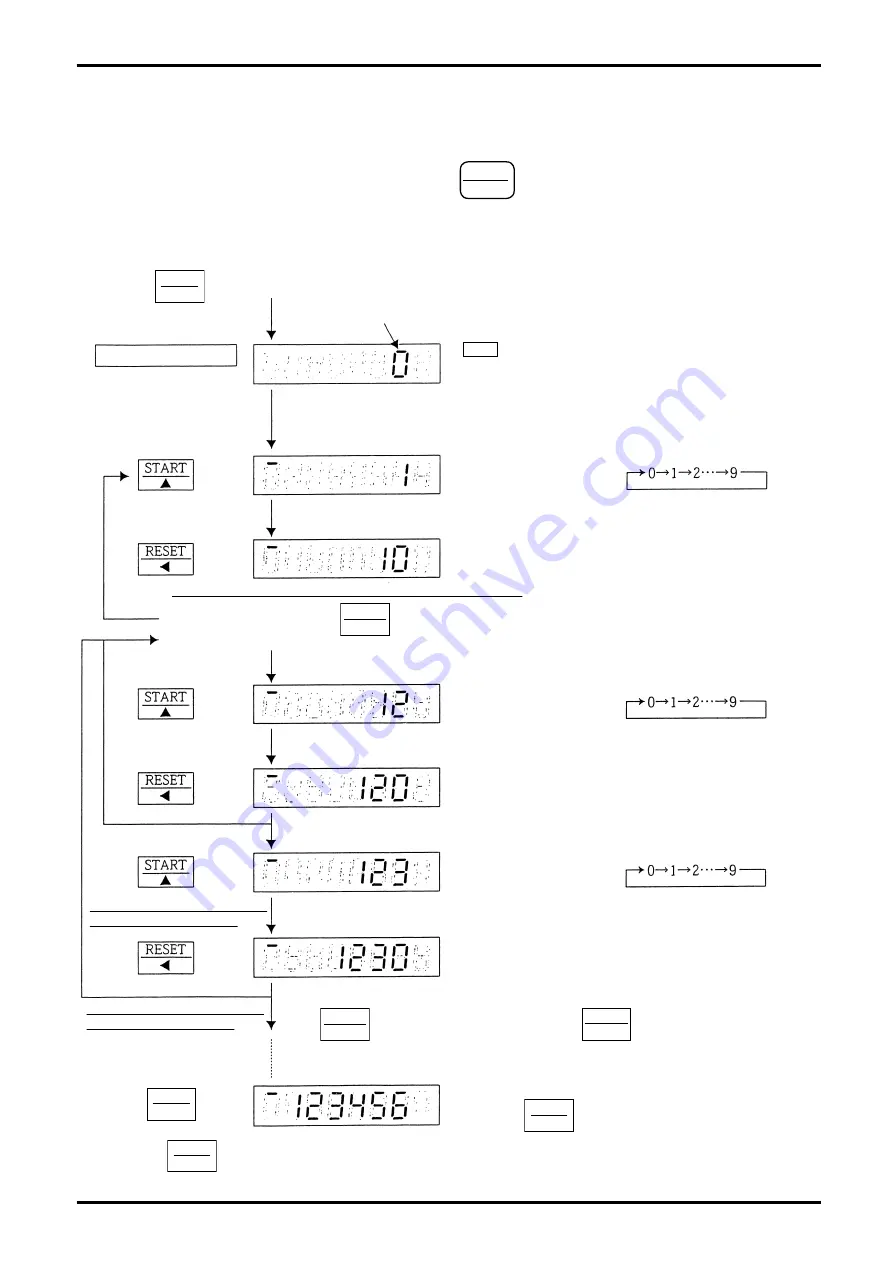
9.1.1.2 Example of Batch Setup
Make sure that your batch setting meets the conditions required for changing batch setpoints outlined in
the previous paragraph.
To change batch setpoints, we recommend to press
RESET
◀
a number of times until the LCD displays
shows 0 (ZERO) and then set up as outlined below.
●
Shown below is an example of setting of a batch of 123456.
Hold key depressed for more than 3 seconds.
START
▲
RESET
STOP
ROT.
STOP
ROT.
STOP
ROT.
Blinks at the previous
setpoint.
Batch setup mode
comes on and LCD (batch setpoint) blinks.
In the operations below, absence of any key entry
for more than 10 seconds will cause the LCD to
return to the previous setting and to RUN mode
automatically (in the batch setup mode).
Set up from the most
significant digit:
“1” in this example.
If the figure has gone too far,
press the key a number of
times to readjust the figure.
If the figure has gone too far,
press the key a number of
times to readjust the figure.
If the figure has gone too far,
press the key a number of
times to readjust the figure.
Press
once.
Press
once.
Press
once.
Press
once.
Press
once.
Press
thrice.
LCD1 Disp.: 0
→
1
LCD1 Disp.: 0
→
10
LCD1 Disp.: 10
→
12
LCD1 Disp.: 12
→
120
LCD1 Disp.: 120
→
123
LCD1 Disp.: 123
→
1230
If you have taken the figure place up more than necessary,
like 1
→
10
→
100, press key
a number of times until the LCD 1 display shows 0 and go back to
→
to
start all over again.
Press
twice.
If figure place has been taken
up more than necessary,
If figure place has been taken
up more than necessary,
In a similar way, keep on adjusting the figure at the rightmost of the LCD 1
with and taking the figure place up with key.
Adjust the figure until the LCD 1 displays 123456
and press key.
At touch of key, the figure is stored in the memory and the LCD display returns to the normal batch display.
SET
RESET
◀
STOP
ROT.
◀


