


Service work
490E75=0_C
74 | Ottobock
4.13 Seat
4.13.1 Replacing the seat plate (standard seat)
f
Prerequisites:
Switch off the control unit and deactivate the main fuse (see Page 15).
Remove the seat cushion and back padding.
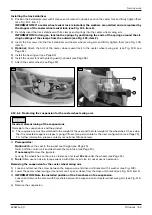
Removing the seat plate (standard seat)
1) Pull the back edge of the seat plate upwards (see Fig. 151).
2) Unhook the seat plate from the front edge and remove it (see Fig. 152, item 1).
NOTICE! Damage to components or cables due to improper removal of the seat plate. Control modules
may be attached to the seat plate. Make sure the modules and cables are not damaged, and remove
them if necessary.
Attaching the seat plate (standard seat)
1) Hook the seat plate onto the front edge (see Fig. 152, item 1).
2) Push the rear edge of the seat plate downwards and engage it securely (see Fig. 151).
151
152
4.13.2 Replacing the seat plate (VAS seat)
f
Prerequisites:
Switch off the control unit and deactivate the main fuse (see Page 15).
Remove the seat cushion and back padding.
f
Tools: Allen wrench size 3, 6; torque wrench with Allen insert size 3, 6
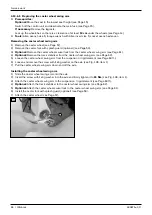
Removing the seat plate (VAS seat)
1) Loosen and remove the 6 outer screws (short) on the seat plate (see Fig. 153, item 1).
2) Loosen and remove the 2 inner screws (long) in the slotted holes of the seat plate (see Fig. 153, item 2).
3) Remove the cover on both bearing plates (see Page 91).
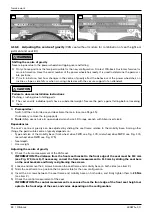
4) Loosen the 2 screws in the bearing plates on both sides (see Fig. 154, item 1).
5) Pull the seat plate forwards and out to remove it. Lift the back slightly if necessary.
NOTICE! Damage to components or cables due to improper removal of the seat plate. Control modules
may be attached to the seat plate. Make sure the modules and cables are not damaged, and remove
them if necessary.
Attaching the seat plate (VAS seat)
1) Slide the seat plate onto the seat frame from the front. Slide the seat plate carefully under the bearing plates as
you do so.
2) IN@MOOC@¿DII@MN>M@RNGJIBDIOJOC@NGJOO@?CJG@NJAOC@N@<OKG<O@<I?uMHGTODBCO@IOC@HOJ4 Nm (see
Fig. 153, item 2).
3) IN@MOOC@ÃJPO@MN>M@RNNCJMODIOJOC@N@<OKG<O@<I?uMHGTODBCO@IOC@HOJ4 Nm (see Fig. 153, item 1).
4) Position the back evenly using the markings on the seat plate (see Page 93).
5) Firmly tighten the 2 screws in the bearing plates on both sides to 25 Nm (see Fig. 154, item 1).
6) Install the cover on both bearing plates (see Page 91).
Summary of Contents for 490E75 Series
Page 1: ...490E75 0_C Service manual...
Page 38: ...Service work 490E75 0_C 38 Ottobock 57 58 59 60 61 62 63...
Page 41: ...Service work 490E75 0_C Ottobock 41 70 71 72 73 74 tt 75 76...
Page 55: ...Service work 490E75 0_C Ottobock 55 103 104 105 106 107 108 109 110...
Page 108: ...Service work 490E75 0_C 108 Ottobock 227 228 229 t 230 231 232...
Page 112: ...Service work 490E75 0_C 112 Ottobock 237 238 239 240 241...
Page 143: ...R Net wheelchair control 490E75 0_C Ottobock 143 Seat module pin assignment 287...
Page 161: ...490E75 0_C Ottobock 161...
Page 162: ...490E75 0_C 162 Ottobock...


