


P 28
OTS-3000 User Manual – Operation and Adjustment
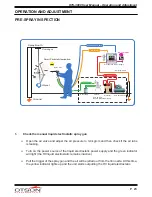
PROCESS OF OPERATION
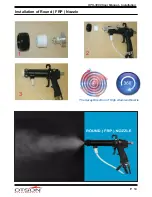
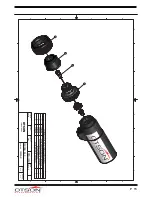
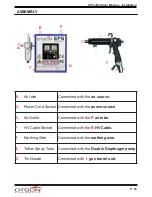
1. Assemble and install the liquid electrostatic spray gun and the conveying pump:
Complete the aforesaid installation and pre-spraying inspection.
2. Pour the paint into the bucket:
Confirm the viscosity of paint (9 ~ 30 sec. Iwata #2 cup or viscosity meter ) and conductivity
(20 ~ 30 mega ohms), and then pour the paint into the bucket and stir well with the pneumatic
agitator.
3. Start the paint-conveying pump for sending the paint to the liquid electrostatic spray
gun:
After sending the air into the pump, adjust the air pressure to 2 ~ 3 kg/cm for making it operate
and suck the paint.
4. Force the air out of the paint tube to confirm if the paint flows out smoothly from the front
end of spray gun:
First, remove Round nozzle and FRP nut. Close Air Ball Valve B (without the residual
atomized air) and pull the trigger to spray air and paint from the front end of nozzle. If
residual air is remained in the paint tube, the paint will be sprayed in intermittent state. In
this case, continue pulling the trigger until the paint flows out smoothly from the front end of
nozzle.
The paint flow is adjusted by the adjusting knob behind the spray gun. The flow increases
by turning left and vice versa.
5. Confirm the atomized air is provided with sufficient source pressure:
Close the conveying pump (without the residual paint).
Open the Air Ball Valve B and turn the air flow adjusting knob K forward to full open
position.
Pull the trigger and adjust the Air Regulating Valve to 3~4 kg/cm, while keeping the air
pressure from dropping.
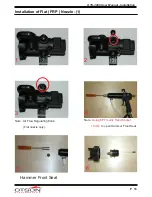
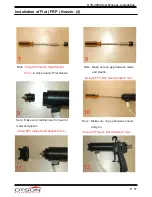
6. Adjust the atomized air of the liquid electrostatic spray gun:
Combine and Round nozzle and the FRP nut with the gun barrel, and then move the adjusting
ring of tin nozzle backward 1mm.
Start the paint conveying pump and then adjust the paint regulating knob to obtain appropriate
paint flow.
Pull the trigger and adjust the Air Flow Regulating Knob K to confirm that the paint is properly
atomized.