background image

32

Otometrics

Preparing for testing


Preparing the equipment 

4.2.4

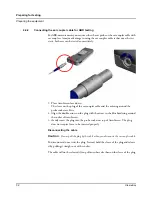
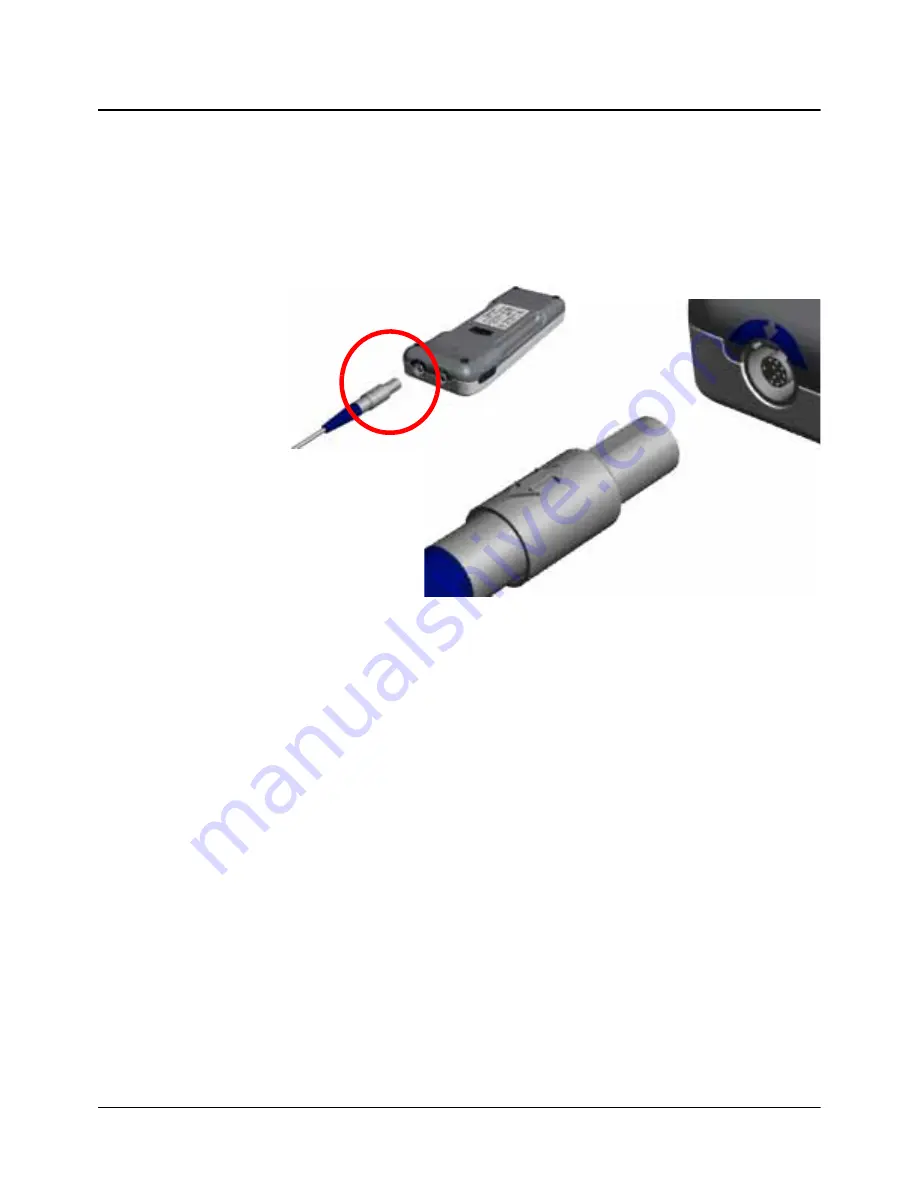
Connecting the ear coupler cable for ABR testing

For ABR-measurements you can use either the ear probe or the ear coupler cable with 
ear couplers. A major advantage in using the ear coupler cable is that once the test 
starts, both ears can be tested consecutively.

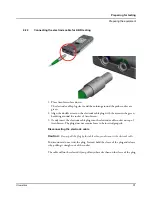
1. Place AccuScreen face down.

The sleeve on the plug of the ear coupler cable and the coloring around the 
probe socket are blue.

2. Align the double arrow on the plug with the arrow in the blue bordering around 

the socket of AccuScreen. 

3. Gently insert the plug into the probe socket on top of AccuScreen. The plug 

does not require force to be inserted properly.

Disconnecting the cable

Caution · 

Do not pull the plug by the cable when you disconnect the ear coupler cable.

To disconnect do not twist the plug. Instead, hold the sleeve of the plug and release 
it by pulling it straight out of the socket.

The cable will not be released if you pull anywhere else than on the sleeve of the plug.

Summary of Contents for AccuScreen ABR

Page 1: ...AccuScreen OAE ABR Screener User Manual Doc no 7 50 0920 US 02 Part no 7 50 09200 US 0459 ...

Page 2: ...the prior written con sent of GN Otometrics A S Copyright 2011 GN Otometrics A S Printed in Denmark by GN Otometrics A S Denmark All information illustrations and specifications in this manual are based on the latest product information available at the time of publication GN Otometrics A S reserves the right to make changes at any time with out notice Version release date 27 September 2011 Techni...

Page 3: ...view 14 2 2 3 The docking station 14 2 2 4 Display 15 2 2 5 Ear probe 16 2 2 6 Electrode cable ABR only 16 2 3 Storage 16 2 4 Assembly 16 2 5 Powering 17 2 5 1 The battery 17 2 5 2 Inserting the battery in AccuScreen 18 2 5 3 Battery status 19 2 5 4 Powering the docking station 19 2 5 5 Charging the battery from the docking station 20 2 5 6 Charging the battery with the external charger 20 3 Getti...

Page 4: ...ip on the probe 34 4 4 3 Inserting the probe with eartip in the patient s ear canal 34 4 4 4 Placing electrodes for ABR testing 35 4 4 5 Fitting the ear couplers 35 5 Tests 37 5 1 Ready to test 37 5 2 The TEOAE test 38 5 2 1 Starting the test 38 5 2 2 The TEOAE test 39 5 2 3 TEOAE test results 40 5 2 4 Options in the test result screens 42 5 2 5 Continuing testing on the other ear 43 5 3 Adding co...

Page 5: ...ings menu 73 9 2 Time and Date setting 74 9 3 Language setting 75 9 4 Sound setting 75 9 5 Display Brightness 76 9 6 System Info 76 10 Handling Data in AccuScreen 77 10 1 Entering data in AccuScreen 77 10 1 1 Using the keypad 77 10 2 Function buttons 78 10 3 General buttons 79 10 4 Deleting data 79 10 4 1 Deleting one patient 79 10 4 2 Deleting all patients 80 11 Maintenance and Cleaning 83 11 1 T...

Page 6: ...age and test related messages 96 App 3 Technical Specifications 99 App 3 1 Accessories 99 App 3 1 1 Standard accessories 99 App 3 1 2 Optional accessories 99 App 3 2 Device 99 App 3 3 Measurement techniques 99 App 3 3 1 TEOAE 99 App 3 3 2 DPOAE 100 App 3 3 3 ABR 100 App 3 3 4 Dimensions 101 App 3 3 5 Weight 101 App 3 3 6 Display 101 App 3 3 7 Keypad 101 App 3 3 8 Sound 102 App 3 3 9 Language setti...

Page 7: ...App 3 5 3 DC power input 105 App 3 5 4 Power adapter 105 App 3 6 OAE probe 105 App 3 6 1 Probe cable 105 App 3 6 2 Dimensions 105 App 3 6 3 Weight 106 App 3 6 4 Eartips 106 App 3 7 ABR electrode cable 106 App 3 8 ABR ear coupler cable optional 106 App 3 9 Device class 106 App 3 10 Notes on EMC Electromagnetic Compatibility 106 Index 109 ...

Page 8: ...8 Otometrics Table of Contents AccuScreen OAE ABR Screener User Manual ...

Page 9: ... AccuScreen uses TEOAE Transiently Evoked Otoacoustic Emissions and DPOAE Distortion Product Otoacoustic Emissions technologies which are highly effective for neonatal hearing screening Otoacoustic Emissions measure cochlear mechanics and indicate whether the cochlea is functioning correctly or not Children s emis sions are typically strong which makes them easy and fast to detect Emission strengt...

Page 10: ... PC application From AccuLink you can create edit view and print data relating to patients and tests users sites and connected locations and facilities From AccuLink you can configure AccuScreen to suit your purposes This includes defining mandatory fields in patient handling defining which screens are to be shown in AccuScreen and uploading and downloading data AccuScreen is operated independentl...

Page 11: ...r discharge from the hospital Infants should be asleep or in a quiet state at the time of screening AccuScreen is intended for use by audiologists ENTs and other health care profes sionals Important GN Otometrics A S does not guarantee the accuracy of the test results or the tests themselves if accessories other than those supplied by GN Otometrics A S are used for this device i e eartips electrod...

Page 12: ...iar with the device before testing on a client Maintenance and cleaning For instructions on how and when to clean AccuScreen and accessories please see 11 Maintenance and Cleaning X 83 1 7 Typographical conventions The use of WARNING CAUTION and NOTE For safety reasons and appropriate use of AccuScreen the manual contains Warn ings Cautions and Notes which you should read carefully They are used a...

Page 13: ...ble damage Make sure that you have received all necessary parts and accessories If your package is incomplete contact your supplier Caution If damage has occurred do not put the device into operation Contact your supplier for assistance 2 2 Views of AccuScreen 2 2 1 Front and rear view A On Off switch B Touch screen display A B C D E F ...

Page 14: ... Top and bottom view A ABR socket B Probe socket ear coupler cable socket C Docking Station connectors 2 2 3 The docking station Bottom Top A B C Front indicators POWER Lit when the mains power supply to the docking station is on Lit when data is being transferred during transfer of data between AccuScreen and AccuLink during printing from label printer USB Lit when docking station is connected to...

Page 15: ...nter Modem Socket for printer modem connection Socket for power adapter The display is a touch screen display where the icons and fields shown serve as buttons Touch the buttons to activate a func tion Caution Never use any type of sharp instrument on the display If you do reli able operation of AccuScreen can no longer be guaranteed ...

Page 16: ... When you receive AccuScreen you must insert the battery in the battery compart ment See 2 5 2 Inserting the battery in AccuScreen X 18 We recommend that you charge the battery fully by placing AccuScreen in the docking station 2 5 5 Charging the battery from the docking station X 20 For testing purposes fit the probe the ear coupler cable and the electrode cable as needed See 4 Preparing for test...

Page 17: ...arantees approximately 8 hours of operating time On delivery the battery is charged approx 50 Before you start testing we recommend that you charge the battery fully Use only the battery type docking station and charger stated in App 3 4 Power sup ply and battery X 104 and App 3 5 1077 docking station optional accessory X 104 See 11 5 Battery safety and maintenance X 86 Battery Storage If the batt...

Page 18: ...button of the battery compartment upwards The battery compartment pops out 2 If needed remove the battery 3 Place a new charged battery in the compart ment Hold the battery so that the arrow with the text Insert this direction points downwards towards the bottom of the compartment 4 Close the compartment ...

Page 19: ...ly with the safety requirements for a medical device system connection to the docking station must always be done outside the patient area min 1 5 meters 5 ft from the patient You will find an adapter plug kit when you unpack AccuScreen The adapter plug kit contains a range of adapter plugs you can choose from to fit your mains outlet Connecting to the mains supply 1 Select the adapter plug approp...

Page 20: ...arger supplied by GN Otometrics A S The battery for AccuScreen can be charged by an external charger optional acces sory See the charger manufacturer s documentation for specifications and instructions for use 1 Place AccuScreen in the docking station The light indicator on the front of Accu Screen will light up Front light indicator Green Fully charged Orange steady Charging Orange flashing Durin...

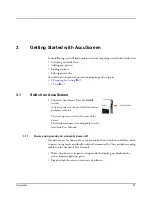
Page 21: ...If you do not use AccuScreen for a certain period of time AccuScreen will first switch to power saving mode and finally switch off automatically These periods are config urable see the AccuLink User Manual When AccuScreen is in power saving mode the display goes black and the power indicator lights up green Simply touch the screen to reactivate AccuScreen 1 Switch on AccuScreen Press the On Off sw...

Page 22: ...ata in AccuScreen X 77 Buttons are described in 10 2 Function buttons X 78 10 3 General buttons X 79 Navigating the screens in AccuScreen The screens in AccuScreen are usually divided into 3 or 4 main areas A The title bar showing the time the screen title the battery status B The main screen where you will typ ically find test screens patient buttons keypad for entering data etc C The function ba...

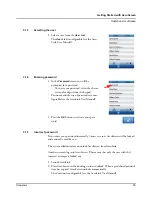
Page 23: ...ect attempts is locked out 1 Launch AccuLink 2 Place AccuScreen in the docking station to unlock When a predefined period of time has expired AccuScreen unlocks automatically The duration is configurable see the AccuLink User Manual 1 Select a user from the User List The User List is configurable see the Accu Link User Manual 1 In the Password screen you will be prompted for a password To enter yo...

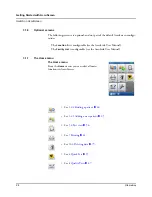
Page 24: ...enu The Location list is configurable see the AccuLink User Manual The Facility List is configurable see the AccuLink User Manual The Home menu From the Home menu you can select all main functions in AccuScreen See 3 2 2 Finding a patient X 26 See 3 2 1 Adding a new patient X 25 See 5 6 Test view X 56 See 7 Printing X 61 See 10 4 Deleting data X 79 See 6 Quick Test X 59 See 8 Quality Tests X 67 ...

Page 25: ...can press to select screens for enter ing patient data There are two types of fields for data entry Mandatory fields In mandatory fields the text Press to edit is shown in red Note You must always enter a value in the man datory fields Mandatory fields are defined in AccuLink see the AccuLink User Manual Optional fields Press the first mandatory field to enter patient data When you have entered da...

Page 26: ...en enables you to view and if needed add data in optional fields or change the entered data In the Date of Birth screen press the arrow but tons to set the correct date of birth DD Day MM Month YYYY Year If you pass the end or the beginning of a month in the day DD column the MM value is stepped up or down accordingly If you step up the MM value to 01 i e to a new year the YYYY value is stepped up...

Page 27: ...7 3 If you wish to change your search criteria in order to limit your search further press the Search Criteria button If needed press repeatedly until you see the category you wish to use 4 Press the OK button to start the search The search will produce a list of patients matching the search criteria 5 Press the button showing the name of the patient you wish to select The Patient Details screen i...

Page 28: ... Editing patient data 1 Find a patient as described in 3 2 2 Finding a patient X 26 2 In the Patient Details screen press the field you wish to edit 3 Edit the field 4 When you have edited data in a field press the OK button to save 5 If needed select the next field you wish to edit ...

Page 29: ... day before you start testing on patients we recommend that you perform whichever quality tests that may be necessary to make sure that probe electrode cable and ear coupler cable function correctly See 8 Quality Tests X 67 4 2 1 Preparing the probe for testing Caution Insert only disinfected probe tips in the test cavity See 11 4 1 Cleaning and disinfecting the test cavity X 85 Every day before y...

Page 30: ...ound the socket of AccuScreen 3 Gently insert the probe plug into the probe socket on top of AccuScreen The plug does not require force to be inserted properly Disconnecting the probe Caution Do not pull the plug by the cable when you disconnect the probe To disconnect do not twist the plug Instead hold the sleeve of the plug and release it by pulling it straight out of the socket The probe will n...

Page 31: ...g around the socket of AccuScreen 3 Gently insert the electrode cable plug into the electrode cable socket on top of AccuScreen The plug does not require force to be inserted properly Disconnecting the electrode cable Caution Do not pull the plug by the cable when you disconnect the electrode cable To disconnect do not twist the plug Instead hold the sleeve of the plug and release it by pulling it...

Page 32: ...e and the coloring around the probe socket are blue 2 Align the double arrow on the plug with the arrow in the blue bordering around the socket of AccuScreen 3 Gently insert the plug into the probe socket on top of AccuScreen The plug does not require force to be inserted properly Disconnecting the cable Caution Do not pull the plug by the cable when you disconnect the ear coupler cable To disconn...

Page 33: ...ABR is best performed when the baby is sleeping The ideal time is after the baby has been fed and changed It is recommended that newborn babies be swaddled tightly for ABR testing Swaddl ing has a very calming effect 4 4 1 Prepare the patient for TEOAE and DPOAE testing General preparations of the patient 1 Position the patient so that you can easily access the ear to be tested 2 Grasp the pinna a...

Page 34: ...before you continue testing on the other ear Warning Using a probe with an unsuitably sized eartip or applying excessive force may irritate the ear canal Note In case of a probe error make sure that the probe tip channels are clear see 11 1 The probe tip and probe body X 83 and that the probe is connected See also 8 2 Probe test X 67 4 4 3 Inserting the probe with eartip in the patient s ear canal...

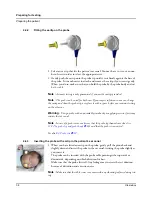
Page 35: ... the patient as follows 2 Make sure that the electrodes fit tightly on the skin Note The hydrogel of the electrodes can dry out Make sure that used packages are closed properly Dried out hydrogel may cause unexpectedly high electrode impedance If this is the case change the electrodes 4 4 5 Fitting the ear couplers Warning Never place the red and blue ear coupler adapters directly in the ear canal...

Page 36: ...ctive film of the ear coupler 4 Place the ear coupler with the red adapter over the right ear of the baby and the ear coupler with the blue adapter over the left ear of the baby The ear couplers can be placed with the cables pointing either upwards or down wards depending on which direction fits best Caution To remove the ear coupler cables do not pull them by the cable Instead hold them by the tr...

Page 37: ...e ABR test X 50 5 1 Ready to test You can choose between two methods of testing Quick testing Regular testing Quick testing 1 Select Quick Test from the Home screen The test selection depends on the device type the configuration of the device and which cables are connected 2 Press the Start button corresponding to the ear you wish to test See the test descriptions in 5 2 The TEOAE test X 38 5 4 Th...

Page 38: ...s screen 3 This will take you to the patient s Test Menu The test selection depends on the device type the configuration of the device and which cables are connected Selecting available tests is configurable see the AccuLink User Manual 4 See the test descriptions in 5 2 The TEOAE test X 38 5 4 The DPOAE test X 45 5 5 The ABR test X 50 1 To start the test press the Start button that is next to TEO...

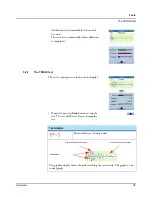
Page 39: ... completed The test as it progresses is shown on the display If needed press the Stop button to stop the test The test will be saved as an incomplete test Test details Shows which ear is being tested The graphic display shows the peaks reaching the test criteria The graph is a sta tistical graph Higher frequency emissions Lower frequency emissions Valid peaks ...

Page 40: ...oise level Make sure the Noise level is as low as possible A high Noise level may indicate a high level of environmental noise or a noisy baby Artifact Shows the average artifact level in percent The artifact rate emanating from noise should be below 20 if possible If artifacts are present this may indicate a high level of environmental noise or a noisy baby In these cases check the test condition...

Page 41: ... not being detected To eliminate this possibility always make sure If the result is a PASS Test passed just the graph is shown A PASS Test passed result indicates that the patient has normal outer hair cell function at the time of testing A PASS Test passed is determined by a statis tical algorithm based on weighted averaging which ensures detection with proven high specificity and sensitivity No ...

Page 42: ...the Stimulus value stimulus stability is less than 80 the probe may have shifted or may not be in a position to record the response Try to reposition the probe and repeat the test Note Retro cochlear hearing loss cannot be detected by TEOAE testing Incomplete test 5 2 4 Options in the test result screens If the test was stopped an error message and detailed results are shown The result screen appe...

Page 43: ...e the tests performed on the patient 5 6 Test view X 56 Start If you wish to repeat the test press the Start button OK Press to return to the Test Menu so that you can test the other ear or continue with another type of test 1 Press the OK button to return to the Test Menu When the test is completed for a specific ear the Start button changes to show the result The buttons show the best most recen...

Page 44: ...t screens and from the patient s Test Menu 1 To add a standard comment press the Add Comments button in the Test Result screen This will take you to the Comments screen If comments have already been added to a test they are marked here 2 In the Comments screen you can select a predefined comment that may apply to this patient or the test conditions Comments are configurable in AccuLink 3 When you ...

Page 45: ...he data entry functions described below See also 10 1 1 Using the keypad X 77 3 When you have entered a comment in the field press the OK button to save 1 To view a comment press the View Com ments button This will take you to the Comment screen If comments have already been added to a test they are listed here 1 To start the test press the Start button that is next to DPOAE and that corresponds t...

Page 46: ...test The probe fit is followed by a speaker test to make sure that the two speakers function correctly Incomplete message If the message Incomplete appears Refit the probe and make sure that it fits correctly Press the Start button to restart the test The test as it progresses is shown on the display The frequency currently being tested is shown on the screen See the bar chart legend below for a d...

Page 47: ... User Manual In a standard DPOAE test the 4 frequencies are 5 kHz 4 kHz 3 kHz 2 kHz where 5 kHz is tested first The default PASS REFER criterion is 3 4 which means that if 3 frequencies have reached a PASS the entire test will PASS The fourth remaining frequency will not be tested DPOAE Response at current test frequency Noise Current noise level Make sure the Noise level is as low as possible Pro...

Page 48: ...on of the buttons available The following PASS REFER definitions apply only to the default DPOAE protocol for AccuScreen See the AccuLink User Manual for customized protocols PASS Test passed 2 Press the OK button to return to the Test Menu For a standard DPOAE test the complete test is terminated successfully with a PASS Test passed if DPOAEs could be registered for at least 3 fre quencies The re...

Page 49: ...requency PASS Test passed is a strong indi cator that test conditions were not optimal If this is the case it is recommended that you improve test conditions and repeat the test A PASS Test passed result indicates that the patient has normal outer hair cell function in at least 3 out of 4 different frequency regions of the cochlea at the time of testing A single frequency PASS Test passed is deter...

Page 50: ...trodes on the patient to ensure that they have time to connect well to the skin for instance while you explain the test process to relatives 2 Connect the electrode cable 3 Fit the probe or the ear couplers with the ear coupler cable The ABR display changes automatically 4 Decide on which ear you wish to perform the test and prepare the patient as described in 4 Preparing for testing X 29 If the t...

Page 51: ...1 but the test can be started even if the indicators are yellow The Start button is greyed out until Stimulus and Impedance values are okay 1 Press the Start button to start the test Impedance test indicators Stimulus The acoustical stimulus is being calibrated If the Impedance and Balance values are OK green press the Start button to start the test Red nape The Red reading indicates the sum of th...

Page 52: ...ttach new electrodes to see whether they will reduce the impedance values Green Less than 4 kΩ Good Yellow 4 to 12 kΩ Fair Red Poor More than 12 kΩ Testing is not possible the Start button is dis abled only Stop can be pressed Balance Indicates the difference in the skin impedance of the white and the red electrode This value should also be fairly low less than 4 kΩ Green Good 0 to 2 kΩ Yellow Fai...

Page 53: ... a Start button Pressing the Pause button will store data registered up to this point in time This will prevent registered data from being influenced by noise or movements The test can be paused for max 2 minutes each time you pause it Press the Start button to resume the test Stopping a test If needed press the Stop button to stop the test The test will be saved as an incomplete test Test details...

Page 54: ...escription of the buttons available Test result PASS Test passed EEG Is an indication of the amplitude of the total registered potential The lower this value is the easier the test will be If the electrode signals are significantly high disturbances muscular artifacts the data measured during this time will be ignored Impedance These impedance values are updated and shown every 20 seconds The actu...

Page 55: ...the device accepts the impedance values it is often worth while to attempt to reduce impedance values and particularly the impedance differences The noise in the electrode cable depends strongly on the impedance values If the result is a PASS Test passed only the graph is shown A PASS Test passed indicates that an audi tory brainstem response to a 35 40 or 45 dB nHL broadband stimulus was detected...

Page 56: ...tude It may be worth while to relocate to another room for testing Is there much acoustic noise in the environment A high level of noise might mask the stimulus Incomplete test 5 6 Test view A patient screened by AccuScreen is either given a PASS Test passed or a REFER Test referred If the result is a PASS Test passed no further action is required If the result is a REFER Test referred it is recom...

Page 57: ...e patient you wish to select 3 On the Patient Details screen press the Test View button This will take you to the patient s Test View screen The Test View screen shows the tests that have been made on a particular patient The tests are listed according to date with the most recent tests at the top of the list 1 To view more tests if available press the arrow buttons to scroll up or down in the lis...

Page 58: ...a test result screen displaying the test you wish to view or print For a description of the individual test result types see 5 2 3 TEOAE test results X 40 5 4 3 DPOAE test results X 48 5 5 4 ABR test results X 54 3 If you wish to view comments to a test result press the Comments button in the specific test results screen ...

Page 59: ... stored As a consequence no data is available in the modes Test View and Print 6 1 Performing a Quick Test 1 Do as described in 4 Preparing for testing X 29 but without adding a new patient or assigning the test to a specific patient 2 Press the Quick Test button on the Home screen From the Quick Test screen you can access the test types available in AccuScreen 3 Prepare the patient as described i...

Page 60: ...that is next to the test you wish to perform and that corresponds to the ear you have selected to test 5 2 The TEOAE test X 38 5 4 The DPOAE test X 45 5 5 The ABR test X 50 Note These test results are not stored See 5 Tests X 37 for a the description of the indi vidual tests ...

Page 61: ...e patient s ear and detach ing all electrodes Note Testing is not possible when AccuScreen is placed in the docking station Note Do not switch off AccuScreen while printing is in progress Doing so may result in distorted test data Note If the label printer is not connected or if it is switched off an error message appears on the screen 1 Connect the label printer cable to the AccuScreen docking st...

Page 62: ...will take you to the Test History Print patient list 2 Press the button showing the name of the patient you wish to select If needed see 3 2 2 Finding a patient X 26 This will take you to the Test View screen 1 To print the entire list from the Test View screen press the Print button on this screen Patient specific comments will be printed automatically ...

Page 63: ... of testing Examiner s name Test type Left and or right ear result date and time General comments relating to the patient are listed at the bottom of the printout 2 To access a test result press the row display ing the test you wish to print 3 Press the Print button in the specific Test Result screen Test specific comments will be printed auto matically ...

Page 64: ...n AccuScreen Jones Linda 12 345 6789 02 05 2010 Examiner Laura Roberts TEOAE Results L Pass 02 05 14 39 R REFER 02 05 14 41 C TEOAE Results L Pass 02 05 14 39 R REFER 02 05 14 41 ABR Results R Pass 02 05 15 23 C Comments Madsen AccuScreen Jones Linda 12 345 6789 02 05 2010 Examiner Laura Roberts TEOAE Results L Pass 02 05 14 39 Comments If present Madsen AccuScreen Jones Linda 12 345 6789 02 05 20...

Page 65: ...Otometrics 65 Printing Printouts from label printer Legend Legend L R Left ear Right ear C There are comments relating to a specific test To view these comments a print of the single result is needed ...

Page 66: ...66 Otometrics Printing Printouts from label printer ...

Page 67: ...hat it functions correctly Caution Make sure that the probe tip has been cleaned and disinfected before you insert it in the test cavity See 11 4 1 Cleaning and disinfecting the test cavity X 85 You can start the probe test in two ways 1 Press the Quality Tests button on the Home screen 2 From the Quality Tests menu you can access the quality test types available in AccuScreen Probe 8 2 Probe test...

Page 68: ...e button on the Quality Tests screen 2 Follow the instructions in 8 2 2 Performing the Probe Test X 68 1 Insert the probe tip without eartip in the test cavity The test starts automatically Note The Probe Test does not start auto matically e g when a patient is being cre ated If the probe functions correctly the message Probe OK appears If the probe does not function cor rectly the message Probe T...

Page 69: ...t functions correctly 2 If needed press the Start button to repeat the test 3 Press the OK button to confirm the test result 1 Clip the electrode clips onto the metal bars of the ABR Tester 2 Press the Electrode cable button on the Quality Tests screen 3 Press the Start button to start the test If the electrode cables function correctly the message Electrode cable OK appears ...

Page 70: ...rrectly If one or more of the electrode cables do not function correctly the message Electrode cable failed appears 4 If needed press the Start button to repeat the test 5 Press the OK button to confirm the test result 1 Insert the transducers into the socket at each end of the ABR Tester 2 Press the Ear coupler cable button on the Quality Tests screen 3 Press the Start button to start the test ...

Page 71: ...ears Caution To remove the ear coupler cables do not pull them by the cable Instead hold them by the transducer If one or both ear coupler cables do not func tion correctly the message Ear Coupler failed appears 4 If needed press the Start button to repeat the test 5 Press the OK button to confirm the test result 1 Clip the electrode clips onto the metal bars of the ABR Tester 2 Insert the transdu...

Page 72: ... All tests OK appears If one or several electrode cables and or ear coupler cables do not function correctly the message Test FAILED appears 5 If needed press the Start button to repeat the test 6 Press the OK button to confirm the test result Caution To remove the ear coupler cables do not pull them by the cable Instead hold them by the transducer ...

Page 73: ...d settings change the brightness of the display view system information AccuLink Settings which can be configured from AccuLink are described in the AccuLink User Manual 9 1 The Settings menu From the Settings menu you can change the basic settings of AccuScreen and see information about the hardware and the software installed 1 Press the Settings button on the Home screen From the Settings menu y...

Page 74: ...lower part Note If you leave the Time and Date screen by pressing the OK button the setting of seconds is set to zero 2 Press the arrows to select the day DD month MM year YYYY hours HH and minutes MIN 3 Press the Tool button to change the date and time formats Date Select from the list how the date setting is to be shown on the screen Time Select from the list how the time setting is to be shown ...

Page 75: ...ed language Note Your screen showing the available languages may not appear as the one shown 1 Press the Sound button on the Settings screen You can switch sounds on off for button strokes and test results by pressing the rele vant button Sound on Key click Pressing a button will produce a sound a click Result sound A PASS or REFER sound is heard at the end of the test Sound off Shows that the sou...

Page 76: ...de of the green bar Note A high level of brightness will influence the power consumption of the device Darkens the display Brightens the display Press the Default button to use the default setting for the display brightness 1 Press the System Info button on the Settings screen to view information regarding Firmware release Release date HW version and Serial number Connected probe Next service date...

Page 77: ... case Press twice to write only upper case character Press once to return to lower case character Special characters button Select to enter special characters when the keypad is displaying standard characters Select to enter standard characters when the key pad is displaying special characters Digits and symbols button Select to enter digits or symbols when the keypad is displaying standard charac...

Page 78: ...are shown in the function bar of the AccuScreen screens These functions vary from screen to screen To perform these functions simply press the relevant function button Function buttons Patient search Press the button Enter the patient s name Press the OK button to start the search Change search criteria Press the button If needed do so repeatedly until you see the category you wish to use The cate...

Page 79: ...nk See the AccuLink User Manual 10 4 1 Deleting one patient Available main functions are shown in the footer bar of the AccuScreen screens To perform these functions simply press the relevant button General buttons Return to previous screen Help Go to the Home screen OK Confirm Save Go to next field Go to next screen Toggle search criteria 1 To delete one single patient press the Delete button on ...

Page 80: ... wish to delete from the list 3 Press the button showing the name of the patient you wish to delete or search for a patient as described in 3 2 2 Finding a patient X 26 You will be prompted to confirm that you wish to delete this patient All test results relating to this patient will be deleted 4 Press the Home button to go to the Home screen 1 To delete all patients press the Delete button on the...

Page 81: ...andling Data in AccuScreen Deleting data You will be prompted to confirm that you wish to delete all patients All test results relating to all patients will be deleted 3 Press the Home button to go to the Home screen ...

Page 82: ...82 Otometrics Handling Data in AccuScreen Deleting data ...

Page 83: ...usually does not come into contact with the skin or secretion from the ear canal as it is covered by the eartip but you should check the channels in the probe tip every time you have used the probe Even small amounts of cerumen or vernix can block the probe channels or be deposited on the probe tip Warning If needed replace the probe tip with a spare one 11 1 1 Regular cleaning Caution You should ...

Page 84: ... the factory prior to delivery This is why there may not be a full year to the next calibration date as stated on the calibration certif icate when you receive AccuScreen The first time you connect the probe to AccuScreen and perform a test the calibra tion date will be set so that there is one year to the next calibration To view the next calibration date select Settings System info Before you pe...

Page 85: ...coupler cable from AccuScreen Caution Never immerse the ear coupler cable in liquid 2 Use a wet tissue with alcohol to clean the ear coupler cable and the ear coupler adapter Wipe only with disinfectants and make sure that liquid does not enter the ear coupler adapter 11 4 Cleaning AccuScreen Before cleaning switch off AccuScreen and unplug it from any external power source Unplug the probe from A...

Page 86: ...ct handling applying excessive charging current or reversing the poles can overcharge or destroy the battery Do not open alter or dismantle the battery Do not place the battery in contact with metal objects The terminals must under no circumstances be short circuited 11 5 2 Increasing service life Use only the battery type docking station and charger stated in App 3 4 Power supply and battery X 10...

Page 87: ...be recycled Caution Dispose of used battery promptly Caution Keep away from children Caution Do not disassemble and do not dispose of in fire Environmental protection When the Li Ion battery loses its capacity to be charged make sure that it is dis posed of according to local environmental regulations or return it to your dealer ...

Page 88: ...88 Otometrics Maintenance and Cleaning Battery safety and maintenance ...

Page 89: ...o associated warnings given in this man ual Please pay special attention to these warnings The instrument is marked with this symbol to indicate compliance with Type BF requirements of EN60601 1 This class of equipment is allowed in domestic establishments when used under the jurisdiction of a health care professional Classified with respect to electrical shock fire mechanical and other specified ...

Page 90: ...ked with this symbol when it is important that the user refers to associated warnings given in this man ual Please pay special attention to these warnings The docking station is marked with this symbol to indicate that it is suitable for direct current only The docking station and this manual are CE marked according to the Medical Devices Directive 93 42 EEC The docking station is marked with this...

Page 91: ...ntact between connected but unused applied parts and other conductive parts including those connected to protective earth Do not store or operate AccuScreen at temperatures and humidity exceeding those stated in Technical Specifications App 3 3 15 Operating environment X 103 Do not use the instrument in the presence of flammable anesthetics gases No parts may be eaten burnt or in any other way use...

Page 92: ...ainst original defects in material and workmanship It is also guaranteed to perform in accordance with the manufacturer s specifications for a full 2 years from the date of purchase The warranty does not apply to the battery to wear parts and disposable items This warranty only applies to those instruments purchased from authorized distrib utors or representatives The purchaser must return the ins...

Page 93: ... electronics engineer should verify the safety of all equip ment Calibration should be performed annually by suitably qualified personnel using the appropriate equipment App 1 6 1 Declaration All devices of the type AccuScreen should be checked and calibrated annually through a service center authorized by the manufacturer App 1 7 Manufacturer GN Otometrics A S 9 Hoerskaetten DK 2630 Taastrup T 45...

Page 94: ...ment is connected is grounded and complies with IEC requirements The equipment is used in accordance with the instructions for use The manufacturer reserves the right to disclaim all responsibility for the operating safety reliability and performance of equipment serviced or repaired by other parties ...

Page 95: ...via the Instrument Management tool in the AccuLink software The real time clock data is invalid Please set time and date The real time clock power backup has been completely drained Set the time and date Select Set tings Date and Time or syn chronize the unit with AccuLink Hardware failure Contact your supplier Real time clock error Self test error Contact your supplier Memory error Self test erro...

Page 96: ... There may be several causes the probe tip is blocked the test cavity is blocked the probe is damaged Make sure that the probe tip is clean and that the channels are not blocked Make sure that the test cavity is not blocked by e g dust lint or such Replace the probe with a spare one and carry out the probe test to establish if the probe is dam aged Speaker mismatch Too great a difference between s...

Page 97: ...r Messages Usage and test related messages Paper feed error The labels are not adjusted cor rectly in the label printer or there is a paper jam Re adjust the labels and remove possible blocking of paper feed Error message Cause Solution ...

Page 98: ...98 Otometrics App 2 Status and Error Messages Usage and test related messages ...

Page 99: ...le ABR version only ABR tester ABR version only Cleaning cloth User manual App 3 1 2 Optional accessories Label printer with printer cable ABR ear coupler cable External battery charger App 3 2 Device MADSEN AccuScreen is type 1077 from GN Otometrics A S App 3 3 Measurement techniques App 3 3 1 TEOAE 1 Standard accessories and optional accessories may vary from country to country please consult yo...

Page 100: ...n level noise level Sampling rate 24 kHz Evaluation method Noise weighted phase statistics Stimulus Primary tone pair f2 f1 1 24 Frame length 512 samples Available test frequencies Configurable f2 range 1 to 6 kHz Default test frequencies f2 2 3 4 and 5 kHz PASS at 3 out of 4 Test level l1 l2 59 50 dB SPL Display DPOAE level test progress noise level DP Gram Result display Overall PASS REFER DP Gr...

Page 101: ... 99 kΩ Impedance accepted for test 12 kΩ Impedance control Before test periodically during test stimulus contin ues during impedance control Display Statistical graph test progress EEG level ABR detection probability Electrodes Disposable hydrogel electrodes Approx 202 x 73 x 30 mm 8 x 2 8 x 1 2 inches Approx 240 g 8 5 oz excluding battery 280 g 9 9 oz including battery Type Color TFT touch screen...

Page 102: ...able in selected language package Patient memory capacity Max 250 patients Test memory capacity Min 500 tests OAE probe connector 14 pin ODU Medisnap For OAE Probe or ABR ear coupler cable ABR ABR version only 4 pin ODU Medisnap For ABR electrode cable Accuracy Max deviation 12 minutes year Backup Min 5 days when battery is removed from unit PC IR data transmission to docking station USB inter fac...

Page 103: ...0 C 4 140 F Humidity range 20 80 rel non condensing Air pressure 500 hPa to 1060 hPa Mode of operation Continuous Temperature range 10 40 C 50 104 F Humidity range 30 80 rel non condensing Air pressure 600 hPa to 1060 hPa 20 seconds Note Should be extended if MADSEN AccuScreen has been stored in a cold environ ment Otoacoustic emissions EN 60645 6 Type 2 Auditory evoked potentials EN 60645 7 Type ...

Page 104: ...om 3 70 V Max 4 20 V Min 3 20 V measured with device load Maximum battery power consumption 1 5 W while measuring Estimated battery life 8 hours of continuous use based on a typical use sce nario Actual use can influence the battery life time Battery level indicator 5 step battery level indicator Charge time in AccuScreen in docking station 80 charged 4 hours Fully charged 6 hours Battery type Rec...

Page 105: ... 5V 1 0 A Max power consumption when AccuScreen is not docked 0 25 VA 5V 50 mA Type Wall mount Input voltage range 100 240 V AC 50 60 Hz Output voltage 5 0 V DC Output current Minimum 1 0 A Mains plug types US UK Europe and Australia Type EP TE from PATH Medical Gmbh Type EP DP from PATH Medical Gmbh Flexible shielded cable approx length 120 cm approx 55 inches Probe body 20 mm Ø x 23 x 11 mm 0 8 ...

Page 106: ...ial safety precautions For this reason the installation and operating instructions provided in this document should be followed closely Portable and mobile high frequency communication devices such as mobile phones may interfere with the functioning of AccuScreen Probe incl probe tip Approx 4 5 grams Standard cylindric 4 sizes 3 7 5 mm Tree tip 1 size 4 7 mm Foam tip 1 size 13 mm Type AECS 01 from...

Page 107: ... 61000 4 8 3 A m 3 A m Power frequency magnetic fields should be at levels char acteristic of a typical location in a typical commercial or hospital environment Note UT is the AC power voltage prior to application of the test level Guidance and manufacturer s declaration electromagnetic immunity for equipment and systems that are not LIFE SUPPORTING AccuScreen is intended for use in the electromag...

Page 108: ...cation in which AccuScreen is used exceeds the applicable RF compliance level above the Accu Screen should be observed to verify normal operation If abnormal performance is observed additional measures might be necessary such as reorienting or relocating AccuScreen d Over the frequency range 150 kHz to 80 MHz field strengths should be less than 3 V m Recommended separation distances between portab...

Page 109: ...ce cleaning 85 preparing for testing 29 technical specifications 99 Display 15 error messages 95 Disposal device 90 eartips 85 old battery 87 DPOAE test process 45 E Ear coupler cable cleaning 85 connecting to AccuScreen 32 Ear couplers fitting 35 testing 70 Ear probe view 16 Eartips disposal 85 fitting on probe 34 Electrode cable connecting to AccuScreen 31 testing 69 Electrodes placing on patien...

Page 110: ... cable test 69 probe test 67 Quick test 59 R Recharging battery 20 Removing battery 18 Repair 93 Results Test view 56 S Safety information 89 Safety symbols 89 Screens AccuScreen Home menu 24 Settings 73 Status messages 95 T Technical specifications 99 TEOAE test process 38 Test cavity cleaning 85 Test environment 33 Test view 56 Testing preparing for t 29 Tests ABR process 50 DPOAE process 45 qui...

Reviews: