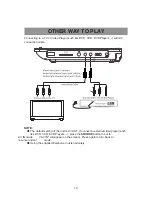
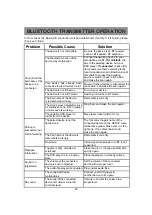
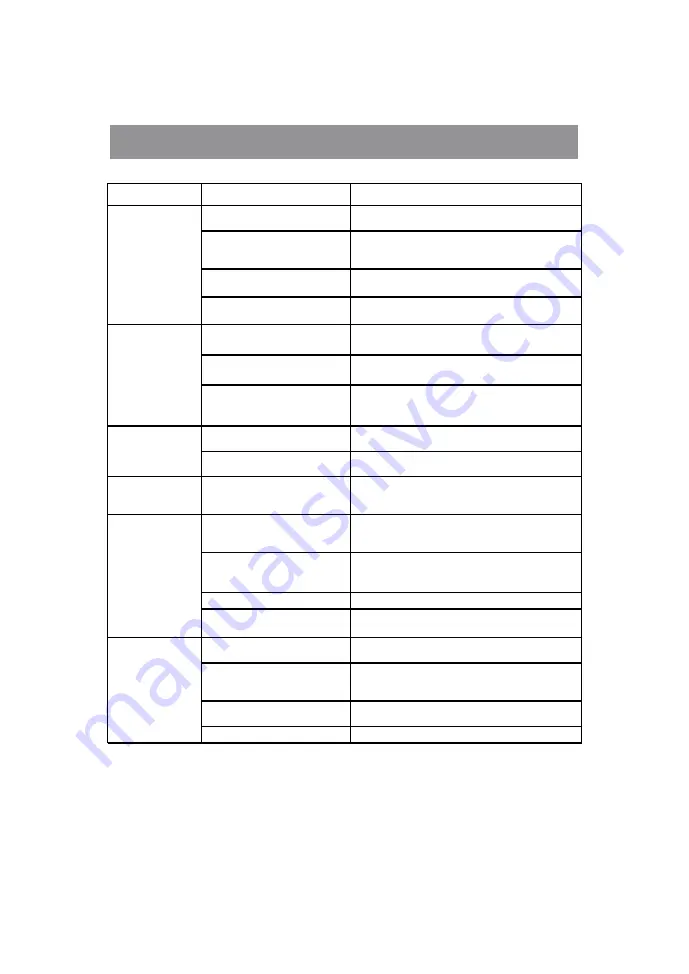
Otic HJ09JRB01 Manual Download Page 28

2

8

TROUBLESHOOTING

Problem

Possible Cause

Solutions

The power supply is not


connected.

Check the mains power plug connection at the


wall socket and ensure that it is switched on.

Power in the battery has run


out  (when  not  connected  to


power


supply)

Recharge the internal battery as mentioned in


the section of "Charing by AC/DC Adapter".

The player is switched off

Slide the POWER switch to ON position to turn


on the player

The player is in Standby mode Press "POWER" button on the remote control to


wake the player up from sleeping.

Display is turned off.

Press the LCD ON/OFF button on the unit or


remote control to turn on display.

The player (or the connected


device) is muted

Press the MUTE button on the remote (or on the


connected device) again to unmute it.

The volume (of the player or


the connected device) is set 
to

 minimum

Increase the volume of the player or the


connected device.

The disc is dirty, distorted or


scratched.

Clean the disc, or change another disc and try


again.

The DVD player is in a  bumpy


state.

Place the player on a steady surface.

Shut down
unexpectedly

Power in the battery has run


out  (when  not  connected  to


power


supply)

Recharge the internal battery as mentioned in


the section of "Charing by AC/DC Adapter".

The regional code of the


inserted disc is 

in

correct.

insert a region 1 disc instead. (The discs bo

u

ght


outside the USA and Canada have different


regional


codes,


and


thus


cannot


be


played

.

The disc is inserted 
placed


unp

ro

perly.

Check that the disc in the DVD/CD tray is the


correct label side up and that it is sitting


correctly within the recessed area of the tray.

The disc is dirty or scratched.

Clean the disc, or change another disc and try

The file format is not


supported in the USB/SD card

Make sure the files are supported by the player.

The batteries may be


exhausted.

Replace with new good quality batteries.

An obstacle between the


remote control and the remote


sensor


on


your


DVD


Player

Remove the obstacle.

Direct sunlight or other bright


light sources is shining,

Change another place.

Too far from the DVD player

Move closer to the DVD player. (within 5 m).

No power/No
response

No picture and/or
No sound

Unable to play

The remote control
is not working

Playback
interruption

Summary of Contents for HJ09JRB01

Page 1: ...MODEL HJ09JRB01 PLEASE READ CAREFULLY BEFORE OPERATING THIS EQUIPMENT KEEP IT IN A SAFE PLACE FOR FUTURE REFERENCE 9 INCH PROTABLE DVD CD PLAYER...

Page 2: ...ections 13 14 Swivel Panel 15 General Operations 16 17 USB or Card Playback 18 Other Way to Play 19 Bluetooth Transmitter Operation 20 22 Remote Control Operation 23 24 System Setup 25 27 Troubleshoot...

Page 3: ...LECTRIC SHOCK DO NOT EXPOSE THIS PRODUCT TO RAIN OR MOISTURE WARNING TO REDUCE THE RISK OF FIRE OR ELECTRIC SHOCK AND ANNOYING INTERFERENCE USE THE RECOMMENDED ACCESSORIES ONLY SURGE PROTECTORS It is...

Page 4: ...se harmful interference and 2 this device must accept any interference received including interference that may cause undesired operation RF Exposure Information The device has been evaluated to meet...

Page 5: ...e point where they exit from the apparatus 11 Only use attachments accessories speci ed by the manufacturer 12 Use only with the cart stand tripod bracket or table speci ed by the manufacturer or sold...

Page 6: ...g electrodes 20 Service Do not attempt to service this product yourself as opening or removing covers may expose you to dangerous voltage or other hazards Refer all servicing to quali ed service perso...

Page 7: ...e unit as it was originally packed at the factory Do not use volatile liquids such as insect spray near the unit Do not leave rubber or plastic products in contact with the unit for a long time They w...

Page 8: ...may occur If you use the DVD player in such a situation it may damage discs and internal parts Remove the disc connect the AC DC adapter to the DVD player and the wall outlet turn on the DVD player an...

Page 9: ...this setting on NTSC If incorrectly set to PAL the TV picture may roll vertically In this case set the TV system to NTSC Notes on Copyright It is forbidden by law to copy broadcast show broadcast on...

Page 10: ...channels Function depends on the disc feature 6 SOURCE Press to enter to AV IN mode press again to resume normal mode 7 Up Previous button Left Fast Rewind button Right Fast Forward button Down Next b...

Page 11: ...mote sensor 24 Bluetooth indicator 15 16 17 18 19 20 21 22 23 24 When the DVD player is connected to the power supply the indicator will turn on in red if the built in battery is not fully charged and...

Page 12: ...B SD button 10 TITLE MENU button 11 STOP button 12 AUDIO button 13 GOTO button 14 REPEAT button 15 SLOW button 16 LCD ON OFF button 17 Numeric buttons 18 SETUP button 19 Skip Previous button 20 Fast B...

Page 13: ...cessive charging or discharging may shorten the battery s life C Battery life naturally shortens slowly over time D The rechargeable battery incorporated in this product is not replaceable Charging by...

Page 14: ...e and Carbon Zinc or old batteries with fresh ones 4 If the device is not to be used for a long period of time remove the batteries to prevent damage or injury from possible battery leakage 5 Do not t...

Page 15: ...15 SWIVEL PANEL The viewing angle of the swivel panel can be adjusted as below as desired 90...

Page 16: ...tton to start playback from the beginning of the disc 4 Press the POWER button on the Remote Control to turn the player to standby mode The Bluetooth indicator will light in red Press the POWER button...

Page 17: ...selected tracks d If you want to delete a track in the left box just use or button to select it and then press OK button or ENTER button to delete it f To delete the whole program playback order list...

Page 18: ...Direction buttons to select and highlight the desired source then press the OK button to con rm 3 During playback Press the or button repeatedly to skip tracks Press the or button repeatedly to select...

Page 19: ...ection cable NOTE The default setting of the unit is AV OUT if connect to external video player such like DVD VCR DVR Players press the SOURCE button to set to AV IN mode AV IN will appear on the scre...

Page 20: ...m and turn it to BT mode Note that it must be disconnected from other audio video input devices via Bluetooth 2 Move your portable DVD player close to your home theater system keep the distance betwee...

Page 21: ...er or insert USB SD MMC card to relative slot and start to play like usual Now it s time to enjoy the audiovisual feast via your DVD player and home theater system BT SETUP BT CONTROL OTIC AEA7 BT LIS...

Page 22: ...cordless phone Wi Fi hotspot or micro oven is working Stop them and make the scan again The portable DVD player is too far from the device Move them closer within 10 m The paired device is not the des...

Page 23: ...sired language or channel Function depends on the recording of the disc ZOOM During movies playback press this button repeatedly to zoom in out the picture When in zoom mode press Direction buttons to...

Page 24: ...red playback time of track Press the GOTO button the third time using the Numeric and OK buttons to set the desired track A B Repeat During Playback press the A B button to select the starting point p...

Page 25: ...type of DVD disc that you plan to watch The AUTO setting is the default Power Resume There are two options available ON or OFF If you set the Resume feature to ON and play a disc that you have played...

Page 26: ...PASSWORD and then press OK Enter the default password of 0000 or the new password you have set and press OK 4 The lock symbol will change to be locked and your viewing rating is now password protected...

Page 27: ...display is for the TFT display You can change the display settings for the Brightness Contrast Hue and Saturation You can use the Up Down Left and Right buttons to highlight each option and then press...

Page 28: ...y state Place the player on a steady surface Shut down unexpectedly Power in the battery has run out when not connected to power supply Recharge the internal battery as mentioned in the section of Cha...

Page 29: ...ut continuously and correctly If the CUSTOM window does not pop out after input it indicates the numbers input is not correct or the input speed is too long If this happens just wait for no less than...

Page 30: ...ight lines from the center of the disc to the outer edge of the disc Never wipe in circular motions Discs should be stored in their cases to avoid damage after use Do not expose discs to direct sunlig...

Page 31: ...hours Playback time about 5 hours Speaker output 3 27V 1 34W 1K0dB VOL Max Bluetooth version 5 0 Bluetooth connection range 10m on the line of sight 1 x User s Manual 1 x AC DC Adaptor 1 x Remote Con...

Page 32: ...ivel 180 degrees 2 Put the strap on the operation panel Done 3 Fasten the loop and hook at the bottom 4 Put the strap across headrest frame 5 Put one end of strap across the lock 6 Pull the strap at t...

Reviews: