1270447_3
22
EN | Installation
Wall mounted HERU 100 and 160 T
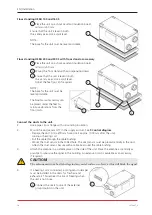
1.
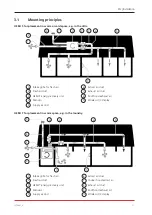
Install HERU T with the duct connections upwards (A) or to the side with the doors upwards (B).
WARNING!
Do not install the unit with the duct connections or the doors down toward the ground due to
the risk of injury.
CAUTION
The unit must be mounted on an insulated wall. Avoid walls to bedrooms.
NOTE!
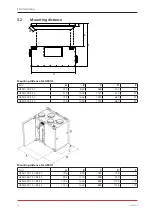
Ensure that there is space for service and maintenance. See
3.2 Mounting distance
.
1 Secure the self-adhesive rubber pads in
the rear lower corner with one rubber pad
in each lower corner (HERU T 100, 160)
and one in the middle (HERU 160 T).
2 Remove the screws (3 for HERU 100 T,
4 for HERU 160 T) and remove the
wall console from the HERU unit.
3 Secure the wall console horizontally on
the insulated wall with the correct
number and type of fastener. The screw
hole in the wall console must be posi-
tioned 27 mm above the top of the unit.
2.
Angle the lower section of the unit away
from the wall, suspend the unit on the console
and allow the unit’s lower section to fall back against the wall.
3.
Adjust the unit sideways to achieve the correct position.
4 Ensure that the self-adhesive rubber pads have good contact with the wall.
5 Secure the unit on the wall console with the accompanying screws (3 screws for HERU 100 T
and 4 screws for HERU 160 T).
1
2
3
5
4
Summary of Contents for HERU 100 S EC
Page 2: ......
Page 3: ...1270447_3 3 INSTALLATION EN 5 INSTALLATION SE 47 INSTALLASJON NO 91 ...
Page 42: ...1270447_3 42 EN Connections main board 9 Connections main board ...
Page 86: ...1270447_3 86 SE Anlutningar huvudkort 9 Anlutningar huvudkort ...
Page 130: ...1270447_3 130 NO Tilkoplinger hovedkortet 9 Tilkoplingar hovedkortet ...
Page 134: ......
Page 135: ......

