background image

Adjustment of the brake

When your ORTHOSCOOT

®

 is delivered, the brake system has already been properly adjusted by us. You may use 

your ORTHOSCOOT

®

 without any further precautions.

When the device is used, there will be wear and abrasion. As a consequence, it is necessary to adjust the cable 

pull again. The way of driving and the load profile may accordingly reduce this interval. New brake pads also requi-

re that the cable pull is adjusted as soon as the brakes have been bedded in.

During the whole period of use, please observe any possibly changes with respect to the response characteristic 

of the brake system. With the help of the following explanations, technically experienced users may easily carry 

out these settings themselves.

Please read the following steps carefully and take all the time you need for the setting. In contrast to the abo-

ve-mentioned setting of the handlebar and knee pad, there is only one correct setting with respect to the brake 

which has to be determined. As soon as you are uncertain whether you understand the explanations correctly and/

or whether you know what to do or not, please contact and consult the authorized specialty stores or even com-

pletely charge them with construction. A brake which technically and ergonomically fits your needs perfectly is 

essential for your safety and a correct handling.

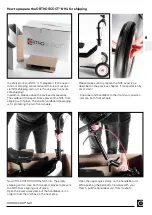
The brake must always be set in such a way that the rear wheel is blocked when the brake lever is pulled. 

Furthermore, with the same setting, the brake must be triggered by operating the locking mechanism and the rear 

wheel must be locked and consequently, any rolling away on sloping undergrounds must be excluded.

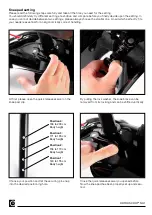
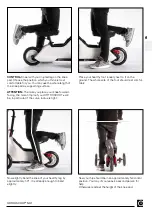
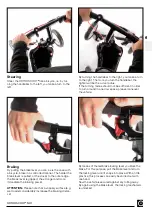
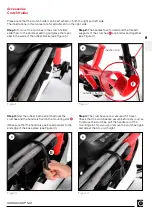
At first turn the lock nut at the brake lever up to the 

stop against the adjusting screw. 

Please do not use any tools for this purpose, just firm-

ly tighten it with your hand.

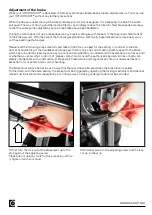
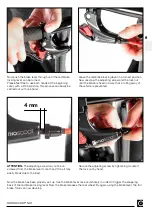
Afterwards screw in the adjusting screw and the lock 

nut up to the stop.

ORTHOSCOOT

®

 NH1

40

Summary of Contents for NH1

Page 1: ...NH1 Bedienungsanleitung NH1 user manual L A N D E S M A R K T M A R K E T D E U T S C H L A N D D E EN ...

Page 2: ...OT GmbH stellt diese Publikation und evtl Ergänzungen online als PDF Download zur Verfügung www orthoscoot com support downloads html 5 Auflage Copyright 2018 ORTHOSCOOT GmbH Neusäß Vogelsang www orthoscoot com Alle Rechte vorbehalten Der ganze oder teilweise Abdruck sowie die elektronische oder mechanische Vervielfältigung gleich welcher Art sind nicht erlaubt Abdruckgenehmigungen für Fotos und T...

Page 3: ...ORTHOSCOOT NH1 DE 01 ...

Page 4: ...ng Erklärung der Bauteile Seite 08 Aufbau und Einstellung des ORTHOSCOOT NH1 auf den Anwender Aufbau des NH1 Seite 11 Lenkereinstellung Seite 12 Kniepolstereinstellung Seite 14 Justierung der Bremse Seite 16 Die erste Fahrt mit dem ORTHOSCOOT NH1 Grundlegendes Fortbewegung Seite 17 Lenkung Bremsen Seite 18 Transport und Versand des ORTHOSCOOT NH1 Transport in PKW und Bahn Seite 19 So bereiten Sie ...

Page 5: ...und Bremshülle Lenker Vorbaueinheit und Kniepolsterstütze Kugellager Kugelköpfe und Steuersatz Seite 23 Wiedereinsatz Wartungsplan Lagerungs und Betriebsbedingungen Entsorgung Gewährleistungen und Garantiebestimmungen Seite 24 Technische Daten Packmaß Materialangaben und Eigenschaften Typenschild und Seriennummer Geräuschentwicklung Lebens und Nutzungsdauer Hersteller Seite 25 Zubehör Gehstützenha...

Page 6: ...nen Schwere Weichteilverletzung an Fuß und Sprunggelenk Komplexe Bandverletzungen von Fuß und Sprunggelenk Amputation auf Höhe distaler Unterschenkel Sprunggelenk Mittelfuß oder Zehen Osteochondrale Verletzung an Sprunggelenk oder Fußwurzel Nach Operationen am Fersenbein oder anderen Fußwurzelknochen Nach schwerwiegenden operativen Eingriffen am Vorfuß Nach Korrektur von schweren Fußdeformitäten K...

Page 7: ...er Sonne geparkten Fahrzeuges gelagert wurde Vermeiden Sie den Kontakt mit einer offenen Flamme oder Zigarettenglut Achten Sie darauf dass die Maximallast von 4 kg des Stauraumes nicht überschritten wird Beladen Sie den Stau raum nicht mit spitzen Gegenständen und oder Gefahrengut jeglicher Art Ferner ist der Transport von Lebewesen z B Kleintiere strengstens untersagt Im Straßenverkehr ist die St...

Page 8: ...en Reparaturen sind nur von der ORTHOSCOOT GmbH selbst durchzuführen Das Produkt ist gemäß unseren Bestimmungen regelmäßig zu reinigen immer jedoch bei jedem Patientenwechsel Konformitätserklärung Die Firma ORTHOSCOOT GmbH erklärt in alleiniger Verantwortung die Konformität für die ORTHOSCOOT NH1 Serie gemäß der europäischen Richtlinie für Medizinprodukte Lieferumfang 1 ORTHOSCOOT NH1 1 Bedienungs...

Page 9: ...22 03 08 09 02 01 10 04 05 06 07 17 18 16 15 12 13 14 21 19 20 ORTHOSCOOT NH1 DE 07 ...

Page 10: ...zum Anschlag ein Setzen Sie den Lenker in den Lenkerschaft ein Ach ten Sie darauf dass der silberne Kugelkopf in eines der Positionslöcher einrastet Schließen Sie den oberen Schnellspannhebel um den Lenker zu fixieren Nach dem Herausheben des NH1 aus der Verpackung werden zuerst die beiden Vorderräder montiert ACHTUNG Beide Vor derräder sind besonders gekennzeichnet Beach ten Sie bitte unbedingt d...

Page 11: ...chert Überprüfen Sie zur Sicherheit den festen Sitz noch einmal indem Sie versuchen mit beiden Händen das Rad aus der Führung zu ziehen Klappen Sie die Lenkereinheit nach oben Verriegeln Sie die Lenkereinheit indem Sie durch Um legen des Schnellspannhebels diesen auf Spannung bringen Sobald dieser völlig geschlossen ist springt der seitliche rote Sicherungsknopf heraus Der Verschluss ist nun gesic...

Page 12: ... Klappen Sie nun die Lenkereinheit wieder nach oben und schließen Sie den Schnellspannhebel erneut Die Spannung ist dann richtig wenn sich der Hebel mit leicht erhöhtem Druck bis zum Ende umhebeln lässt Alle übrigen Schnellspanner ohne roten Knopf am NH1 lassen sich nach dem gleichen Prinzip mithilfe einer Stellmutter justieren Sollte sich der Schnellspannhebel zu leicht oder gar nicht schließen l...

Page 13: ...s Ein perfekt auf Ihre Bedürfnisse eingestelltes Hilfsmittel ist ausschlaggebend für eine ergonomisch korrekte Hand habung Öffnen Sie zuerst den oberen Schnellspanner zwi schen T Lenkereinheit und Lenkerschaft Am Lenkerschaft befinden sich vier verschiedene Positionslöcher Durch Drücken des Kugelkopfes kann die T Lenkereinheit aus ihrer Arretierung gelöst und vertikal verschoben werden Stellen Sie...

Page 14: ...stelltes Hilfsmittel ist wichtig für eine ergonomisch korrekte Handhabung Öffnen Sie bitte zuerst den Schnellspanner an der Kniepolster Klemme Durch Ziehen der Sicherungsscheibe kann die Knie polster Stütze aus ihrer Arretierung gelöst und verti kal verschoben werden Wählen Sie Ihre Position und lassen Sie den Siche rungszapfen wieder in das gewünschte Positionsloch einrasten Schließen Sie den zuv...

Page 15: ...nie und damit Ihren Schwerpunkt platzieren desto weniger neigt Ihr NH1 bei Kurvenfahrten zum Kippen Den gesunden Fuß stellen Sie locker daneben auf den Boden Die gesamte Fußsohle soll bequem aufliegen Gehen Sie nun mit Ihrem gesunden Bein etwa 10 in die Knie Ein leichtes Einknicken genügt bereits Ihre Hüfte sollte jetzt in etwa waagerecht ausgerich tet sein Ziehen Sie hierzu gerne eine zweite Pers...

Page 16: ... als bei der vorangegangenen Einstellung von Lenker und Kniepolster gibt es bei der Bremse nur eine korrekte Einstellung die es zu ermitteln gilt Sobald Sie unsicher in Verständnis und oder Ausführung sind ziehen Sie unbedingt den autorisierten Fachhandel zurate oder beauftragen ihn komplett mit der Ausführung Eine technisch sowie ergonomisch perfekt auf Ihre Bedürfnisse eingestellte Bremse ist be...

Page 17: ...die Bremse gerade so fest ist dass sie ein Wegrollen des Fahrzeuges verhindert ACHTUNG Die Stellschraube darf nicht über 2 3 aus dem Bremshebel herausgedreht werden da diese sonst unter Belastung leicht abbrechen kann Sichern Sie die Stellschraube durch handfestes Gegen drehen Kontern der Kontermutter Die Bremse ist nun ordnungsgemäß eingestellt Betätigen Sie einmal kräftig den Bremshebel um das Z...

Page 18: ...ermeiden Sie un bedingt hastige Manöver gleich welcher Art Sie bewegen nun ein Fahrzeug und tragen somit eine höhere Verant wortung Bei aller neu gewonnenen Mobilität bedenken Sie stets dass Sie eine physische Einschränkung haben und handeln Sie diesen Umständen entsprechend ACHTUNG Der NH1 ist kein Sportgerät und nicht für hohe Geschwindigkeiten ausgelegt Befahren Sie kein star kes Gefälle und la...

Page 19: ...tärker greift die Bremse ACHTUNG Beachten Sie dass ein rutschiger Un tergrund z B regennasse Fahrbahn den Bremsweg erheblich verlängert Mittels des roten Bremsenfeststellhebels können Sie die Bremse blockieren Ziehen Sie hierfür den Brems hebel an und legen den Feststellhebel um bis dieser einrastet Mit etwas Übung geht dieser Vorgang spielend mit einer Hand vonstatten Das Fahrzeug ist nun gegen W...

Page 20: ...freien Hand den roten Gummi knopf bis zum Anschlag ein um das Rad zu entsper ren Zeitgleich schieben Sie mit dem Daumen der anderen Hand das Rad axial nach außen um den Verschluss dauerhaft zu lösen Das Rad ist nun frei kann ab gezogen werden Um den NH1 für den Transport auf ein möglichst kleines Packmaß zu reduzieren stellen Sie sowohl das Kniepolster als auch den Lenker auf die jeweilige Minimal...

Page 21: ... zu können Öffnen Sie den oberen Schnellspanner an der T Len kereinheit Drücken Sie den Kugelkopf mit dem Daumen ein und ziehen Sie gleichzeitig die T Lenke reinheit aus dem Schaft Um Ihren NH1 sicher einzulagern oder für den Trans port bzw Versand vorzubereiten bitten wir Sie aus schliesslich den NH1 Versandkarton zu verwenden Nur so wird ein sicherer Transport gewährleistet Verwenden Sie bitte a...

Page 22: ...n Sie nun wie bebildert in den in Fahrtrichtung linken Transportkeil aus Karton legen Achten Sie bitte auf einen knickfreien Verlauf des roten Bremskabels Den Lenkerschaft klappen Sie bitte wie bebildert voll ständig in den Innenbereich der Transporttasche ein Verwenden Sie bitte die kleine Kartonage zum Verpa cken der beiden Vorderräder und schieben Sie diese wie bebildert in den in Fahrtrichtung...

Page 23: ...n verweisen wir auf handelsübliche Produkte VAH RKI gelistet zwingend ohne Zusätze von Chlo riden Wie macht sich Verschleiß bemerkbar und was ist zu tun Der NH1 wurde für eine langfristige Nutzung konzipiert und ist für den Mehrfacheinsatz ausgelegt Obwohl bei der Entwicklung besonderen Wert auf die Auswahl wartungsfreundlicher Bauteile gelegt wurde unter liegen einige Bauteile natürlichem Verschl...

Page 24: ...en Belastung dieser Bauteile Kontrollieren Sie diese regelmäßig Ein Austausch ist zwingend notwendig sobald Verformungen oder Risse zu erkennen sind Steuersatz Kugellager und Kugelköpfe Bei beweglichen Teilen kommt es generell immer zu Reibung zwischen den Bauteilen Je nach Intensität der Nutzung bzw Wahl des Einsatzbereiches schreitet der Verschleiß schneller fort was bis zu einem totalen Funk ti...

Page 25: ...von 24 Monaten eine Gewährleistung Diese Gewährleistung deckt keine Unfall oder Folgeschäden wie Verletzungen oder Verluste ab die durch falsche Montage unsachgemäße Wartung und oder Reparatur Missbrauch Nutzung im falschen Einsatzbereich Unfall oder Verschleiß entstehen Wir behalten uns das Recht vor Produkte Bauteile und Komponenten die nicht mehr ersetzt werden können oder lieferbar sind durch ...

Page 26: ...m einzustufen Auf festem ebenem Untergrund entwickelt er einen durchschnitt lichen Dauerschallpegel von 20 bis 30 Dezibel Dies entspricht in etwa leisem Flüstern Tel 49 0 821 71 01 99 20 Fax 49 0 821 71 01 99 40 E Mail info orthoscoot com Web www orthoscoot com Hersteller ORTHOSCOOT GmbH Gessertshausener Straße 2 86356 Neusäß Vogelsang Deutschland Sie sind die erste Person die das hier liest Das T...

Page 27: ...n Mittrans port befestigt Überprüfen Sie dennoch vor jeder Fahrt den sicheren Sitz und Halt der Gehstützen Für die Entnahme der Gehstützen ziehen Sie den Haltegriff der Riemen aus dem Befestigungsschlitz Nun können Sie die Gehstützen wieder entnehmen und auf Ihre Körpergröße einstellen Abbildung 1 1 Schritt 2 Die Griffe zeigen hierbei nach vorne die Unterarmstützen der Gehstützen sind ineinander g...

Page 28: ...es this publication and possible additions available online as PDF download www orthoscoot com support downloads html 5th edition Copyright 2018 ORTHOSCOOT GmbH Neusäß Vogelsang www orthoscoot com All rights reserved Any reprint in whole or in part and any electronic or mechanical reproduction of whatever kind is prohibited Permission to reproduce photos and texts of the user manual of ORTHOSCOOT ...

Page 29: ...ORTHOSCOOT NH1 EN 27 ...

Page 30: ...onents Page 34 Assembly and setting of the ORTHOSCOOT NH1 to the user Assembly of the ORTHOSCOOT NH1 Page 37 Handlebar setting Page 38 Knee pad setting Page 40 Adjustment of the brake Page 42 Your first ride with the ORTHOSCOOT NH1 Basics Mobility Page 43 Steering Braking Page 44 Transport and shipment of the ORTHOSCOOT NH1 Transport by car and train Page 45 How to prepare the ORTHOSCOOT NH1 for s...

Page 31: ...le and outer casing of the brake cable Handlebar stem unit and knee brace ball bearing ball heads and control set Page 49 Reuse Maintenance schedule Storage and operating conditions Disposal Warranty and guarantee provisions Page 50 Technical data Pack size Information about material and characteristics Nameplate and serial number Noise development Service and operating life Manufacturer Page 51 A...

Page 32: ...nkle joint complex injuries of the ligaments of foot and ankle joint amputation at the level of distal lower leg ankle joint midfoot or toes osteochondral injury to ankle joint or tarsus after operations to the calcaneus or other bones of the tarsus after serious operative surgery on the forefoot After correction of serious foot deformities club foot flat foot cavovarus foot Contraindication when ...

Page 33: ... any contact with an open flame or cigarette glow Please ensure that the maximum load of the storage space of 4 kg is not exceeded Do not load the storage space with sharp objects and or dangerous goods of any kind Furthermore it is strictly prohibited to transport living beings e g small animals On the road the road traffic regulation Straßenverkehrsordnung StVO must be observed The NH1 is equipp...

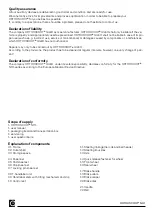
Page 34: ... only to be carried out by ORTHOSCOOT GmbH According to the provisions the product has to be cleaned at regular intervals however on every change of pati ent Declaration of conformity The company ORTHOSCOOT GmbH under its sole responsibility declares conformity for the ORTHOSCOOT NH1 series according to the European Medical Device Directive Scope of supply 1 ORTHOSCOOT NH1 1 user manual 1 packagin...

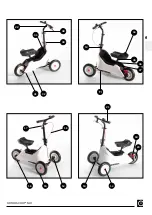
Page 35: ...22 03 08 09 02 01 10 04 05 06 07 17 18 16 15 12 13 14 21 19 20 ORTHOSCOOT NH1 EN 33 ...

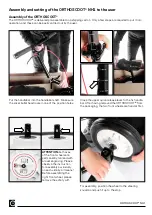
Page 36: ...h it up to the stop Put the handlebar into the handlebar shaft Make sure the silver bullet head locks in one of the position holes Close the upper quick release lever to the fix handle bar After having removed the ORTHOSCOOT from the packaging the two front wheels are fixed at first ATTENTION both axes of the front wheels are permanently marked with a laser en graving Please observe the instructio...

Page 37: ...ure safety please check again the tight seat by trying to pull the wheel out of its position with both hands Now place the ORTHOSCOOT with all three wheels on the ground and fold the handlebar unit upwards Lock the handlebar unit by turning the quick release lever and tension it As soon as it is completely lo cked the red safety knob at the side jumps out Now the fastener is secured ORTHOSCOOT NH1...

Page 38: ...bar unit upwards again and close the quick release lever once more The tension is correct if the lever can be levered until the end with slightly in creased pressure All other quick release clamps without red button on the NH1 can be adjusted according to the same principle using a lock nut If the quick release lever can be closed too easily or not at all open it once more and readjust the adjusti...

Page 39: ...y fits your needs is essential for an ergonomically correct handling At first open the upper quick release skewer between the T handlebar unit and the handlebar stem Four different positioning holes are placed on the handlebar stem By pressing the ball head the T handlebar unit can be removed from its locking and can be shifted vertically Adjust the handlebar to your height and ensure that the bal...

Page 40: ...an ergonomically correct handling At first please open the quick release skewer on the knee pad clip By pulling the lock washer the knee brace can be removed from its locking and can be shifted vertically Choose your position and let the securing pin snap into the desired positioning hole Close the quick release skewer you opened before Now the knee pad has been properly set up and secu red Positi...

Page 41: ... your ORTHOSCOOT will be in particular if the curve radius is tight Place your healthy foot loosely next to it on the ground The whole sole of the foot should rest comfor tably Now slightly bend the knee of your healthy leg by approximately 10 It is already enough to bend slightly Now your hip should be in an approximately horizontal position You may of course ask a second person for help Otherwis...

Page 42: ...d setting of the handlebar and knee pad there is only one correct setting with respect to the brake which has to be determined As soon as you are uncertain whether you understand the explanations correctly and or whether you know what to do or not please contact and consult the authorized specialty stores or even com pletely charge them with construction A brake which technically and ergonomically...

Page 43: ...s fixed in a way that a rolling away of the vehicle is prevented ATTENTION The adjusting screw may not be un screwed from the brake lever more than 2 3 as it may easily break due to the load Secure the adjusting screw by tightening counter the lock nut by hand Now the brake has been properly set up Use the brake lever once and sharply in order to trigger the snapping back of the red brake locking ...

Page 44: ...ving and absolutely avoid hasty maneuvers of any kind Now you move a vehicle and therefore bear a greater responsibility Despite your new mobility please always keep in mind your physical restriction and act according to the circumstances ATTENTION The ORTHOSCOOT is not a piece of sports equipment and not designed for high speed riding Do not run at steep incline and don t get pulled from other ve...

Page 45: ... gripped the stronger and more immediate the braking power ATTENTION Please note that a slippery surface e g wet roads considerably increases the braking distan ce By means of the red brake locking lever you block the brake For this purpose pull the brake lever and turn the locking lever until it snaps into place With a little practice this process can easily be carried out with one hand Now the v...

Page 46: ...e stop with your free hand in order to unlock the wheel Simultaneous ly axially push the wheel outwards with the thumb of your other hand in order to permanently unlock the fastener Now the wheel is free and can be removed In order to reduce the ORTHOSCOOT to a pack size which is as small as possible to enable transportati on set the knee pad as well as the handlebar to their respective minimum po...

Page 47: ... in the next step Open the upper quick clamp on the handlebar unit While pushing the ball button inwards with your thumb pull the handlebar unit from its shaft To safely store your NH1 or to prepare it for transpor tation or shipping we recommend the use of our spe cial NH1 shipping carton It is the only way to ensure safe shipping In addition please use all the enclosed accessories The cardboard ...

Page 48: ...rated Please en sure that there are no kinks in the red brake cable and that it is not folded Make sure to fully fold back the handlebar shaft into the interior of the transport bag as illustrated Please use the small cardboard packaging for packing the two front wheels and push the packaging into the right transport block as illustrated Close the packaging by first folding the two smaller side fl...

Page 49: ... refer to commercial products VAH RKI listed always without chloride additives Tires Due to abrasion wheels are subject to natural wear and tear Condition of the road surface weight of the user and period of use are factors which have a sometimes strong impact on this process Compared to the rear wheel the front wheels are less subject to wear and tear However there may be increased abrasion due t...

Page 50: ...riving these components will be dynamically loaded Check them at regular intervals As soon as deformations or cracks are visible it is necessary to replace these components Control set ball bearing and ball heads With respect to movable parts there is usually friction between the components Depending on the intensity of use or the places where the device is used wear and tear proceeds more quickly...

Page 51: ...period of 24 months from the date of issue This warranty does not cover accidental or consequential damages such as injuries or losses resulting from incor rect assembly improper maintenance and or repair misuse use in unsuitable areas accident or wear and tear We reserve the right to replace products parts and components which can no longer be replaced or which are no longer available by equivale...

Page 52: ...elopment The ORTHOSCOOT NH1 produces a very low level of noise On firm level ground it produces an average conti nuous sound pressure level of 20 to 30 decibels This is the equivalent of a low whisper The nameplate of the ORTHOSCOOT NH1 is perma nently fixed to the left hand side in the driving directi on of the frame It contains data from the manufactu rer and a reference to the serial number Und...

Page 53: ...he crutches are now secured for travel Check that the crutches are secure before any journey To remove the crutches pull the handle out of the mounting slot Now you can remove the crutches again and adjust them to your height Figure 1 Step 2 The handles face forward and the forearm supports of the crutches are interlocked together see Figure 2 Step 1 To mount the crutches in the crutch holder slid...

Page 54: ...ORTHOSCOOT NH1 52 ...

Page 55: ...ORTHOSCOOT GmbH Gessertshausener Straße 2 86356 Neusäß Vogelsang GERMANY Tel 49 0 821 71 01 99 20 Fax 49 0 821 71 01 99 40 info orthoscoot com www orthoscoot com ...

Page 56: ......
Reviews: