background image

PROFESSIONAL

SuRvEILLANcE SYSTEM

14

eight channel digital video recorder  

SC184

19  system > encode conFig

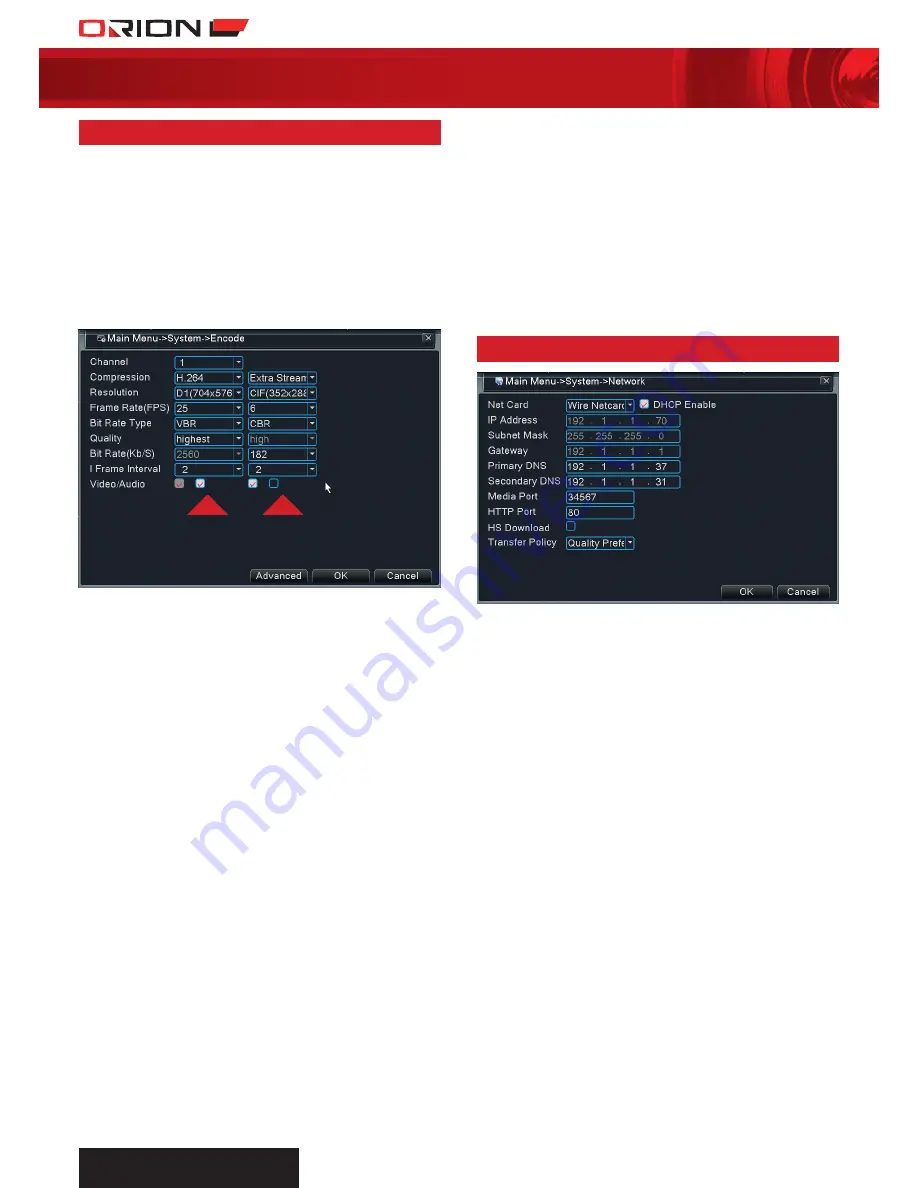
Encode config allows configuration of the quality video streams 

are encoded and recorded. The DVR allows two different 

channels of compression.

›  

Main sTreaM

 is for the video streams that are displayed 

and recorded by the DVR. Main stream has the best quality 

for local viewing.

›  

exTra sTreaM

 is for the video streams transmitted 

through the network to mobile devices or remote PC. The 

subtream usually has poorer quality to keep the files small, 

making it easier to transmit through network and ensure a 

smooth video stream.

MAIn 

STREAM

ExTRA 

STREAM


channel:

 Video channel that is being configured. This 

number corresponds to the BNC video input on the rear 

panel of the DVR.


resoluTion: 

Number of pixels in the video. There are 

three resolution settings which are D1, HD1 and CIF. It is 

recommended to encode all eight channels in D1 resolution 

in main stream and CIF resolution in Extra Stream.
>  Resolution of D1 is (704x480 NTSC and 704x576 PAL). 
>  Resolution of HD1 is (704x240 NTSC and 704x288 PAL). 
>  Resolution of CIF is (352x240 NTSC and 352x288 PAL). 


FraMe raTe (Fps):

 Number of images frames that are 

recorded by the DVR per second. The higher the number, 

the smoother the video and higher data transmission.


biT raTe Type:

 There are 2 types of bit rate which are 

Variable Bit Rate (VBR) and Constant Bit Rate (CBR).
>  VBR encoding data consumption can vary by the amount 

of data usage over time according to requirement. It 

allocates higher bit rate to more complex recordings 

such as one with a lot of movement in view. Conversely, it 

allocates lower bit rate to recordings with no movements. 

It is recommended to use VBR for Main Stream as the DVR 

can manage the allocation of data on the hard disk wisely.

>  CBR encoding data consumption is always constant per time. 

CBR is useful when transmitting data over limited capacity 

channels such as networks over the internet. The disadvantage 

of CBR is that complex recordings may lose some information 

and form fuzzy blocks on the video stream. It is recommended 

to use CBR for Extra Stream as it can ensure a constant 

stream of video over the internet to remote devices.


QualiTy:

 Quality of the video recording. When VBR is 

selected, there are 6 quality options of the video stream.


biT raTe:

 Amount of data transmitted over time. The quality 

of video recording directly correlates to the bit rate. The higher 

the bit rate, the higher quality the video recording. When CBR 

is selected, there are 6 bit rate options of the video stream.


ViDeo/auDio:

 Check the box to enable video or audio 

recording.


aDVanceD:


up WinDoW: 

Return to previous menu.

shoW DeskTop: 

Exit to main monitoring display screen.

copy: 

Copy current channel settings. 

pasTe: 

Paste copied channel settings.

DeFaulT: 

Restore default settings.

20 system > network

Network menu allows the configuration of basic network settings.


neT carD: 

DVR


networking module.


Dhcp:

 Dynamic Host Configuration Protocol is a networking 

function that automatically acquires IP address from a device 

in the same network, usually a router. DHCP is usually used 

in networks with a lot of devices which makes IP address 

management a complex task. All devices in a network need 

to own a unique IP address for them to function properly. 

DHCP is enabled by default so the following settings will be 

acquired automatically.


ip aDDress:

 IP address is a set of numbers that determine 

the address of the DVR in the local network. This number 

is used to locate the DVR in the network when trying to 

access it with another device. This DVR uses IPv4 addressing 

where the IP address consists of four sets of numbers (0-255) 

separated by a period.


subneT Mask:

 This refers to a subdivision of a local IP 

network. Subnet mask works in conjunction with IP address 

and splits the address into 2 parts which are network prefix 

and host identifier. If IP address is 192.168.1.100 and subnet 

mask is 255.255.255.0, the network prefix is 192.168.1.0 and 

the host identifier is 0.0.0.100. 


gaTeWay: 

IP address of the router in the local network that 

communicates with the larger network, the internet. 


priMary Dns:

 Domain Name Server translates the IP address 

of a device such as 192.168.1.100 into a domain name 

such as mydvr.orionlive.com.au. A Domain Name Server is 

required for this functionality. For advanced users only.


seconDary Dns:

 Backup Domain Name Server. In any 

case that communication with primary DNS fails, the DVR will 

Summary of Contents for SC184

Page 1: ... surveillance SYSTEM 1 tb HARD DRIVE store up to 45 days of continuous recording D1 Resolution REAL TIME HIGH RESOLUTION RECORDING LIVE REMOTE MONITORING THROUGH SMARTPHONES TABLETS PCs eight CHANNELS monitor and record with up to 8 high definition cameras 20 days recording on default settings 45 days recording on low settings SUPPORTS UP TO 8 CAMERAS ...

Page 2: ...ne User 23 index Page page 34 Advanced Output Adjust 23 35 Advanced auto maintain 23 36 Advanced Restore 24 37 Advanced Upgrade 24 38 Advanced Device Info 24 39 Advanced Import Export 25 40 Info HDD info 25 41 Info BPS 26 42 Info Log 26 43 Info Version 26 44 Logout 26 45 Cms Introduction 27 46 CMS login 27 47 CMS MAin interface 27 48 cms Add DVR 27 49 CMS Live monitoring 29 50 CMS Channel Control ...

Page 3: ...the DVR 1 Introduction 2 Installation Guidelines CAMERA 600TVL HIGH definition CAMERA SENSORS NIGHT VISION 24 POWERFUL INFRA RED LEDS FOR NIGHT VISION OF UP TO 20 METRES IP66 RATING WEATHERPROOF CAMERA CASING WITH IP66 RATING DIGITAL VIDEO RECORDER SMARTPHONE TABLET PC LIVE REMOTE MONITORING EIGHT CHANNELS MONITOR AND RECORD with up to 8 HIGH DEFINITION CAMERAS VGA HDMI EASY CONNECTION TO MONITOR ...

Page 4: ...revious menu INFRA RED RECEIVER Picks up signals from remote control Front Panel Connect the other end of video power cable Bnc connector only to Bnc video input on Dvr rear panel Connect the other end of video power cable dc connector only to power splitter 1 6 7 8 9 2 Connect camera to video power cable Connect monitor to DVR VGA or HDMI video output Connect mouse to DVR USB input Connect router...

Page 5: ... and input corresponding dvr number to enable remote control RECORD Bring up the Record Mode menu PLAYback CONTROL vga video output HDMI video output Network port power switch audio output audio input composite output video USB 2 0 ports alarm and PTZ port Rear Panel VIDEO INPUT power input Alarm Input Port Specifications 4 channel alarm input Alarm device COM and ground ports are parallel DVR and...

Page 6: ...ra lost g Sound Toggle channel sound output h Tour Toggle tour function i Toolbar Main Menu PTZ Control Record mode Color Setting Logout Output Adjust Single view Playback Quad view Interactive Live monitoring Click and drag a box in a particular section of the video channel for digital zoom Double click any channel to view it in full screen Right click anywhere on the screen to bring up toolbar f...

Page 7: ...in menu 8 Menu Layout Logout Shutdown Reboot Version BPS Log HDD Info Auto Maintain Restore Upgrade Device Info Import Export HDD Manage Account Online User Output Adjust GUI Display PTZ Config RS232 General Encode Network Alarm Input Motion Detect Video Blind Video Loss Abnormality Alarm Output Record Conf record Backup Playback ...

Page 8: ... Copy current channel settings paste Paste copied channel settings Default Restore default settings HDD manage Open HDD Manage menu 10 Record Playback Playback allows browsing of recorded video footages in local hard drive or external storage devices It is recommended to play one channel at a time to get the best video quality Playback recorded videos a Record Source Select source of recording fil...

Page 9: ...or storage devices connected with DVR b Select file to delete c Select Erase to clear selected files 12 ALARM Motion Detect Motion detection is a very powerful function in this DVR that generates notifications to the user about an event occurring and trigger the necessary actions to acquire useful video footage With this footage it is easy to distinguish the eventful video footage from others with...

Page 10: ...otion detect alarm is triggered Refer to 21 System Net Service Email for details Buzzer DVR emits an alarm tone using its internal buzzer when the motion detect alarm is triggered FTP Upload DVR uploads recording files of the alarm event to the FTP server when the motion detect alarm is triggered Refer to 21 System Net Service FTP for details Advanced Up window Return to previous menu 13 ALARM Vid...

Page 11: ...e video loss detection Period Video loss detection schedule This schedule can be customised for each day of the week Choose All if it is required to keep the schedule the same for everyday The green bar indicates the periods when the video loss detection is enabled Alarm OutPUT Send signal to connected wired alarm device when video loss alarm is triggered DELAY Duration between video loss alarm tr...

Page 12: ...e when the current alarm input is triggered Refer to 29 System Tour for details PTZ Activation This function requires a PTZ camera to be installed with the DVR PTZ camera can be configured to perform specified actions when alarm input is triggered PTZ camera can be set to move to preset viewing direction or start patrolling Refer to 23 System PTZ Config for details Delay Duration the DVR continues...

Page 13: ...ideo footages logs and notifications Date Format Select preferred date format DST Daylight savings time is used to reconfigure the time during daylight savings Daylight savings differ from country to country Enter the dates and times that daylight savings time applies begins and ends according to locality Date SEPARATOR Select preferred separator Time Format Select preferred time format 24 hours o...

Page 14: ...can ensure a constant stream of video over the internet to remote devices Quality Quality of the video recording When VBR is selected there are 6 quality options of the video stream Bit Rate Amount of data transmitted over time The quality of video recording directly correlates to the bit rate The higher the bit rate the higher quality the video recording When CBR is selected there are 6 bit rate ...

Page 15: ...in username password and IP address if local network is connected to internet using PPPOE For advanced users only NTP Network Time Protocol allows the DVR time settings to be updated automatically by syncing to the time server Server IP IP address of the NTP server It is recommended to use the default NTP server time nist gov Port Set the port according to the NTP server It is recommended to use t...

Page 16: ...stricted Type b Check the IP address to delete from list c Select Delete to exclude IP address from list DDNS Dynamic Domain Name Server is a server that communicates with the DVR to update the IP address and assigns the IP address to a domain name This allows the users to connect to their security devices from the internet using a domain name instead of IP address Domain name such as mydvr orionl...

Page 17: ...ing of port forwarding on the router is necessary Mobile Monitor Mobile Monitoring enables users to access DVR and monitor cameras using smartphones or tablets This port is used to stream video from DVR to mobile devices The default mobile port is 34599 ARSP Not applicable for this model Wireless config Not applicable for this model wifi Not applicable for this model 22 System GUI Display Display ...

Page 18: ...nds to the BNC video input on the rear panel of the DVR Protocol There are numerous supported communication protocols between DVR and PTZ device Select the protocol that matches the device Address One DVR can be connected to multiple PTZ devices This address is assigned to the PTZ device This address is used when communicating with a system connected to multiple PTZ devices Baudrate Rate of the DV...

Page 19: ... Tour to commence camera patrolling function Autoscan Enter border number in No box and select Autoscan to commence camera border scanning movement Autopan Commence PTZ camera horizontal panning movement flip Rotate the PTZ camera horizontally by 180 Reset Clear all PTZ settings page switch Switch to ptz auxiliary controls The following menu allows the the control of PTZ camera auxiliary functions...

Page 20: ...reset 27 PTZ Control pattern Pattern function enables DVR to move the PTZ camera according to user defined pattern CREATING PATTERN a In PTZ Control menu select Set to bring up PTZ Config menu and select Pattern function c Select a number for the Pattern d Select Begin to start creating pattern e Create pattern by moving camera using directional arrows or adjust the focus zoom and iris The DVR rec...

Page 21: ...the first setting This setting enables the DVR to operate at highest recording resolution for all channels 31 Advanced hdd manage HDD manage allows the management of internal DVR hard drive storage space The table displays the hard drive type maximum capacity of the hard drive remaining storage space and status Note that externally connected storage device like USB flash drives and external hard d...

Page 22: ...assword for existing user account Add User Add a new user account Check Reuseable to allow multiple login using this user account at the same time Enter a suitable username and password Select the group the user account belongs to Authority list contains all the functionality of the DVR Check the functions to allow user access to the functions Memo is for additional information regarding the user ...

Page 23: ... allows the calibration of the display output on the monitor TOP DEFLATE Compress display output from top Bottom DEFLATE Compress display output from bottom left DEFLATE Compress display output from left right DEFLATE Compress display output from right Horizontal black Shift horizontal position of video in channel box Vertical black Shift vertical position of video in channel box 35 Advanced auto ...

Page 24: ...est firmware is available on Orion website for download b Copy it to your flash drive and plug it onto the DVR Make sure there are no other files to make sure DVR detects the upgrade files c Select the drive that contains the firmware in Upgrade Position d Select the firmware file in Upgrade File e Select Upgrade to commence upgrade 38 Advanced Device Info Device Info displays the device basic inf...

Page 25: ...et category d Click on Import under Set Category to import DVR settings from file to DVR Exporting Log a Plug in external storage device onto DVR b Select storage device from Device Name list c Click on Export under Log category to export DVR log to storage device 40 Info HDD info HDD info displays information of the internal hard drives TYPE Hard drive operating mode Read Reading hard drive is al...

Page 26: ...System Config Storage Alarm Event Week Day Account Playback b Select the start date and time c Select the end date and time d Select Search to search for all events that matches the criteria within the time span A list shows the event logs in detail Index Number allocated to event Log Time Time of event occurence Type Type of event Log Event description e Select Remove to clear all log entries 43 ...

Page 27: ...Pentium 4 above 2 0 GHz Memory More than 512MB Graphics Card Dedicated graphics card required OS Windows 2000 Windows XP Windows 2003 Windows Vista DirectX DirectX 9 0c or above Internet Connection 512kbps and above 46 CMS login Username and password is required to login into Orion CMS The default username is admin and no password Select Save to remember the username and password It is highly reco...

Page 28: ...count name Password Enter DVR account password d Select OK to complete form and exit to main interface The newly added device will appear on the Device List e Double click on the new device to connect to DVR and expand the list of cameras f Double click any of the camera channels to start live monitoring AUTOSEARCH DVR a DVR and PC must be connected to the same router modem when using Autosearch f...

Page 29: ...down extended menu Remote config Configure DVR settings from Orion CMS The interface is identical to that of the DVR Start Talk Commence sending audio communication from PC to DVR Refresh Channel Name Refresh DVR channel titles Open all main stream Open all DVR channels on main monitoring display in high quality stream Open all Sub stream Open all DVR channels on main monitoring display in lower q...

Page 30: ...evices connected to the DVR Directional arrows Control of the PTZ camera in 8 different directions Speed Movement speed of PTZ camera Zoom Select button to adjust PTZ camera zoom Focus Select button to adjust PTZ camera focus Iris Select button to adjust PTZ camera aperture Preset Preset number assigned to camera position Refer to 25 PTZ Control Preset Creating Preset for details MoveTo Select pre...

Page 31: ...Creating Monitoring Task a Select Monitor on the top toolbar b Select Config to bring up the following menu c Select New to create new monitoring task d Enter a suitable name for the monitoring task select the number of windows to be displayed and select the video stream type e Drag and drop channel from Device List to the monitoring task table to include channel in the monitoring task The channel...

Page 32: ...Enter a suitable name for the monitoring project select monitoring task to be displayed and enter required start time e Select Add to add Monitoring Task to the project Other monitoring tasks can be added to the project to view different tasks at different times Enabling Monitoring Project a Select Monitor on the top toolbar The created monitoring project will appear on the menu b Select created m...

Page 33: ...roup a Double click on group name to modify group attribute b Group Normal displays the list of users in the group c Select Modify and select User Accounts to add or remove user accounts from the group d Select Apply to confirm or select Cancel to dismiss modifications e Group Device displays the list of DVRs added to CMS f Select Modify and select DVRs to allow or disallow group members access to...

Page 34: ...l PC Access Local Setting by clicking on System Settings and selecting Local Setting Record Path Directory of backup video recording files Record format File title format of recording files Picture path Directory of backup picture files Picture format File title format of picture files Alarm pic path Directory of backup alarm triggered picture files packet type Type of video recordings Packet size...

Page 35: ...ble Enable or disable alarm alarm prompt sound Enable or disable sound output when alarm triggered Sound Path Sound file to play when alarm triggered auto watch warn Automatically display video channel on monitoring screen when alarm triggered link Link video channel to Motion alarm or Sensor alarm Select Alarm Port and corresponding Video Channel then select Add to link them 57 CMS Map Control Ma...

Page 36: ... c Type Select type of recording to search for Normal Normal recordings recorded within the scheduled periods without events Alarm Recordings triggered by alarm input motion Recordings triggered by motion detect function manual Continuous recordings d Date and time Enter date and enter time or select DVR scheduled periods e Source Select source of recording Local PC or DVR f Search Search for reco...

Page 37: ...ackup files g Schedule Displays the backup schedule for everyday of the week The green bar indicates that backup is scheduled during those times and white bar indicates that no backup is scheduled during those times h Setup Select Setup to configure the backup schedule for a particular day There are up to 6 periods for each day that can vary in time and recording trigger In the following example t...

Page 38: ...ple devices from App Store vMEye is available for Android devices from Google Play Main Interface a Display Window b Channel Select c PTZ Control d Channel Page Switch e Play Live Preview f Snapshot g Device List h App Information c Select Add in Device List menu b Select Device List on the bottom toolbar Adding DVR to MOBILE APP a Select Address Mode to enter Main Interface A B C D d Enter DVR in...

Page 39: ...DDNS to acquire domain name Port Enter DVR Mobile Port Default is 34599 Refer to DVR Main Menu System Net Service Mobile Monitor to acquire port number User ID Enter DVR account name Password Enter DVR account password Max Channel Enter number of video input channels This DVR has 8 channels f Select DVR and channel to start live monitoring e Return to Main Interface and select button to add DVR g ...

Page 40: ...ct When IR night vision is activated screen only displays white Infra red LED light is reflected off from glass or reflective objects Relocate camera away from windows reflective and glass objects or remove obstacles When IR night vision is activated screen only displays black and white Infra red LED light is activated This is normal No action required DVR does not record according to schedule or ...

Page 41: ...d NETWORK LAN Connection Yes Network Interface RJ45 10M 100M Ethernet Connector Network Protocol TCP IP DDNS UPnP PPPOE DNS DHCP FTP SMTP NTP Remote Operation Yes GENERAL Power Supply DC 12V 4A Operating Temperature 0 C 50 C Operating Humidity 10 90 Backup Method USB to Flash Drive Network Serial Port RS485 for PTZ Camera USB 2 x USB 2 0 Alarm Input 4 Inputs Alarm Output 1 Output Mouse Yes Remote ...

Page 42: ...ur own expense return the product and provide proof of original purchase and your name address and telephone number to Arlec at the address below or the retailer from whom you originally purchased the product within 12 months from the date of purchase Arlec will or authorise the retailer to assess any claim you may make on the Warranty in the above manner and if in Arlec s reasonable opinion the W...

Reviews: