background image

-46-

-47-

1

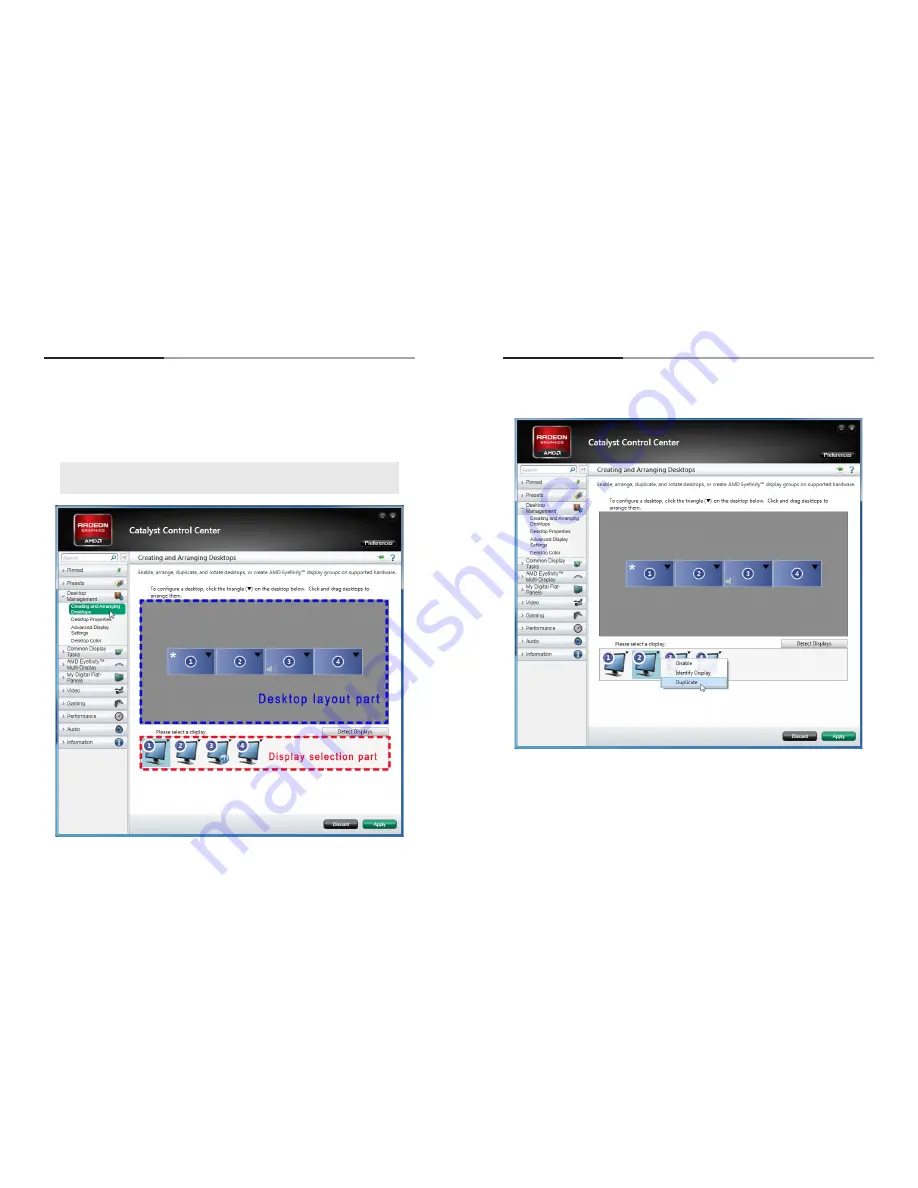
Duplicating Display

• Select 

Creating and Arranging Desktops

 from the menu bar on the left after executing CCC. 

• The upper part of the 

Creating and Arranging Desktops

 window is 

Desktop layout part

 and the 

lower part is 

Display selection Part.

 The basic display No. 

1

2

3

 and 

4

 will be displayed as shown below. 

But, the layout may vary due to the cable connection.

• Following process is duplicating the display No. 

2

3

, and 

4

 as the display No. 

1

. In case you do not have the same display layout like following 

screen image, you still duplicate the displays as described below.

• Click the display No. 

2

 in the 

Display selection part

 with the right button of your mouse to popup the 

window and select 

Duplicate.


Summary of Contents for OLS-8410NL

Page 1: ...purchasing this product Please read this manual thoroughly prior to install the product for your safety User s Manual Address 257 6 Gongdan dong Gumi si Gyeongsangbuk do Korea Tel 82 2 6678 8533 Fax 8...

Page 2: ...ons 3 Heed all warnings 4 Follow all instructions 5 Do not use this apparatus near water 6 Clean only with dry cloth 7 Do not block any ventilation openings Install in accordance with the manufacturer...

Page 3: ...ly operable 2 WARNING To Reduce The Risk Of Fire Or Electric Shock Do Not Expose This Appliance To Rain Or Moisture 3 Apparatus shall not be exposed to dripping or splashing and no objects filled with...

Page 4: ...ime it causes burn in image Please keep the following instruction to optimize the lifetime and functions of the product 1 Operating condition Temperature 20 15 C Humidity 55 20 Display pattern moving...

Page 5: ...duct not to cover the fan air holes with any structural object If the holes are covered with anything the inner temperature can be raised rapidly and it can cause malfunctions Regularly clean o the ve...

Page 6: ...e ventilation hole is blocked the inside temperature may rise to cause overheating resulting in fire Do not poke the front screen with sharp material It may damage the screen and may cause malfunction...

Page 7: ...de D Sub 9pin 6 LAN Display control via Ethernet RJ45 7 A S Service port for firmware upgrade 8 IR Remote controller input port 03 Names PWR SRC MODE AC INPUT ON OFF HDMI1A HDMI2A HDMI1B HDMI2B HDMI1C...

Page 8: ...MI2B HDMI1C HDMI2C HDMI1D HDMI2D RS232 LAN A S IR ENT IR SRC MODE ENT IR POWER ON Turn on the display POWER OFF Turn off the display EXIT Exit from MENU Configuration INFO Display the resolution MENU...

Page 9: ...I2A HDMI1B HDMI2B HDMI1C HDMI2C HDMI1D HDMI2D RS232 LAN A S USB IR Ethernet Control PC DVD player with HDMI out DVD player with HDMI out DVD player with HDMI out DVD player with HDMI out DVD player wi...

Page 10: ...on Press EXIT button to exit from the MENU after adjustment 4 INFO button The display information for the screen at the moment is displayed at the upper left corner of the screen ex Input HDMI 1A Ex U...

Page 11: ...4 Exit from the MENU Press EXIT button to getting out of OSD MENU 06 Configuration BRIGHTNESS ADJUSTMENT Screen brightness can be adjusted The brightness of black color at the dark side of the screen...

Page 12: ...d move buttons to adjust the value 2 EXIT MENU Press Exit button to exit from the menu after adjusting the value VIDEO MODE SELECTION Adjust the color temperature of the screen 1 Select VIDEO MODE fro...

Page 13: ...lize the value 3 EXIT MENU Press Exit button to exit from the menu after reset SCREEN ADJUSTMENT H POSITION V POSITION ASPECT RATIO VIDEO MUTE SCREEN MODE and SCREEN RESET can be adjusted in the SCREE...

Page 14: ...ter selecting V POSITION 2 EXIT MENU Press Exit button to exit from the menu ASPECT RATIO Configuration Adjust screen ratio FULL All the input will be displayed with the screen ratio of 16 9 ASPECT Al...

Page 15: ...ss MENU button Move to OFF and press MENU button to deselect VIDEO MUTE 3 EXIT MENU Press Exit button to exit from the menu SCREEN RESET Adjustment Initialize the values of SCREEN MENU 1 Select SCREEN...

Page 16: ...To configure the sub menu move to the sub menu and press MENU button to enter 4 EXIT MENU Press Exit button to exit from the menu AUTO POWER Configuration The display set can be turned on automaticall...

Page 17: ...s MENU button to check current LAN configuration Configurations for DHCP ENABLE or DISABLE IP ADDRESS SUBNET MASK DEFAULT GATEWAY DNS PRIMARY SECONDARY and PORT can be checked 2 EXIT MENU Press Exit b...

Page 18: ...ress MENU button TURN OFF Configuration TURN OFF Select the duration time of OSD on the screen 1 Select TURN OFF Move to TURN OFF and press MENU button 2 Select the sub items of TURN OFF Select the du...

Page 19: ...tion INFO DISPLAY Select the duration time of INFO OSD 1 Select INFO DISPLAY Turn on or off INFO DISPLAY OSD and select display duration time Use buttons to select ON or OFF Press MENU button after se...

Page 20: ...the menu SETUP B Adjustment INFORMATION POWER ON SOURCE SETUP B RESET and FACTORY RESET can be adjusted in SETUP B MENU 1 Press MENU button Press MENU button to display OSD MENU on the screen 2 Selec...

Page 21: ...ove to the item you want to select and press MENU button 3 EXIT MENU Press Exit button to exit from the menu KEY LOCK Configuration It restricts key strokes to prevent any of expected set activities O...

Page 22: ...Press Exit button to exit from the menu FACTORY RESET Configuration Initialize the previously adjusted values of the set to the factory level Every configuration will be initialized 1 Select FACTORY...

Page 23: ...must be the same interface e g 4 HDMI ports 4 DVI ports or 4 DP ports etc Even though the output ports are not same it still can display UHD image but the screen image may not be displayed properly e...

Page 24: ...ration software provided by the graphic card makers Pleaserefertotheuserguideofeachgraphiccardmakerorcontacttothecompanyfordetailedusageofthegraphiccard The configuration for the optional ORION PC is...

Page 25: ...ection Part The basic display No 1 2 3 and 4 will be displayed as shown below But the layout may vary due to the cable connection FollowingprocessisduplicatingthedisplayNo 2 3 and4asthedisplayNo 1 Inc...

Page 26: ...Then you will see the following window for caution Select Continue The screen will be turned off for a moment and turned on After the screen is turned on the following caution window will be displaye...

Page 27: ...Then you will see the following window for caution Select Continue The screen will be turned off for a moment and turned on After the screen is turned on the following caution window will be displaye...

Page 28: ...ion will not be popped up and the following caution window will be displayed Then select Continue The screen will be turned off for a moment and turned on After the screen is turned on the following c...

Page 29: ...p menus and select Display Group Create Group Then you will have the window for selecting layout as shown below You can select 4displays 4X1 or 4displays 2X2 Select 4displays 2X2 and click Accept The...

Page 30: ...be arranged in disorder as shown below The following screen image is an example and the incorrect arrangement can be vary Concurrently CCC window will be displayed as shown below If the arrangement is...

Page 31: ...58 59 In case you select No follow the display arrangement procedure as shown below Simultaneously one of 4 displays is turned on with blue color...

Page 32: ...part in CCC Then the other one of 4 displays is turned on with blue color again In the same manner click the position of the display of blue color in the Desktop layout part in CCC again When the disp...

Page 33: ...63 The next procedure is Bezel Compensation Since it is not a necessary procedure click No Then all configurations for CCC are completed The desktop with UHD resolution will be displayed as shown bel...

Page 34: ...ta The areas for ID and the other Data Variable ID Code for distinguishing LCD sets Group ID 0x01 Multi ID 0x01 Fixed Check sum Execute Not operation after adding all the values in STX Data area ETX 0...

Page 35: ...ength Data ETX Group ID Multi ID Mode Value 0x02 0x1A 0x01 0x03 Variable Variable Variable 0x03 Group Multi ID Range Program Group ID 0x01 Multi ID 0x01 Fixed Mode Write Set 0x02 Receive From LCD STX...

Page 36: ...g all the values in STX Data area 4 5 Video Mode Color Temperature Mode This is command to adjust the color temperature of the entire screen A WARM 6500K will make the screen reddish A COOL 1000K will...

Page 37: ...select blank screen CMD 0xB7 Send To LCD STX CMD Ex CMD Length Data ETX Group ID Multi ID Mode Control Value 0x02 0xB7 0x01 0x04 Variable Variable Variable Variable 0x03 Group ID Multi ID range Progra...

Page 38: ...03 Group ID Multi ID range Program Group ID 0x01 Multi ID 0x01 Fixed Mode Read Get 0x00 0 Receive From LCD STX CMD Ex CMD Length Data Check Sum ETX Group ID Multi ID Mode Version 20Bytes Value 0x02 0x...

Page 39: ...selected it is 1 0x01 The length of IP Address Subnet Mask Default Gateway DNS Primary and DNS Secondary is 4Bytes respectively Check Sum Execute Not operation after adding all the values in STX Data...

Page 40: ...80 0x01 0x04 Variable Variable Variable Variable Variable 0x03 Group Multi ID Range Program Group ID 0x01 Multi ID 0x01 Fixed Mode Read Get Response 0x00 0 Write Set Response 0x02 2 Control Value The...

Page 41: ...ead Get Response 0x00 0 Write Set Response 0x02 2 Control Panel Key Lock Off 0x00 0 Panel Key Lock On 0x01 1 Check Sum Execute Not operation after adding all the values in STX Data area 8 Factory Cont...

Page 42: ...ync Width Back Porch 640 480 60 25 175 800 640 8 96 40 525 480 2 2 25 DMT 800 600 50 30 750 992 800 24 72 96 621 600 3 4 14 CVT 800 600 60 40 000 1054 800 40 128 88 628 600 1 4 23 DMT 1024 576 50 34 7...

Page 43: ...1917x 1103 x 95mm 1977 2 x 1163 2 x 10⁴ 3mm 1917x 1103 x 95mm Weights 72Kg 0 5Kg 120Kg 0 5Kg 72Kg 0 5Kg Installation Landscape only Landscape Portrait Product design and specification can be changed...

Page 44: ...84 85 12 Dimension OLS 8410NL OLS 8420NL 1917 600 95 50 5 25 1917 25 25 25 1103 200 400 1103 OLS 8410T6L 1977 2 600 104 3 60 3 55 3 1977 2 55 3 55 3 55 3 1163 2 200 400 1163 2 331 6 431 6...

Page 45: ...86 Memo...

Reviews: