


- 10 -
- 11 -
W
ARNING
W
ARNING
※
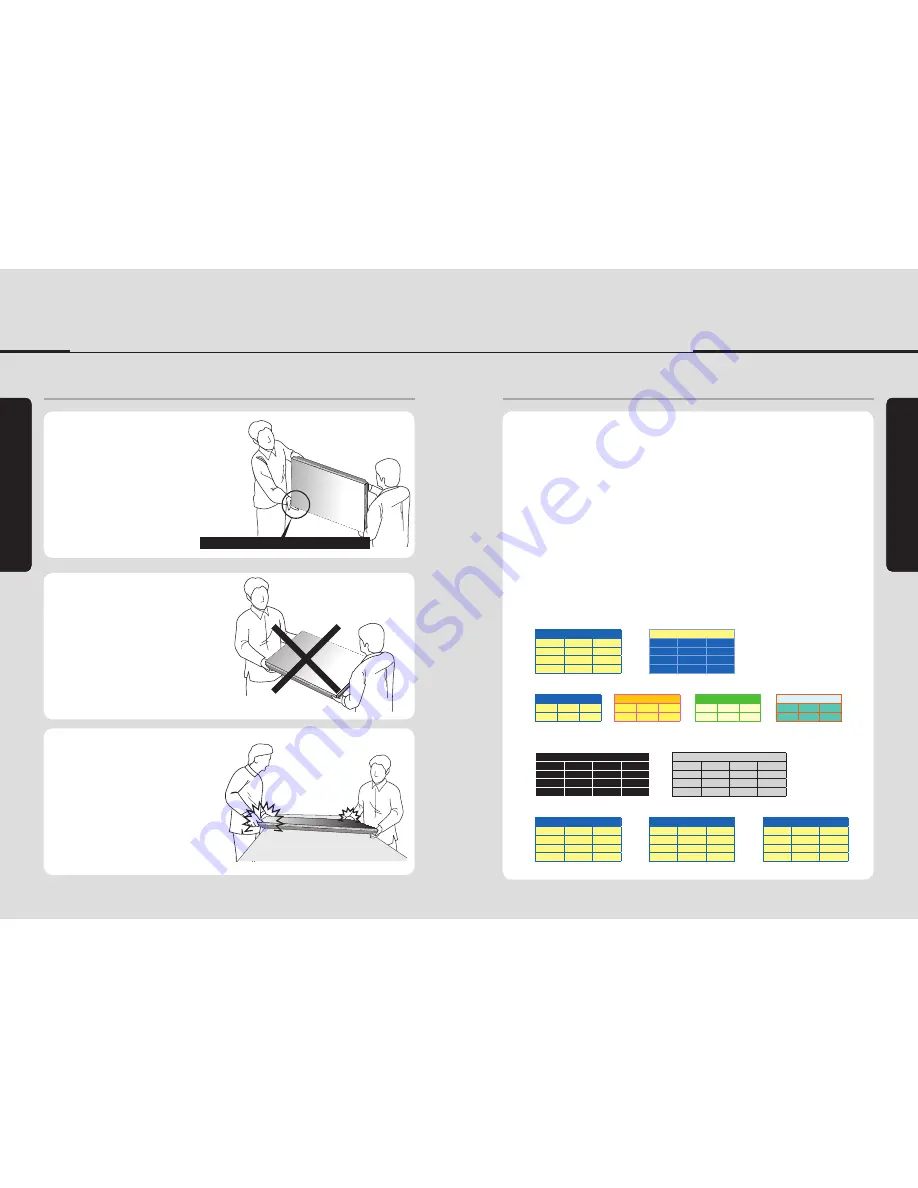
How to carry
※
Application information
It always needs two persons to carry or install
monitor .
When you carry monitor with up straight
manner, please hold handles on the back and
bottom part of the panel together.
Please be careful not to touch the bottom part
of the panel when you put down the panel.
Don't carry monitor in Horizontal Status.
When two operators uphold monitor, Panel is
twisted by unbalanced handling.
Pleasedonottouchthepanelwithyourhand.
If static images are displayed on the screen for a long time, it causes burn-in image.
Please keep the following instruction to optimize the lifetime and functions of the
product.
1. Operating condition
- Temperature: 20 ± 15˚C
- Humidity: 55 ± 20 %
- Display pattern: moving picture or regular switchover display
- Environmental condition : Well ventilated place is recommended.
- Power off and screen saver : Periodical power-off or screen saver is needed after long-term static
display.
※
Note : Moving picture or black pattern is strongly recommended for screen saver.
2. Operating methods to minimize burn-in image due to long-term static information
display
- For optimal performance, we suggest turning off the LED power on the Planar monitor for four hours
per day
- Periodical display contents change from static image to moving picture.
- Periodical background color and character (image) color change
DEPARTURE
ÅÆ
DEPARTURE
Flight No.
Time
Gate
Flight No.
Time
Gate
UA 012
11:20
A02
UA 012
11:20
A02
KE 732
12:10
K17
KE 732
12:10
K17
AN 291
12:45
F11
AN 291
12:45
F11
- Change the images of little luminance difference between the background and characters, periodically.
DEPARTURE
Æ
DEPARTURE
Æ
DEPARTURE
Æ
DEPARTURE
Flight No.
Time
Gate
Flight No.
Time
Gate
Flight No.
Time
Gate
Flight No.
Time
Gate
UA 012
11:20
A02
UA 012
11:20
A02
UA 012
11:20
A02
UA 012
11:20
A02
- It is not recommended to display the images of huge luminance difference between the background
and characters or the images of grey tone.
ARRIVAL
(X)
ARRIVAL
(X)
Flight No.
Time
Gate
Delay
Flight No.
Time
Embark
Delay
AA 213
9:20
K11
On time
AA 213
9:20
New York
On time
OZ 621
11:25
G21
10 min.
OZ 621
11:25
Seoul
10 min.
JA 032
12:05
A19
On time
JA 032
12:05
Beijing
On time
- Scroll the characters periodically.
DEPARTURE
Æ
Æ
DEPARTURE
Flight No.
Time
Gate
Flight No.
Time
Gate
UA 012
11:20
A02
UA 012
11:20
A02
KE 732
12:10
K17
KE 732
12:10
K17
AN 291
12:45
F11
AN 291
12:45
F11
(Whole Screen Scroll)
DEPARTURE
DEPARTURE
Flight No.
Flight No.
Time
Time
Gate
Gate
UA 012
KE 732
UA 012
KE 732
11:20
12:40
A02
K17
13:40
15:20
K17
A02
UA 012
KE 732
17:03
18:20
A02
K17
Summary of Contents for OLMU-5520
Page 31: ...58 Memo...


