13
Primary Mirror Center Mark
You may have noticed that your StarBlast 4.5 has a small adhe-
sive ring in the exact center of the primary mirror. This “center
mark” allows you to achieve a very precise collimation of the
primary mirror; you don’t have to guess where the center of the
mirror is, which is important in the collimation process. This cen-
ter mark is especially useful when using an optional collimating
device.
Note: The adhesive ring should not be removed from the
primary mirror. Because it lies directly in the shadow of
the secondary mirror, its presence in no way adversely
affects the optical performance of the telescope or the
image quality. That might seem counter-intuitive, but it’s
true! Leave it in place.
Aligning the Secondary Mirror
Align the secondary mirror first. Note secondary mirror collima-
tion screws are Allen screws, so you will need to use the includ-
ed 2mm Allen wrench to adjust them.
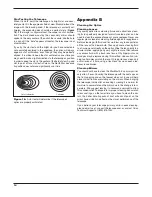
Look down the focuser at the secondary (diagonal) mirror. If
the entire primary mirror reflection is not visible in the second-
ary mirror, as in
Figure 13B
, you will need to adjust the tilt of
the secondary mirror. This is done by alternately loosening one
of the three secondary mirror alignment screws then lightly
tightening the other two (
Figure 14
). The goal is to center the
primary mirror reflection in the secondary mirror, as in
Figure
13C
. Don’t worry that the reflection of the secondary mirror (the
smallest circle) is off-center. You will fix that in the next step.
It will take some trial and error to determine which screws to
loosen and tighten to move the reflection of the primary mirror
to the center of the secondary mirror. But be patient and you’ll
get it.
Aligning the Primary Mirror
The final adjustment is made to the primary mirror. It will need
adjustment if, as in
Figure 13C
, the reflection of the primary
mirror is centered in the secondary mirror, but the small reflec-
tion of the secondary mirror is off-center. The tilt of the primary
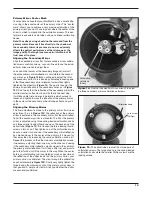
mirror is adjusted using three spring-loaded collimation knobs
and three smaller locking thumbscrews on the back end of the
optical tube (
Figure 15
). First loosen the three locking thumb-
screws a turn or so. Then tighten one of the collimation knobs
about a quarter turn and see if the secondary mirror reflection
has moved closer to the center of the primary. If it moved far-
ther away then try loosening the same collimation knob a bit.
Repeat this process on the other two sets of collimation screws,
if necessary, adjusting them one way or the other and seeing
if the secondary mirror reflection moves closer to the center of
the primary mirror reflection. It will take a little trial and error to
get a feel for how to tilt the mirror in this way. When the center
hole in your collimating tool is centered as much as possible on
the reflection of the adhesive dot on the primary mirror, your
primary mirror is collimated. The view through the collimation
cap should resemble
Figure 13D
. Finally, very lightly tighten the
three locking thumbscrews so that the primary mirror stays in
that position. A simple star test will tell you whether the optics
are accurately collimated.
Figure 15.
The optical tube’s rear cell has three pairs of
collimation screws. The large knobs are the spring-loaded
collimation knobs while the smaller Phillips screws are the
locking screws.
Collimation knob
Lock screw
(Phillips)
Figure 14.
Use the included 2mm Allen wrench to adjust
the three secondary mirror collimation setscrews.
Collimation
setscrews
(Allen)


