6
1. First, remove the dust cover from the front of the
telescope.
2. With the 20mm eyepiece installed in the focuser, point
the telescope at a well-defined land target (e.g., the top
of a telephone pole) that’s at least a quarter mile away.
3. Center the target in the telescope eyepiece.
4. Next, you will also center the target object on the EZ
Finder II’s red dot. Without moving the telescope, use
the EZ Finder II’s altitude and azimuth adjustment
knobs (shown in
Figure 6
) to position the red dot on
the object.
5. When the red dot is centered on the distant object,
check to make sure the object is still centered in the
telescope’s eyepiece. If it isn’t, re-center it then adjust
the EZ Finder II’s alignment again. When the object
is centered in the telescope eyepiece and in the EZ
Finder II, the EZ Finder II is properly aligned with the
telescope.
The EZ Finder II’s alignment should be checked before each
observing session. At the end of your observing session, be
sure to turn the power knob counterclockwise until it clicks off.
Figure 5.
.
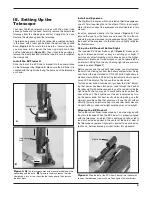
Insert an eyepiece into the focuser and secure it
by lightly tightening the two thumbscrews.
Focus knobs
Focuser
Eyepiece
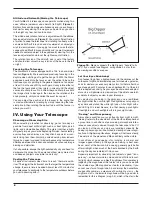
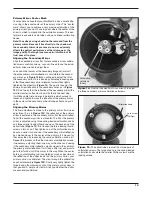
Figure 6.
The EZ Finder II “red dot” scope
Sight tube
Bracket foot
Altitude
adjustment
knob
Azimuth
adjustment
knob
Power
knob
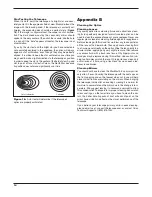
Figure 7.
The EZ Finder II superimposes a tiny red dot on
the sky, showing right where the telescope is pointed.
Figure 8. A)
To replace the EZ Finder II’s CR2032 3V
lithium battery, first remove the small Phillips screw to unlock
the battery cover,
B
)
then remove the old battery and replace
it with the positive (+) side facing the retaining clip.
Retaining clip
Battery
Battery cover
A
B


