background image

12

Appendix A 

Collimation – Aligning the Optics 

Collimation is the process of adjusting the optics of a telescope 
so they are precisely aligned with one another and with the 
telescope tube. For this reflector telescope, the primary and 
secondary mirrors must be in precise alignment. Your tele-
scope’s optics were aligned at the factory, and should not need 

much adjustment unless the telescope is handled roughly. 
Accurate mirror alignment is important to ensure the sharpest 
possible images viewed through your telescope, so it should 
be checked occasionally. With practice, collimating is relatively 
easy to do and can be done in daylight. 
It helps to perform the collimation procedure in a brightly lit 
room with the telescope pointed toward a bright surface, such 
as a light-colored wall. The telescope tube should be oriented 
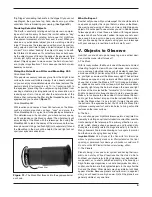
horizontally (parallel to the ground). Placing a piece of white 
paper in the telescope tube opposite the focuser (i.e., on the 
other side of the secondary mirror from the focuser) will also be 
helpful (see 

Figure 12

). You will need the included 2mm Allen 

wrench and a philips screwdriver to perform the collimation. 
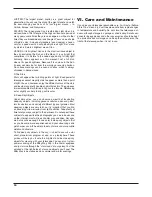
To check your telescope’s collimation, remove the eyepiece and 
look down the focuser. You should see the secondary mirror 
centered in the focuser, as well as the reflection of the primary 
mirror centered in the secondary mirror, and the reflection of 
the secondary mirror (and your eye) centered in the reflection 
of the primary mirror, as in 

Figure 13A

. Got all that? Review 

it again carefully, and compare what you see to 

Figure 13A

If anything is off-center, proceed with the following collimation 
procedure. 

NOTE: Precise collimation is best achieved by using an 
optional collimating tool, such as a quick-collimation 
cap, a Cheshire eyepiece, or a laser collimator. Check 
our website for available collimating tools. 

Figures 13B 

through 13D

 assume that you have an optional Cheshire 

eyepiece or collimation cap in the focuser. 

Figure 12.


Before collimating your telescope, place a piece of 

white paper inside the optical tube opposite the focuser. Make sure 
the telescope tube is oriented parallel to the ground during the 
collimation process.

Figure 13. 

Collimating the optics. 

(A)

 When the mirrors are 

properly aligned, the view down the focuser drawtube should look 

like this.


(B) 

Here, only part of the primary mirror is visible in the 

secondary mirror, so the secondary mirror needs to be adjusted 

(tilted).


(C) 

Here the secondary mirror is correctly aligned because 

the entire primary mirror is visible in it. But the reflection of the 

secondary mirror is off-center. So the primary mirror still needs 

adjustment. 

(D)

 Now the primary mirror is correctly aligned, so the 

secondary mirror is centered.


A.

B.

C.

D.

Summary of Contents for 10015

Page 1: ...rre de recherche v Cliquez ensuite sur le lien du manuel d utilisation du produit sur la page de descrip tion du produit u Wenn Sie das vollst ndige Handbuch einsehen m chten wechseln Sie zu OrionTe l...

Page 2: ...2 Figure 1 Components of the StarBlast 4 5 Astro Reflector telescope Dust cap EZ Finder II Allen wrench 25mm eyepiece 10mm eyepiece Moon filter Optical tube and Base...

Page 3: ...n the focus knobs to achieve the sharpest possible image 4 EZ Finder II Reflex Sight A non magnifying finder scope that helps you aim the telescope and locate objects in the sky for viewing It emits a...

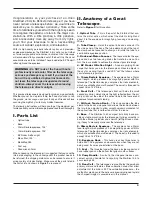
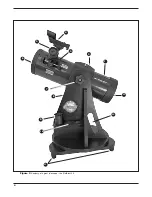
Page 4: ...4 Figure 2 Anatomy of a great telescope the StarBlast 4 5 1 2 3 4 5 7 12 13 8 9 11 10 6...

Page 5: ...erimposes a red dot generated by an internal LED light on the sky showing right where your tele scope is pointed Figure 7 Before you can use the red dot finder scope you must remove the small tab stic...

Page 6: ...ered in the telescope eyepiece and in the EZ Finder II the EZ Finder II is properly aligned with the telescope The EZ Finder II s alignment should be checked before each observing session At the end o...

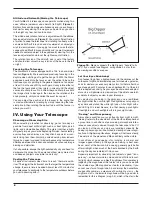
Page 7: ...a haystack Once you ve centered the object in the eyepiece you can switch to a higher magnification shorter focal length eyepiece if you wish This is recommended for small and bright objects like pla...

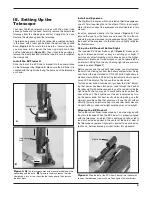
Page 8: ...try skies You ll be amazed at how many more stars and deep sky objects are visible in a dark sky Cooling the Telescope All optical instruments need time to reach thermal equilib rium The bigger the in...

Page 9: ...osure cameras and have false color added Our eyes are not sensi tive enough to see color in deep sky objects But remember that you are seeing these objects using your own telescope with your own eyes...

Page 10: ...Deep Sky Objects Under dark skies you can observe a wealth of fascinating deep sky objects including gaseous nebulas open and globu lar star clusters and a variety of different types of galaxies Most...

Page 11: ...aterial with laminate finish Mounting saddle Vixen style dovetail with clamp knob Optical tube mounting adapter Vixen style dovetail bar two 20 threaded holes on bottom Eyepieces 20mm 4 element Bertel...

Page 12: ...red in the focuser as well as the reflection of the primary mirror centered in the secondary mirror and the reflection of the secondary mirror and your eye centered in the reflection of the primary mi...

Page 13: ...ut be patient and you ll get it Aligning the Primary Mirror The final adjustment is made to the primary mirror It will need adjustment if as in Figure 13C the reflection of the primary mirror is cente...

Page 14: ...esigned for eyeglasses Before cleaning with fluid and tissue blow any loose particles off the lens with a blower bulb Then apply some cleaning fluid to a tissue never directly on the optics Wipe the l...

Page 15: ...15...

Page 16: ...ned postage paid Proof of purchase such as a copy of the origi nal receipt is required This warranty is only valid in the country of purchase This warranty does not apply if in Orion s judgment the in...

Reviews: