background image

11

يبرع

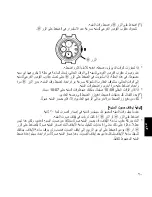
فاقيلإا ةعاس براقع

)فاقيلإا ةعاسل يناوثلاو قئاقدلا ابرقع(

تقولا ضرعل براقع

)ريغصلا يناوثلا برقعو تاعاسلا برقعو قئاقدلا برقع(

هبنملا براقع

)هبنملل ةعاسلاو قئاقدلا ابرقع(

جات

]تقولا نييعت ةيفيك[

 .12 ةعاسلا عضوم ىلع ريغصلا يناوثلا برقع نوكي امنيب ةيناثلا ةرقنلا ىلإ جراخلا هاجتاب جاتلا بحسا  )1(

.ةطقنلا ىلإ ريغصلا يناوثلا برقع فقوتي

.”0“ عضوملا ىلع اًيئاقلت فاقيلإا ةعاس براقع طبض داعي ،نمزلا بسحت فاقيلإا ةعاس تناك اذإ  *

.يلاحلا تقولا ىلإ ريشتو ةعرسب هبنملا براقع كرحتتس ،هبنملا طبض مت اذإ  *

ريغص ٍناوث رشؤم

 هبنملل  يعرفلا  صرقلا  ريشي

.يلاحلا تقولا ىلإ

Summary of Contents for KFA (TD)

Page 1: ...ysical danger and property damage to you as well as other people concerned A demarcation with this symbol represents the contents assuming imminent danger for death or serious injury when the product...

Page 2: ...hout WATER RESISTANT WATER RESIST Water resistant watches Water resistant for daily life WATER RESISTANT WATER RESIST Reinforced water resistance for daily life I WATER RESISTANT WATER RESIST 50m 5bar...

Page 3: ...t Water may enter the interior of the watch and defeat the water resistance 6 If your watch is non water resistant beware of splashes of water during face washing rain etc and sweat If the watch becom...

Page 4: ...s not a rechargeable battery so it cannot be recharged and used again Do not attempt to charge the battery as doing so could cause it to overheat or explode 4 A skin rash or other symptom may develop...

Page 5: ...for more information 4 Shock 1 Be sure not to carry the watch when you engage in strenuous sports whereas playing such light sports as golf etc will not adversely influence the watch 2 Avoid a violent...

Page 6: ...discoloration of the watchcase watchband and dial face Discoloration deformation and damage to various resin based component parts may also occur 9 About accessory parts CAUTION Do not attempt to dis...

Page 7: ...s when the light is stored such as the shape of the glass the thickness of the paint surrounding brightness level the distance from the watch to the light source and the light absorption level Please...

Page 8: ...Oscillations per second 2 Wrist worn accuracy at normal temperature 5 C 35 C Mean monthly rate 20sec Alarm accuracy 1 minute 3 Operating temperature range 5 C 50 C 4 Drive system Step motor 4 pieces...

Page 9: ...nt NAMES AND FUNCTIONS OF INDIVIDUAL COMPONENT PARTS A Tachymeter scale H Button A B Stopwatch minute hand I Date C Stopwatch second hand J Crown D Hour hand K Button B E Small second hand L Dial F Al...

Page 10: ...t and then loosen it until the screw stops The buttons may not be able to be used if the button ring cannot be loosened enough Do not turn it more forcefully than necessary 2 After finishing using the...

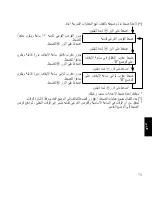
Page 11: ...h and alarm sub dial 1 Pull out the crown to the second click when the small second hand is at the 12 o clock position The small second hand stops on the spot If the stopwatch is measuring the stopwat...

Page 12: ...button B and set the time on the alarm sub dial Set it to the same time as that of the basic watch set in 2 above The alarm sub dial hands move quickly when button B is kept pressed The alarm sub dial...

Page 13: ...e stopwatch minute hand to the 0 position The hand moves quickly when button B is kept pressed Then press button A for about 2 seconds and the stopwatch second hand will turn a full circle Press butto...

Page 14: ...ings as often as you like 6 After all the adjustments are completed push the crown back in to the normal position in accordance with a time signal Check that the time of the basic watch and the alarm...

Page 15: ...following 30 day months 1 Pull out the crown to the first click Pressing button B in this condition will result in either setting or adjusting the alarm time and so we advise not to press button B if...

Page 16: ...position If the stopwatch hands do not return to 0 position when the stopwatch is reset follow the procedure in SETTING THE TIME AND ADJUSTING THE STOPWATCH HAND POSITION to reset them In that case be...

Page 17: ...ccumulated elapsed time measurement 1 Press button B to reset the stopwatch Split time was measured and remains displayed Split time measurement 1 Press button B The split time is released and the sto...

Page 18: ...Split release Button A Stop Button B Reset Measurement of two competitors Button A Start Button B Finish time of first competitor Button A Second competitor finishes Button B Finish time of second com...

Page 19: ...larm sub dial when you set the time of the basic watch etc Refer to SETTING THE TIME AND ADJUSTING THE STOPWATCH HAND POSITION How to set the alarm time 1 Pull out the crown to the first click Note th...

Page 20: ...all the adjustments are completed push the crown back into the normal position Be sure to push the crown back into the normal position otherwise the alarm will not sound How to stop the alarm sound Wh...

Page 21: ...t the correction or reset push the crown back into the normal position HOW TO USE THE TACHYMETER Some models may come with a tachymeter scale printed around the bezel or dial Check your watch to see i...

Page 22: ...uld be used properly Turn the bezel by pointing the mark to the minute hand While certain time goes by you can measure the elapsed time from the distance between minute hand and figures on the rotatin...

Page 23: ...ung f r sp tere Bezugnahme gut auf SICHERHEITSMA NAHMEN Um zu verhindern dass Sie oder andere Personen sich verletzen oder Sachsch den entstehen lesen Sie die Anweisungen die mit den nachfolgenden Sym...

Page 24: ...st ndige Uhren Wasserbe st ndig f r das t gliche Leben WATER RESISTANT WATER RESIST Verst rkte Wasserbe st ndigkeit I f r das t gliche Leben WATER RESISTANT WATER RESIST 50m 5bar Verst rkte Wasserbe s...

Page 25: ...digkeit Wasser kann in die Uhr eindringen 6 Wenn Ihre Uhr nicht wasserbest ndig ist achten Sie auf Wasserspritzer beim Gesichtwaschen Regen usw und Schwei Wenn die Uhr durch Wasser oder Schwei nass wi...

Page 26: ...T Servicecenter f r Hilfestellung 3 Die Batterie dieser Uhr ist nicht wiederaufladbar und kann daher nicht ein weiteres Mal verwendet werden Laden Sie die Batterie nicht wieder auf da sie sich anderen...

Page 27: ...ITION DER STOPPUHRZEIGER Zeiger f r Zeitanzeige und Stoppuhrzeiger f r weitere Informationen 4 St e 1 Tragen Sie die Uhr nicht bei harten sportlichen Aktivit ten bei relativ sanften sportlichen Aktivi...

Page 28: ...t u erste Vorsicht erforderlich Solcher Kontakt kann Verf rbung des Uhrgeh uses des Armbands bzw des Zifferblatts verursachen Es kann auch zu Verf rbung Verformung oder Besch digung der verschiedenen...

Page 29: ...Dauer der Lichtabgabe h ngt von verschiedenen Faktoren bei der Lichtspeicherung ab wie der Form des Glases der Dicke der Farbe der Helligkeit der Umgebung der Entfernung der Uhr zur Lichtquelle und de...

Page 30: ...kgestellt TECHNISCHE DATEN 1 Kristallschwingfrequenz 32 768 Hz Hz Schwingungen pro Sekunde 2 Genauigkeit bei Tragen am Handgelenk bei einer normalen Temperatur von 5 C bis 35 C Durchschnittliche Monat...

Page 31: ...sserungen bleiben jederzeit vorbehalten NAMEN UND FUNKTIONEN DER EINZELTEILE A Tachymeterskala H Taste A B Stoppuhr Minutenzeiger I Datum C Stoppuhr Sekundenzeiger J Krone D Stundenzeiger K Taste B E...

Page 32: ...rehen Sie den Tastenring zuerst nach links und l sen ihn bis die Schraube stoppt Wenn der Tastenring nicht lose genug ist k nnen die Tasten m glicherweise nicht verwendet werden Drehen Sie nicht st rk...

Page 33: ...d Alarm Nebenziffernblatt 1 Ziehen Sie die Krone zur zweiten Raststellung heraus wenn der kleine Sekundenzeiger an der 12 Uhr Stellung ist Der kleine Sekundenzeiger wird dann an dieser Position angeha...

Page 34: ...auf dem Alarm Nebenziffernblatt ein Dabei muss die gleiche Zeit wie die im Schritt 2 oben eingestellte Zeit der normalen Uhr gew hlt werden Wenn Knopf B gedr ckt bleibt bewegen sich die Zeiger des Al...

Page 35: ...ppuhr Minutenzeiger auf die Nullstellung Position 0 Wenn Knopf B gedr ckt bleibt bewegt sich der Zeiger schnell Dr cken Sie dann Knopf A f r etwa 2 Sekunden und der Stoppuhr Sekundenzeiger wird einen...

Page 36: ...oft wie gew nscht zur ckgesetzt werden 6 Nachdem alle Anpassungen abgeschlossen wurden dr cken Sie die Krone entsprechend des Zeitzeichens zur ck in die Normalposition Stellen Sie sicher dass die norm...

Page 37: ...eingestellt werden 1 Ziehen Sie die Krone zur ersten Raststellung heraus Dr cken von Knopf B in diesem Zustand verursacht entweder Einstellen oder Korrektur der Alarmzeit weshalb wir empfehlen dass S...

Page 38: ...puhr bei der R ckstellung nicht zur Nullstellung 0 zur ckzukehren so befolgen Sie das Verfahren in STELLEN DER UHR UND EINSTELLEN DER POSITION DER STOPPUHRZEIGER um die Zeiger zur ckzustellen Achten S...

Page 39: ...e den Knopf B um die Stoppuhr zur ckzustellen Eine Zwischenzeit wurde gemessen und bleibt angezeigt Zwischenzeitmessung 1 Dr cken Sie den Knopf B Die Zwischenzeit wird freigegeben und die Stoppuhrzeig...

Page 40: ...nopf A Stopp Knopf B R ckstellung Messen f r zwei Wettbewerbteilnehmer Knopf A Start Knopf B Endzeit des ersten Teilnehmers Knopf A Zweiter teilnehmer am ziel Knopf B Endzeit des zweiten Teilnehmers K...

Page 41: ...des Alarm Nebenziffernblatts ein wenn Sie die Uhrzeit der normalen Uhr einstellen Siehe EINSTELLEN DER UHRZEIT UND EINSTELLEN DER POSITION DER STOPPUHRZEIGER Einstellen der Alarmzeit 1 Ziehen Sie die...

Page 42: ...8 vormittags betr gt dann ist eine maximale Alarmzeit von 10 07 abends m glich 3 Nachdem alle Anpassungen abgeschlossen sind dr cken Sie die Krone zur ck in die normale Position Stellen Sie sicher das...

Page 43: ...rm korrigiert oder aufgehoben haben dr cken Sie die Krone zur ck in die normale Position VERWENDEN DES TACHYMETERS Bei manchen Modellen ist eine Tachymeterskala auf der Lunette oder dem Ziffernblatt a...

Page 44: ...n Sie die L nette indem Sie die Markierung auf den Minutenzeiger weisen lassen W hrend verschiedene Zeiten durchlaufen werden k nnen Sie die vergangene Zeit am Abstand zwischen dem Minutenzeiger und d...

Page 45: ...nto specificato dai contrassegni sotto indicati per evitare qualsiasi pericolo di danneggiare cose e di ferire voi stessi e altre persone PERICOLO Questo simbolo indica un pericolo imminente che pu ca...

Page 46: ...SIST Orologi resistenti all acqua Resistente all acqua per l uso giornaliero WATER RESISTANT WATER RESIST Resistente all acqua rinforzato per l uso giornaliero I WATER RESISTANT WATER RESIST 50m 5bar...

Page 47: ...trare all interno dell orologio e comprometterne la resistenza all acqua 6 Se il modello non impermeabile fare attenzione agli spruzzi d acqua durante le abluzioni la pioggia ecc e al sudore Se l orol...

Page 48: ...pi vicino per richiedere assistenza nel caso si desideri rimuovere la batteria 3 La batteria utilizzata in questo orologio non una batteria ricaricabile quindi non pu essere ricaricata e riutilizzata...

Page 49: ...a batteria Dopo aver sostituito la batteria assicurarsi di regolare le lancette dell ora e del cronometro sulla posizione 0 Permaggioriinformazioni fareriferimentoa REGOLAZIONEDELL ORA E AGGIUSTAMENTO...

Page 50: ...ssima cautela in caso di contatto con gas mercurio prodotti chimici diluenti benzina solventi vari detergenti contenenti tali componenti prodotti adesivi vernici medicine profumi cosmetici e cos via I...

Page 51: ...tit di luce emessa e la durata dell emissione dipendono dai vari fattori in atto nel periodo d immagazzinamento tra i quali la forma del vetro lo spessore della vernice stessa il livello di luminosit...

Page 52: ...tore a cristallo 32 768 Hz Hz Oscillazioni al secondo 2 Precisione orologio portato al polso a temperatura normale 5 C 35 C Errore medio mensile 20 sec Precisione sveglia 1 minuto 3 Limiti temperatura...

Page 53: ...ristici sopra sono soggetti a variazioni per miglioramento senza Preavviso NOME E FUNZIONI DELLE PARTI A Scala del tachimetro H Pulsante A B Lancetta dei minuti del cronometro I Data C Lancetta dei se...

Page 54: ...i pulsanti se l anello non allentato abbastanza Prestare attenzione a non applicare una forza eccessiva quando si svita l anello 2 Dopo aver utilizzato i pulsanti ruotare l anello verso destra e serra...

Page 55: ...e Corona Come regolare l orologio sull ora esatta 1 Estrarre la corona fino al secondo click quando la lancetta piccola dei secondi si trova nella posizione delle ore 12 esatte La lancetta piccola dei...

Page 56: ...impostare l ora nel quadrante secondario dell allarme Impostarla sulla stessa ora dell orologio di base come descritto nel passo 2 in alto Le lancette del quadrante secondario dell allarme si muovono...

Page 57: ...n posizione 0 La lancetta si muove rapidamente quando si tiene premuto il pulsante B Quindi premere il pulsante A per circa 2 secondi per far compiere alla lancetta dei secondi del cronometro un giro...

Page 58: ...azioni quando si desidera 6 Una volta completate le regolazioni riportare la corona in posizione normale in base a un segnale orario Verificare che l orologio e il quadrante secondario dell allarme in...

Page 59: ...mesi di 30 giorni 1 Tirez la couronne sur le premier cran La pressione del pulsante B in questa seconda condizione dar come risultato l impostazione o la correzione dell ora della sveglia e quindi si...

Page 60: ...tro Se le lancette del cronometro non ritornano in posizione 0 quando l orologio viene inizializzato seguire la procedura in REGOLAZIONE DELL ORA E AGGIUSTAMENTO POSIZIONI LANCETTE CRONOMETRO per ripo...

Page 61: ...pulsante B per inzializzare il cronometro Veniva misurato il tempo parziale e rimane visualizzato Split time measurement Misurazione del tempo parziale 1 Premere il pulsante B Il tempo parziale rilas...

Page 62: ...one del tempo parziale intermedio Pulsante A Avvio Pulsante B Parziale Pulsante B Rilascio parziale Pulsante A Arresto Pulsante B Reimposta Per misurare e rilasciare il tempo parziale ripetutamente pr...

Page 63: ...rme quando si imposta l ora dell orologio di base ecc Vedere IMPOSTAZIONE DELL ORA E REGOLAZIONE DELLE LANCETTE DEL CRONOMETRO Come impostare l ora dell allarme 1 Tirare la corona nella posizione del...

Page 64: ...possibile impostare l allarme fino alle 22 07 3 Una volta completate tutte le regolazioni riportare la corona nella posizione normale Ricordarsi di riportare la corona nella posizione normale altrimen...

Page 65: ...rrente 3 Dopo aver corretto l ora o aver annullato l allarme riportare la corona nella posizione normale USO DEL TACHIMETRO In alcuni modelli la scala del tachimetro stampata intorno alla ghiera o al...

Page 66: ...coincidere il simbolo con la lancetta dei minuti cos possibile misurare il tempo trascorso osservando la distanza angolare tra la lancetta dei minuti e le cifre riportate sulla lunetta rotante Ruotand...

Page 67: ...a usted u otras personas involucradas PELIGRO Un contenido demarcado con este s mbolo indica la posibilidad de ocasionar peligro de muerte inminente o de sufrir lesiones graves si el producto se util...

Page 68: ...SIST Relojes resis tentes al agua Resistente al agua para uso diario normal Con WATER RESISTANT WATER RESIST Resistente al agua reforzado para uso diario normal I Con WATER RESISTANT WATER RESIST 50 m...

Page 69: ...del reloj y da ar la resistencia al agua 6 Si su reloj no es resistente al agua cu dese de las salpicaduras de agua durante el lavado de cara lluvia etc y del sudor Si el reloj llegara a mojarse con a...

Page 70: ...on el lugar de compra del reloj o con el centro de reparaciones autorizado de ORIENT m s cercano si desea extraer la pila 3 La pila que se usa en este reloj no es recargable de modo que no puede recar...

Page 71: ...DE LAS MANECILLAS DEL CRON METRO Manecillas para la indicaci n de la hora y del cron metro 4 Golpes 1 Aseg rese de quitarse el reloj cuando participe en deportes extenuantes aunque el uso del reloj pa...

Page 72: ...diversos disolventes detergentes que contengan tales componentes adhesivos pinturas medicinas perfumes cosm ticos etc y otros productos similares El contacto con tales sustancias podr ocasionar la dec...

Page 73: ...luz almacenada La cantidad de luz emitida y su duraci n dependen de varios factores vinculados al almacenamiento de la luz por ejemplo la forma del cristal el espesor de la pintura el nivel de brillo...

Page 74: ...encia del oscilador de crista 32 768 Hz Hz Oscilaciones por segundo 2 Precisi n del reloj de pulsera a temperatura normal 5 a 35 C Variaci n media mensual 20 seg Exactitud alarma 1 minuto 3 Gama de te...

Page 75: ...d a 9 Circuito integrado IC C MOS 1C 1 pieza Las especificaciones de arriba est n sujetas a cambio sin previo aviso por motivos de mejora PARTES COMPONENTES Y SUS FUNCIONES A Escala de taqu metro H B...

Page 76: ...stos modelos siga estas instrucciones 1 Si quiere usar los botones gire el anillo con bot n hacia la izquierda y afl jelo hasta que se detenga Si el anillo no est lo suficientemente desenroscado puede...

Page 77: ...cillas de las horas y de los minutos Corona Forma de ajustar la hora 1 Extraiga la corona hasta la posici n del segundo chasquido cuando la manecilla peque a de los segundos est en la posici n de las...

Page 78: ...en la subesfera de la alarma Aj stela a la misma hora que la del reloj b sico ajustado en el punto 2 de arriba Las manecillas de la subesfera de la alarma se mueven r pidamente si se mantiene presiona...

Page 79: ...la posici n 0 La mano se mueve r pidamente si se mantiene presionado el bot n B A continuaci n pulse el bot n A durante unos 2 segundos y la manecilla de los segundos girar una vuelta completa Pulse...

Page 80: ...s ajustes tantas veces como desee 6 Despu s de haber finalizado todos los ajustes devuelva la corona a su posici n normal de acuerdo con una se al horaria Compruebe que la hora del reloj b sico y la s...

Page 81: ...er ajustado la hora Usted tendr que ajustar la fecha el uno de marzo y los meses siguientes de 30 d as 1 Extraiga la corona hasta el primer chasquido Si presiona el bot n B en estas condiciones se efe...

Page 82: ...los minutos Notas sobre el ajuste de la posici n de las manecillas del cron metro Si las manecillas del cron metro no vuelven a la posici n 0 cuando reponga el cron metro realice el procedimiento de A...

Page 83: ...transcurrido acumulado 1 Presione el bot n B para reponer el cron metro Se midi tiempo parcial y permanece indicado Medici n de tiempo parcial 1 Presione el bot n B La medici n de tiempo parcial se d...

Page 84: ...po parcial Bot n A Parada Bot n B Reposici n Medici n de dos competidores Bot n A Inicio Bot n B Tiempo de finalizaci n del primer competidor Bot n A Finalizaci n del segundo competidor Bot n B Tiempo...

Page 85: ...ma cuando se ajusta la hora del reloj b sico etc Consulte el AJUSTE DE LA HORA Y DE LA POSICI N DE LA MANECILLA DEL CRON METRO C mo ajustar la hora de alarma 1 Saque la corona hasta la primera posici...

Page 86: ...e la alarma alcancen la hora actual las manecillas en movimiento r pido se detendr n una vez Para ajustar la hora de alarma suelte el bot n B una vez y p lselo de nuevo para ajustar la hora de alarma...

Page 87: ...restablecer autom ticamente C mo corregir la hora de alarma o cancelar la alarma ajustada 1 Saque la corona hasta la primera posici n de clic 2 Pulse el bot n B y despu s corrija la hora de alarma La...

Page 88: ...producci n por unidad de tiempo por hora Intervalo de medici n hasta 60 segundos 1 Pulse el bot n A en el punto de inicio o cuando un producto comience a fabricarse 2 Vuelva a pulsar el bot n A cuand...

Page 89: ...r la marca a una hora dada como un recordatorio del tiempo que le falta para un compromiso El bisel no puede girarse en sentido inverso ya que est provisto de un mecanismo de protecci n para prevenir...

Page 90: ...90 TD KFA O...

Page 91: ...WATER RESISTANT WATER RESIST WATER RESISTANT WATER RESIST I WATER RESISTANT WATER RESIST 50m 5bar II WATER RESISTANT WATER RESIST 100m 10bar 200m 20bar AIR DIVER S 100m 150m 200m He GAS DIVER S 200m...

Page 92: ...92 1 30 3 2 I 50 5 3 II 100 200 10 20 4 5 6 7 8 9...

Page 93: ...93 2 O 1 2 ORIENT 3 4 3 1 2 3 ORIENT...

Page 94: ...94 4 ORIENT 5 0 4 1 2 5 1 2 6 7 5 35...

Page 95: ...95 8 9 He B 10 c 11...

Page 96: ...96 12 B 1 11 59 60 1 5 12 1 32 768 2 5 C 35 C 20 1 3 5 C 50 C 4 4 5 1...

Page 97: ...97 60 60 1 5 60 12 6 7 SR927W 1 8 3 20 2 9 C MOS 1C 1...

Page 98: ...98 A H A B I C J D K B E L F M G 1 2 A C D E F G H J L K B 8 I M...

Page 99: ...99 1 2 0 1 2 3 0...

Page 100: ...100 1 12 0...

Page 101: ...101 2 AM PM 4 5 3 B 2 B AM PM B 0...

Page 102: ...102 4 0 A 2 B 0 B A 2 B 0 B A B...

Page 103: ...103 5 A 2 A 2 0 A 2 0 A 2 6 12 B B B...

Page 104: ...104 21 00 1 00 30 1 B B 2 60 1 5 12...

Page 105: ...105 0 1 5 48 10 2...

Page 106: ...106 1 A 2 B 1 B 1 B 2 A 3 B 1 B 2 B A B...

Page 107: ...107 A A B A A A A B A B B A B A B A B B A B...

Page 108: ...108 1 11 59 1...

Page 109: ...109 2 B B B B B 10 08 10 07 3 20 A B A B...

Page 110: ...110 1 2 B B B B B 3...

Page 111: ...111 1 60 1 A 2 A 1 3 80 80 1 1 A A...

Page 112: ...112 1 10 10 20...

Page 113: ...23 u s 20 10 10...

Page 114: ...22 u 1 60 A 1 A 2 3 80 80 A A...

Page 115: ...21 1 B 2 B B B B 3...

Page 116: ...20 B 2 B B B 10 07 10 08 3 20 B A B A B...

Page 117: ...19 59 11 1...

Page 118: ...18 A A B A A A A B A A B B A B B A B A B B...

Page 119: ...17 A 1 B 2 B 1 B 1 A 2 B 3 B 1 B 2 A B...

Page 120: ...16 0 u 1 5 2 10 48...

Page 121: ...15 u 1 1 00 a m 9 9 00 p m 30 1 B B 2 u 1 5 60 12...

Page 122: ...14 5 A A 0 A 0 A 6 12 B B B...

Page 123: ...13 0 4 A 0 B B A 0 B B A B...

Page 124: ...12 2 0 AM PM 5 4 B 3 2 B AM PM B...

Page 125: ...11 12 1 0...

Page 126: ...10 u 1 2 u 1 2 u 0 1 2 0 3...

Page 127: ...9 u A B C D E F G A H I J B K L M A C D E F G H J L K B 8 I M...

Page 128: ...8 u 59 11 1 5 60 12 u 32768 1 35 5 2 20 1 50 5 3 4 4 5 60 60 60 12 6 1 SR927W 7 20 3 8 1 C MOS 1C IC 9...

Page 129: ...7 11 12...

Page 130: ...6 8 9 10...

Page 131: ...5 0 4 5 6 7 35...

Page 132: ...4 2 ORIENT 3 ORIENT ORIENT...

Page 133: ...3 3 30m 5 50m I 20 10 200m 100m II...

Page 134: ...WATER RESISTANT WATER RESIST WATER RESISTANT WATER RESIST I WATER RESISTANT WATER RESIST 50m 5bar II WATER RESISTANT WATER RESIST 100m 10bar 200m 20bar AIR DIVER S 100m 150m 200m He GAS DIVER S 200m 3...

Page 135: ...1 TD KFA u...
Reviews: