13
Installing the chimney
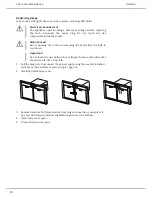
Important!
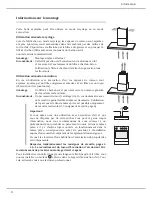
Ensure that there is sufficient space to lay the mains cable between
the ceiling and the upper chimney section 1.
1. Place the lower chimney section 2 on the extraction hood 3 and push the
upper chimney section 1 into the lower chimney section 2.
2. Hold the mounting bracket 4 horizontally on the wall at the required chimney
height so that the centre of the bracket is flush with the vertical guide line.
Pay attention to the height of the upper chimney section 1 and its clearance
height to the ceiling.
Mark the two holes.
3. Drill two holes with a diameter of 8 mm on the marked points.
4. Push the wall plugs (not supplied) into the holes.
5. Install the mounting bracket 4 on the wall using two fixing screws (not
supplied).
6. Pull the upper chimney section 1 upwards out of the lower chimney section
2 and affix it on the mounting bracket 4 laterally using the screws 6. If the
full length of the upper fireplace veneer is requested, terminal strip 5 can
be clasped into lower terminal strip 2. Thus the upper terminal strip 1 is
supported.
7. Route the mains cable covered through the chimney section to the socket.
8. Connect the mains plug with the socket.
Installation
Preparation
English
4
4
1
6
6


