background image

11 

confirm. 


7.


Press 

 or 

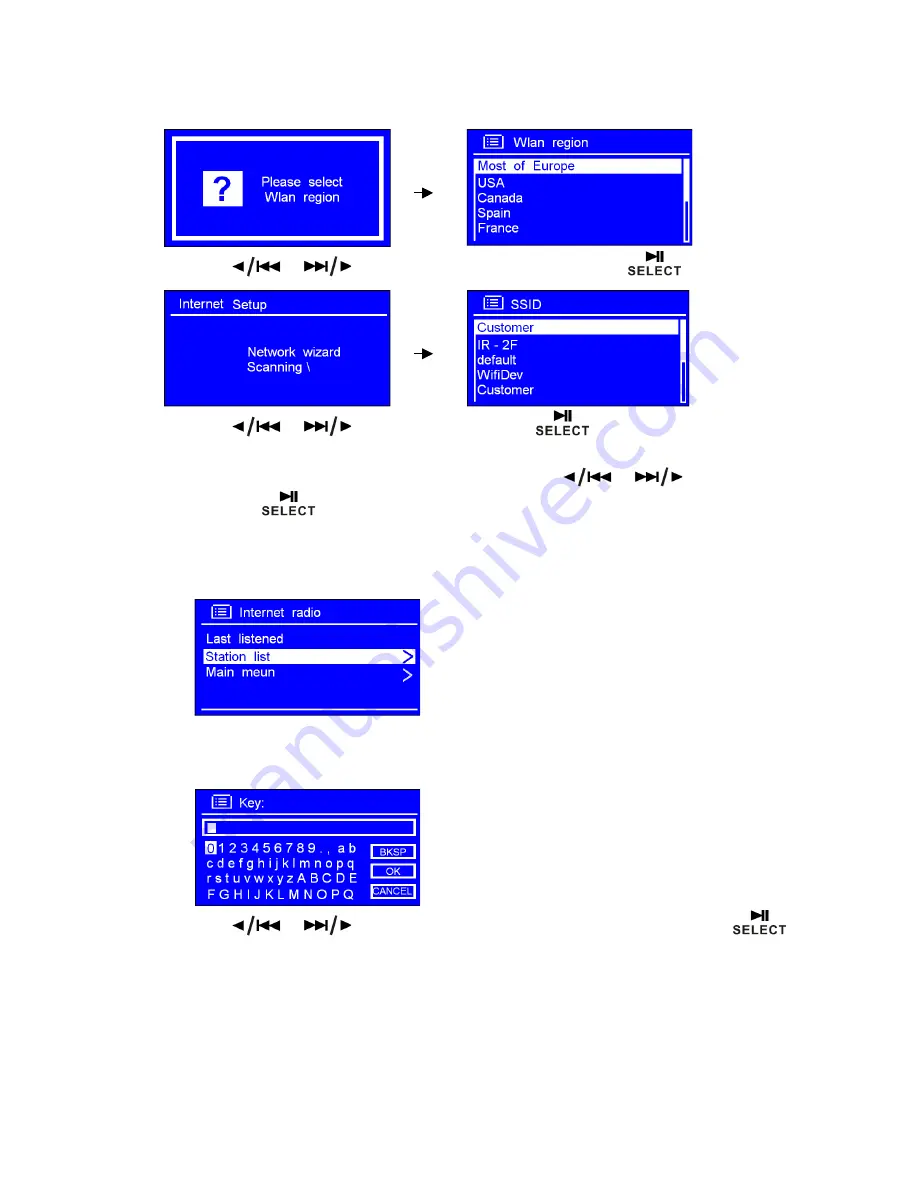
 to your local ‘Wlan region’, and then press 

 to confirm. 


8.


Press 

 or 

 to  your  prefer  ‘SSID’,  press 

 to  confirm.  Radio  will  save  it  in 

memory. 

Note: Your radio may find more than one network. Press 

 or 

 to your favorite 

one, press 

to confirm. 


If your network is not configured to request a password (WEP/WPA), radio will connect to the network 

and display: 


If a WEP/WPA key (password) is required, radio will ask you to input the WEP/WPA code and display the 

password entry screen as follows: 


9.


Press 

 or 

 to  cycle  through  the  alpha-numeric  character  list,  press 

 to 

select an appointed character. 


Summary of Contents for T4

Page 1: ...WiFi Internet DAB DAB FM radio and iPod dock User s Guide Software version v2 019 ...

Page 2: ......

Page 3: ...ation 17 Station Updates 17 Music Player Mode streaming music 18 DAB DAB Mode 19 Manual Tune 20 Prune invalid stations 20 DRC Dynamic Range Control value 21 To change station order 21 FM Mode 22 Scan Setting 22 Audio Setting Stereo Mono 22 Setting Station Presets 23 iPod Mode 24 AUX IN Mode 25 Other functions 26 Sleep Function 26 Setting Clock Time Date 27 Set hour format 28 Set timezone 28 Daylig...

Page 4: ...Updates 35 Enter Setup Wizard 36 SW Version and Radio ID 36 Media Sharing Guide 37 Set Up Media Sharing in WMP 11 37 Set Up Media Sharing in MAC OSX 38 Troubleshooting 39 Specifications 40 Orbitsound Warranty 41 ...

Page 5: ...ft cloth moistened with a detergent and water 3 DO NOTuse solvents abrasive cloths thinners or alcohol on the unit Care in use 1 Do not block any ventilation holes during operation 2 Do not place the radio near a heat source when in use 3 Take care that the power cord is not tripped over or damaged in another way 4 NEVER USEthe power supply if it is damaged Contact orbitsound for a replacement pow...

Page 6: ...Package Contents 1 orbitsound T4 radio unit 2 AC DCmains adaptor 3 Instruction booklet 4 iPod adaptors ...

Page 7: ...ice as WEB Key or WPA key 4 If your wireless network is configured for trusted stations you will need to enter the Radio s MAC address into your wireless access point To find the Radio s MAC address use menu items as follows Main menu System settings Network View settings MACAddress 5 To enter the MAC address into your wireless access point you must read the instructions supplied with the wireless...

Page 8: ...M mode press and hold to auto search Next Track Press to increase or decrease volume level ALARM 1 ALARM 2 Press to set alarm 1 alarm 2 MODE Press to switch sound source Internet Radio Music Player DAB FM iPod AUX in modes SLEEP Press to set SLEEP time after which the radio will go into standby sleep mode SCAN No Function Press to SCAN for station No Function PRESET Press and hold to Save Preset T...

Page 9: ...9 Front and Back Overview Remote control Overview Unit Back Overview ...

Page 10: ...irst use 1 Continue above press to confirm YES and then press or to your ideal hour format 2 Press to confirm 3 Press or to Update from Network and then press to confirm This will search for enhanced software versions and update the unit if newer software is available 4 Press or to your local timezone and then press to confirm 5 Press or to your preferred Daylight saving status and then press to ...

Page 11: ...ork Press or toyour favorite one press toconfirm If your network is not configured to request a password WEP WPA radio will connect to the network and display If a WEP WPA key password is required radio will ask you to input the WEP WPA code and display the password entry screen as follows 9 Press or to cycle through the alpha numeric character list press to select an appointed character ...

Page 12: ...e 0 or after Z 10 After selecting the final character of your password press or to and then press to confirm The WEP WPA password is then stored you will not need to re enter it 11 Press to exit Internet Radio 1 Press MENU to and then press to enter Internet radio mode Note Or you may also pressMODErepeatedly until Internet radio shows up then stop pressing to enter 2 Then it will say ...

Page 13: ...router see it working normally or not 2 Relocate your radio to a stronger signal position is necessary 3 Make sure your password is correctly input Local Stations Note a make sure your radio connected to WiFi network If there is no connection press BACK 1 Point the cursor to Station list and then press to confirm 2 Press or to highlight Local XXX where XXX is your local region and then press to co...

Page 14: ...o Stations and then press to confirm There are 5 options are available for you to choose a station 1 Location LOCATION enables you to choose from the radio stations provided by any country which you can choose from a list 1 While cursor highlights Location press to confirm 2 Press or to the region you wanted is shows up press to confirm 3 Use the navigation keys to select a station from the countr...

Page 15: ...r to highlight the station you would like press to confirm Note Some radio stations do not broadcast 24 hours per day and some stations are not always on line Note If this station has on demand content that is it gives an option of listening to the past programs Podcasts 1 Press or to highlight Podcasts 2 Press to confirm and then press or to your favorite option 3 Press to confirm and then step b...

Page 16: ... to your preferred stations The screenshot above shows the website where stationscan be added to My Favourites Note Your added my favourites stations are stored on the website Therefore doing a factory reset of the radio DOESNOTdelete them To remove your stations remove them from your account on the website How to Get an Access Code for website use 1 Press or to highlight Help and then press to co...

Page 17: ...ided by either internet radio station or broadcaster Reliability of Station This will indicates the degree of reliability of station which you are listening to Signal Information This shows the digital bit rate and the signal mode of current station Playback Buffer This displays the playback buffer strength of current station The playback buffer ensures uninterrupted playback of the station Today ...

Page 18: ...ss MODErepeatedly until Music player is showing active 2 While the cursor points to Shared media press to confirm and then step by step to your preferred Music Repeat play mode 1 Press MENU and then press or to Repeat play Off press to shift Off to On or press again then Off Shuffle play mode 1 Press MENU and then press or to Shuffle play Off press to shift Off to On or press again then Off ...

Page 19: ...be selected Note if no DAB DAB signal is found in your area try moving your T4 for better signal Change to Another DAB Station 1 Press BACK to return to the station list 2 While the cursor points to Station list press to confirm 3 Press or to cycle through stations in the list and then press to confirm and change the active station Dynamic Label Segment DLS Some stations may have scrolling text in...

Page 20: ...ferred channel Note If there is a multiplex corresponding to this channel and frequency then the display will show a tuning meter with the signal strength and the multiplex name after a few seconds 3 Press again to exit Prune invalid stations 1 Press MENU and then press or to Prune invalid press to confirm 2 Press or to YES and press to confirm ...

Page 21: ...ion I e make all stations sound similar in volume 1 Press MENU and then press or to DRC press to confirm 2 Press or to your ideal option press to confirm To change station order 1 Press MENU and then press or to Station order press to confirm Note There are 3 options Alphanumeric Ensemble and Valid shows the active ordering STATION ORDER DESCRIPTION Alphanumeric Display all stations in alphanumeri...

Page 22: ...repeat step 3 The unit will display the frequency changing until it stops on the next station After it reaches the end of the frequency range it will search again from the beginning of range Scan Setting When in FM mode press BACK or MENU to enter its setting mode 1 While the cursor points to Scan setting press to confirm 2 Press or to select YES or NO and then press to confirm Audio Setting Stere...

Page 23: ... station 1 Press and hold PRESET and then press or to your desired preset slot 2 Press to confirm And then it will return to its normal working condition and preset icon appeared on display Selecting a Preset station 1 Press PRESET and then press or to your purpose one 2 Press to confirm and recall the station ...

Page 24: ...3 iPod Nano 3rd Gen 14 iPod Touch 1st Gen 16 iPod Touch 2nd Gen 17 iPod Nano 4th Gen 2 Insert your iPod into the iPod dock it will ask you to switch to iPod mode Note the Dock will begin to charge your iPod if necessary Charging will stop when the iPod is fully charged check the iPod screen Or another way to enter iPod mode by pressing MODErepeatedly until iPod is displayed You can choose tracks t...

Page 25: ...und source and the other end to the AUX input on the T4 rear of unit 2 Press MODErepeatedly until AUX in is showing up Note Or enter Main Menu and then press or to AUX in press to confirm 3 To gain optimal volume levels adjust the output volume level on both the source device and on radio itself It is usually better to set the source device to near maximum volume so the overall volume is the same ...

Page 26: ...tly enter its setting 2 or It also can be activated from Main menu Sleep press to confirm 3 Press or to define the sleep period which between 0 60 minutes When you see the required time stop pressing the selectors Note The interval time is15minutes per step The sleep icon shows when sleep is active and shows a countdown to sleep To wake the T4 press ...

Page 27: ...rm 3 Press or to set the date and then press to confirm 4 Use the same method to set month year hour and minute in turn Auto set Time Date Note Choose Auto update please ensure your radio is connecting to internet successfully 1 Press or to Auto update press to confirm 2 You can either choose Update from DAB or Update from Network press to confirm and the clock will synchronise to the chosen time ...

Page 28: ...rm Set timezone 1 Press or to Set timezone press to confirm 2 Press or to your location timezone press to confirm Daylight Savings 1 This feature is activated from Main menu System settings Time Date Daylight savings press to confirm 2 Press or to ON and then press to confirm then daylight savings are activated ...

Page 29: ...ress to confirm 2 While the cursor points to Enable Off press to confirm 3 Press or to your ideal alarm frequency press to confirm 4 Press or to Time 00 00 press to confirm 5 Press or to change hours press to confirm 6 Using the same method set minutes and then press to confirm 7 Press or to Mode Internet radio press to confirm and then press or to set your favoured alarm sound mode ...

Page 30: ...then press or to Volume 12 press to confirm 9 Press or to your ideal volume level press to confirm 10 Finally press or to Save press to confirm The display will show Alarm Saved for 3 seconds an alarm icon appears on the main screen To check alarms status press to enter standby mode alarm information is displayed ...

Page 31: ...ged by the number of times SNOOZEis pressed Note While in SNOOZEmode the relative alarm should be twinkling and shows how long it will be before re sounding during this time you also can press to turn the alarm off To Cancel Alarm Permanently 1 Select your chosen Alarm ALARM 1 or ALARM 2 then enter alarms setting mode 2 While the cursor points to Enable Daily or other frequency press to enter 3 Pr...

Page 32: ...just Volume level Adjust the volume level by pressing or The T4 will remember its previous volume level usually Browse Station Information It is possible to view the information that is displayed on the second line of the display when listening a radio program To browse more information you can by pressing INFO repeatedly this cycles through the information available Note In aux mode there is no i...

Page 33: ...s Equaliser 1 Press MENU and then press or to Main Menu press to confirm 2 Press or to highlight System settings press to confirm 3 Press or to Equaliser press to confirm 4 Press or to your ideal option press to confirm ...

Page 34: ...rk Setup can be activated from Main menu System settings Network press to confirm 2 Press or to your chosen option press to confirm 3 Further features are navigated in a similar way Contrast Setup for Backlight 1 Contrast can be activated from Main menu System settings Contrast press to confirm 2 The contrast of Power On normal use and Standby when not on can be set independently with the navigati...

Page 35: ... to confirm and then press or to YES 3 Press to confirm Software Updates WARNING Whenupdatingsoftware software update may take several minutes do not switch Radio off until this procedure has beencompleted Otherwise may cause permanently damaged 1 Software updates can be activated from Main menu System settings Software update press to confirm 2 While cursor point to Auto check setting press to co...

Page 36: ...t is up to date Enter Setup Wizard 1 It can be activated from Main menu System settings Setup wizard press to confirm SW Version and Radio ID 1 It can be activated from Main menu System settings Info 2 Press to confirm Note This information may be requested when dealing with technical support issues ...

Page 37: ...dia Sharing In the Media Sharing dialogue box select the Share my media check box Check the share my media to box In the list click your Radio click Allow the selected device will now show a green tick and then click OK If your device does not appear in the list of devices perform the following steps 1 From the Media Player menu of your Internet radio select UPNP Servers a list of available comput...

Page 38: ... From the System Preferences window in the System section click on Accounts Select an account and remember its Short Name and password This will be used for the Radio to connect to the MAC Directory Setup From the Dock click on Finder From the Finder menu click on Applications then Utilities Click on More Info for Directory Access and ensure that the Read Write option is enabled Double click on Di...

Page 39: ...orrect key or password into the Radio Remember that text format keys are case sensitive If when attempting to connect to an encrypted network your Radio displays Wireless error followed by a 5 digit number then please ensure that you enter the correct passphrase for the network If the problem persists then you may need to consult your network configuration 5 If your Radio can connect to the networ...

Page 40: ...splay Rated Output Power 5Wrms Speakers 8 ohm airSOUND mid side array Headphone Line out socket 32 ohm 47K ohm Dimensions 109 x 109 x 143mm This symbol on the product packaging means that your electrical and electronic equipment should be disposed at the end of its life separately from your household waste There are separate collection systems for recycling in the EU Please recycle For more inform...

Page 41: ...d any costs payable subject to the conditions of this warranty Orbitsound Ltd Warranty Terms and Conditions 1 RETURN TO BASEWARRANTY Faulty products will be repaired or replaced as deemed appropriate by the relevant Agent at the Agent s premises 2 LIMITATIONS The warranty covers the product and any agent installed accessories provided that the equipment has been installed and used in accordance wi...

Page 42: ... 5 FORCEMAJEURE The Agent shall have no liability for delay or failure to perform if such failure is due directly or indirectly to any cause beyond the Agent s reasonable control including but without limitation to acts of God explosion fire terrorism accident war or threats of war prohibitions of any kind embargoes strikes or lockouts GENERAL The Agent may assign or subcontract responsibilities a...

Reviews: