background image

27

Touch Sensitivity (

TchSense

)

(–64 to +63) — Controls changes in
the volume of the tone depending
on how hard you strike the keys.
You can specify more volume for
stronger striking and less volume for
lighter striking, or you can specify 00
to set the same volume regardless
of how hard you strike the keys. 

Pan (

Pan

) (–64 to +63) — Controls

the relative position of the tone
between the left and right speaker
channels. A greater positive value
moves the center point further to the
right, a negative value moves it to
the left. 

4. Use 

+

 or 

 to change the parame-

ter’s setting. You can also use the
number buttons to directly enter a
value for the parameter.

Notes:

• If you want to change another

parameter, repeat Steps 3 and 4.

• If you selected a layered preset

tone, press 

 to recall the DCO2

parameters (

d Co2

 appears), and

repeat Steps 3 and 4 to set the
parameters. Press 

TONE

 again to

return to the DCO1 parameters.

5. Press 

SYNTH

.

Save?

 appears.

To store the settings, press 

 to

display the tone number where you
want to save the user tone. 

To exit the Custom Tone Synthe-
sizer mode without storing a new
tone, press  . The display changes
to

Cancel?

 Press 

TONE

 to cancel.

6. Press 

+

 or 

 until the tone number

you want appears on the display. If
you do not want to assign a name,
skip to Step 10.

7. To give a name to your tone, press

. The first character of the tone

name flashes.

8. Repeatedly press 

+

 or 

 until the first

character of the new name appears
on the display.

9. Press   to move to the next charac-

ter position. Repeat Steps 8 and 9 to
enter the rest of the characters in
the new name.

Note: Press   to change the tone
number (the name of the tone
returns to its preset name).

10. Press 

 to save the user tone.

Save OK

 appears briefly and the

keyboard exits the Custom Tone
Synthesizer mode.

42-4041.fm  Page 27  Tuesday, August 3, 1999  6:56 AM

Summary of Contents for 42-4041

Page 1: ...Cat No 42 4041 OWNER S MANUAL Please read before using this equipment Electronic Keyboard MD 1200 42 4041 fm Page 1 Tuesday August 3 1999 6 56 AM ...

Page 2: ...ult your local RadioShack store if the problem still exists WARNING To reduce the risk of fire or shock hazard do not expose this product to rain or moisture CAUTION RISK OF ELECTRIC SHOCK DO NOT OPEN CAUTION TO REDUCE THE RISK OF ELECTRIC SHOCK DO NOT REMOVE COVER OR BACK NO USER SERVICE ABLE PARTS INSIDE REFER SERVICING TO QUALIFIED PERSONNEL This symbol is intended to alert you to the presence ...

Page 3: ...as you play them along with the current tone rhythm and tempo The built in back light makes it easy to read the display even in darkness 24 Note Polyphonic Sound lets you play and hear up to 24 notes at the same time so you can play or create al most any type of music Memory lets you set the MD 1200 to record up to 2 songs 6 tracks and 5 200 notes The recording remains stored even while the keyboa...

Page 4: ...Function lets you make the MD 1200 sound multiple tones for auto accompaniment memory playback or to play MIDI data received from another MIDI device Automatic Intro Ending Rhythm lets you set the MD 1200 to automatical ly add a 3 to 8 measure introduction or 3 to 8 measure ending to the selected auto rhythm Drum Pads play drum sounds re gardless of the keyboard s tone setting Two Built In Speaker...

Page 5: ...e Preset Auto Rhythms 15 Selecting Playing an Auto Rhythm 15 Using SYNCHRO 16 Using INTRO 17 Using FILL IN 17 Using VARIATION 17 Using ENDING 17 Using Auto Accompaniment 17 Adjusting the Accompaniment Volume 18 Concert Chord 19 Standard Fingering 20 Full Range Chords 21 Using FREE SESSION 21 Using the Mixer 22 Editing the Status of a Channel 23 Editing the Parameter 24 Using the Custom Tone Synthe...

Page 6: ...cording 38 Changing the Navigation Track 39 Editing Memory Contents 39 Editing Techniques and Display Contents 40 Deleting Individual Data 40 Deleting All Data in a Specific Track 40 Using MIDI 41 About MIDI 41 Making the MIDI Connections 41 MIDI Data 42 Changing MIDI Settings 44 Dumping Importing Data 45 Dumping Data 45 Importing Data 46 Notes About the MIDI Implementation Chart 46 Troubleshootin...

Page 7: ...and longest life we recom mend RadioShack alkaline batteries Cautions Use only fresh batteries of the required size and recommended type If you do not plan to use the MD 1200 with batteries for a week or more or if you will be using only AC power remove the batteries Do not mix old and new batteries different types of batteries stan dard alkaline or rechargeable or rechargeable batteries of differ...

Page 8: ...nsert the adapter s barrel plug into the DC 9V jack on the back of the MD 1200 2 Plug the adapter into a standard AC outlet CONNECTING HEADPHONES To listen to your MD 1200 without dis turbing others you can connect a pair of 1 4 inch 6 35 mm plug stereo head phones not supplied Your local Ra dioShack store sells a wide selection of headphones To connect a pair of headphones insert the headphones 1...

Page 9: ...inch 6 35 mm plug To connect an external amplifier to your keyboard insert the cable s 1 4 inch 6 35 mm plug into the PHONES OUT PUT jack on the back of the keyboard and connect the cable s other end to the amplifier s input jack s such as AUX IN or TAPE IN Your local RadioShack store sells a full line of amplifiers speakers and connec tion cables USING THE MUSIC STAND To easily view sheet music w...

Page 10: ... Each time you turn it on after that it recalls the last selected tone To select a different tone see Using the Preset Tones on Page 11 To select an auto rhythm see Using the Preset Auto Rhythms on Page 15 To play auto accompaniment see Using Auto Accompaniment on Page 17 5 Slide VOLUME toward MAX to increase the sound level or MIN to decrease it 6 To turn off the MD 1200 press POWER The red POWER...

Page 11: ...board s preset tones however are capable of only 12 note polyphony Most tones on this keyboard have been recorded and processed using a technique called digital sampling To ensure a high level of tonal qual ity samples are taken in the low mid and high ranges and then com bined You might notice very slight differences in volume or sound qual ity for some tones when you play them at different posit...

Page 12: ...rs 168 199 are the user tone area See Using the Custom Tone Synthesizer on Page 24 3 Play the keyboard to hear the selected tone 4 Adjust the volume to the desired level To select a different tone while TONE appears simply enter the desired tone number No Tone 128 SYNTH PAD 1 129 SYNTH PAD 2 130 TOUCH STRINGS 131 DO AHH 132 STRINGS HIT 133 VIBES PIANO 134 SAW SYNTH 135 TOUCH BASS 136 STRINGS PIANO...

Page 13: ...the acoustics of a small club ROOM adds the acoustics of a studio To turn off REVERB press REVERB so no indicator appears on the display USING SPLIT The MD 1200 s SPLIT feature lets you play two different tones on opposite ends of the keyboard so the low end keys play one tone and the high end keys play another Follow these steps to use SPLIT 1 Press TONE 2 Enter the three digit number for the ton...

Page 14: ... key Note The first tone you select when us ing LAYER is called the base tone and the second tone is called the layer tone 1 Press TONE 2 Enter the three digit number for the base tone 3 Press LAYER The LAYER indicator appears 4 Enter the three digit number for the layer tone 5 Play the keyboard to hear the selected layered tones To select a different layer tone enter the three digit number for th...

Page 15: ...to rhythms that provide a steady beat for your music The name and two digit number of each preset auto rhythm is marked to the left of the MD 1200 s dis play You can play a preset auto rhythm on the MD 1200 in any of these ways Select and play a rhythm See Selecting Playing an Auto Rhythm Synchronize the start of a rhythm with your music See Using SYN CHRO on Page 16 Start a rhythm with a special ...

Page 16: ...own TEMPO or You can also adjust the tempo by first pressing TEMPO or then entering the desired number of beats per minute in three digits 040 to 255 or by holding down or on the keypad To reset the tempo to its default original speed press TEMPO or at the same time To select a different rhythm repeat Steps 1 and 2 To stop the auto rhythm press START STOP Using SYNCHRO The MD 1200 s SYNCHRO featur...

Page 17: ...variation plays continuously at the selected tempo To insert the fill in segment in the alter nate rhythm press VARIATION FILL IN The keyboard adds a 1 to 2 measure variation in the rhythm To return to the normal rhythm press NORMAL FILL IN To stop the auto rhythm press START STOP Using ENDING To end the selected rhythm with a spe cial 3 to 8 measure flourish press SYN CHRO ENDING while the auto r...

Page 18: ...rately from the overall volume of the keyboard 1 Press ACCOMP VOLUME The three digit number of the last selected accompaniment volume appears on the display 2 Within 5 seconds enter a number from 0 0 0 softest to 1 2 7 loudest on the keypad The numbers appear on the display as you press the keys To select the next highest or lowest accompaniment volume number you can also press or after pressing A...

Page 19: ...ese steps to start concert chord auto accompaniment 1 Set MODE to CONCERT CHORD 2 Select and enter an auto rhythm 3 To start the auto rhythm before the auto accompaniment press START STOP or INTRO To synchronize the start of the selected auto rhythm with your accompaniment press SYNCHRO ENDING 4 Begin the accompaniment by press ing the desired accompaniment key s To play a melody along with the ac...

Page 20: ... dim7 chord the lowest note you play determines the root of the chord Be sure that your fingering correctly defines the root you want The diagrams above show only one possible fingering position for each chord It is possible to play a chord using several different positions For example these three fingering positions produce the same C chord Major M Minor m Augmented aug Suspended 4th sus4 Dominan...

Page 21: ...e full range chord method lets you play chords of any type using any of the MD 1200 s keys Set MODE to FULL RANGE CHORD and follow the steps under Standard Finger ing If you press three or more keys anywhere on the keyboard that form a chord the MD 1200 plays that chord The MD 1200 responds with melody sounds if you press fewer than three keys Notes In the full range chord mode the MD 1200 recogni...

Page 22: ...the root key is automatically set to C To start the free session accompani ment with a short introduction press INTRO To synchronize the start of the free session accompaniment with the start of your melody press SYN CHRO ENDING 7 Adjust TEMPO and VOLUME to the desired levels 8 Play your melody using the entire keyboard 9 To stop the free session accompani ment press START STOP To end the free ses...

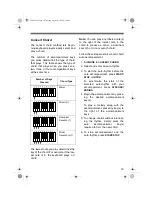
Page 23: ...ars on the display 2 Use or on the keypad to select the channel you want to edit 3 Press or to display the current status of the channel on oFF or SoL solo 4 Use or to select the status you want on default Turns on the current channel A bar appears at the bot tom of the level meter for the selected channel oFF Turns off the current channel The bar at the bottom of the level meter disappears SoL Tu...

Page 24: ...ed channel Pan 000 to 127 controls the pan 000 is fully left 64 is the center position and 127 is fully right Fine Tune 50 to 50 fine tunes the pitch of the selected chan nel in cent units A cent is one hun dredth of a semitone There are 12 semitones per octave C Coarse Tune 12 to 12 coarsely tunes the pitch of the selected channel in semitone units Express Expression 000 to 127 controls the volum...

Page 25: ... Waveform PCM Set Volume Characteristic Amp Envelope Set Tone Pitch Pitch and Pitch Envelope Set Tone Characteristic Attack Rate Release Rate Level Touch Sensitivity and Pan Understanding 1DCO and 2DCO Tones A Digital Controlled Oscillator DCO controls the sound output of a digital sig nal Some of the MD 1200 s built in tones are simple tones 1DCO and some are layered tones 2DCO When you select a ...

Page 26: ...te Atk Rate 1 to 127 Sets the speed of the attack the period from when you press a key to when the tone reaches its maximum volume The greater the value the quicker the attack Use this parame ter to make fine adjustments to the tone characteristics of the amp envelope Release Rate Rel Rate 1 to 127 Controls the speed of a tone release the period from when you release a key to when the tone stops s...

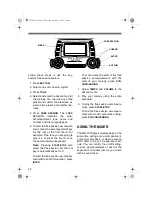
Page 27: ...nd repeat Steps 3 and 4 to set the parameters Press TONE again to return to the DCO1 parameters 5 Press SYNTH Save appears To store the settings press to display the tone number where you want to save the user tone To exit the Custom Tone Synthe sizer mode without storing a new tone press The display changes to Cancel Press TONE to cancel 6 Press or until the tone number you want appears on the di...

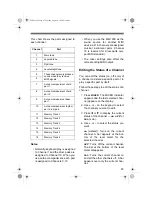
Page 28: ...tting these two parameters to get the general sound you want and then set the other parameters to add the finishing touches Experiment with different settings There are no real rules about what a tone should sound like Let your imagination run free and experiment with different combinations You might be surprised at what you can achieve Deleting a User Tone To delete an existing user tone follow S...

Page 29: ...atically resets the key to the default value of 0 middle C each time you turn off the keyboard The transpose setting also affects memory playback see Playing Back from Memory on Page 34 and auto accompaniment TUNING THE KEYBOARD Although your MD 1200 never goes out of tune it does let you adjust its pitch to match other instruments or musical re cordings Note You cannot adjust the keyboard s pitch...

Page 30: ...ot affect auto accompaniment or received MIDI data The MIDI data sent out from the MD 1200 is affected by the touch response setting CHANGING AUTO POWER OFF When you operate the MD 1200 with battery power the keyboard automati cally shuts off after about 6 minutes if you do not press a key Press POWER again to turn power back on To have the keyboard not automatically turn off during a session turn...

Page 31: ...ten the key board s sound and even start or stop an auto rhythm To connect a sustain pedal to your MD 1200 insert the plug on the pedal s cord into ASSIGNABLE JACK on the back of the keyboard You can adjust the MD 1200 s assign able jack to these settings when you use a sustain pedal Follow these steps to change the as signable jack s setting 1 Repeatedly press TRANSPOSE TUNE MIDI until Bend appea...

Page 32: ...tart read these tips To record without an auto rhythm skip Step 5 of Real Time Record ing Recording starts when you press a key To start recording with synchro start press SYNCHRO ENDING instead of START STOP in Step 5 of Real Time Recording Recording starts when you play a note or a chord on the accompaniment keys To record using an intro ending or fill in use INTRO SYNCHRO END ING NORMAL FILL IN...

Page 33: ... 1 to select a song number 3 Press CHORD 1 to select Track 1 While the keyboard is in memory record mode the level meters for channels 11 through 16 correspond to memory tracks 1 through 6 When all four bars are lit that channel has something in memory if only one bar is lit that track is empty 4 If desired you can change these settings tone number rhythm number tempo MODE Note Do not change the t...

Page 34: ...hen memory becomes full recording automatically stops and auto accompaniment or rhythm stops playing if used Memory contents are saved as long as power is supplied to the key board Unplugging the adapter with out batteries or with weak batteries erases the memory To prevent data loss connect an adapter before replacing the batteries Turning off the keyboard while recording erases the contents of t...

Page 35: ...of the specified length is recorded A rest can be specified there so you can create an original chord pattern To add chord accompaniment dur ing rhythm play enter rests from the beginning of the recording up to where you want accompaniment to start Then enter only the chords no rests Follow these steps to record chords with step recording 1 Press MEMORY until REC No appears 2 Within 5 seconds use ...

Page 36: ...ODE is set to NORMAL during step recording you need to specify them using a method other than Concert Chord or Fingered That way you can enter 18 chord types using only two keys While holding down the desired chord root key press the chord key to specify the chord The root and chord types are labeled above each key The chord root letter and type of chord also appear on the display as you play a ch...

Page 37: ...ording RECORDING MULTIPLE TRACKS In addition to Track 1 where you record auto accompaniment as well as key board play there are five other melody tracks that you can use to record melody parts only You can record different tones on these tracks and build a full en semble of instruments You can play back what you already re corded on Track 1 or any other track while you record on Tracks 2 6 Real Ti...

Page 38: ...splay shows the note you enter To delete a rest entry press 0 again 7 Use 1 9 to enter the length of the note or rest 8 Repeat Steps 5 and 6 to enter more notes 9 Press MEMORY STEP or START STOP to end recording Notes If you make a mistake see Correct ing Mistakes on Page 37 When you record on a track that already contains data the keyboard automatically locates the end of the previous recording m...

Page 39: ...lashing Make the desired changes to the selected parameter The actual procedures you use to change a parameter depend on the type of data it contains See Editing Techniques and Display Contents on Page 40 Notes Do not change a note identical to the preceding or succeeding note Doing so might alter the length of the note and you will have to re record the entire track When you change note key pres ...

Page 40: ... Press and at the same time DataDel appears 3 Press to delete the selected data Or press or or or to cancel the procedure without deleting any thing Deleting All Data in a Specific Track 1 Press MEMORY until Rec No appears Within 5 seconds use or to select a song number 2 Hold down MEMORY until Tr Del appears 3 Within 5 seconds press the MEM ORY TRACK number 2 6 for the track s you want to delete ...

Page 41: ...o MIDI data sent by the other MIDI instrument s MIDI THRU lets you connect network additional MIDI instruments and sends along to other MIDI devices a copy of all data it receives through its MIDI IN ter minal The cable that connects MIDI devices does not actually carry sound between them like a speaker wire carries sound from a receiver to a speaker Instead MIDI equipped devices talk to each oth ...

Page 42: ...sent automatical ly as you play Notes The MD 1200 s demonstration tunes cannot be sent as MIDI data For detailed specifications of the MIDI function see the MIDI Imple mentation Chart on Page 58 Note On Off specifies which keys are pressed Note On or released Note Off Also includes how loud a note is played as a value from 0 to 127 Notes The pitch of a note depends on the tone that is being used a...

Page 43: ...rved for drum sounds only so it is not necessary to send bank select data when changing tones RPN is used when combining multiple control changes RPN 100 and 101 se lects the parameter to control and Data Entry 6 and 38 sets the contents of the parameter On the MD 1200 RPN is used to set pitch bend range transpose and tune control from an external MIDI device All Sound Off forces all sound on the ...

Page 44: ...rocess than other messages when you program GM Mode On in the sequencer leave at least a 100 msec pause before the next message GM Mode Off F0 7E 7F 09 02 F7 used to turn off the MD 1200 s GM mode Reverb Change F0 44 0E 09 yy F7 switches the keyboard s reverb function yy determines the type of reverberation effect Note The contents of the System Ex clusive message affect the entire key board Other...

Page 45: ...oFF to send data only as MIDI data the speakers on the keyboard remain silent AcompOut Accompaniment Out Default Off set to on to send auto accompaniment as MIDI data Set to oFF to turn it off 3 Within 5 seconds use or to change the setting of the parameter DUMPING IMPORTING DATA The MD 1200 s internal data including data recorded to memory and synthesiz er data can be sent and received in bulk as...

Page 46: ...Y This means the MD 1200 sends and receives polyphonic data on only one channel at a time Note Number This number repre sents each key of the keyboard The lowest number 0 is five octaves below middle C Since the MD 1200 s lowest note is two octaves below middle C and the highest is three octaves above mid dle C your keyboard can send a note number between 36 and 96 But it can receive all 0 through...

Page 47: ...send the synchronizing signal System real time commands send three kinds of signals start tells the key board to start playing from the begin ning stop tells all the synchronized instruments to stop playing and contin ue is similar to start but it signals the music to begin at whatever point it was last stopped All Notes Off This feature is a kind of panic button it stops the sounds cur rently pla...

Page 48: ...ted Disconnect headphones Power supply problem Make sure the batteries are facing correctly to match the marked polarity Replace the batteries with fresh ones Connect the AC adapter properly You are pressing too few accompaniment keys while MODE is set to FINGERED Set MODE to NORMAL or CONCERT CHORD Press 3 or 4 keys to form a chord while MODE is set to FINGERED No sound when connected to an exter...

Page 49: ... and dirt which can cause prema ture wear of parts Handle the MD 1200 gently and carefully Dropping it can damage cir cuit boards and cases and can cause the MD 1200 to work improperly Use only fresh batteries of the required size and recommended type Batteries can leak chemicals that damage your MD 1200 s electronic parts Wipe the MD 1200 with a damp cloth occasionally to keep it looking new Do n...

Page 50: ...ythm Controller Start Stop Intro Normal Fill In Variation Fill In Synchro Ending Accompaniment Volume 0 to 127 128 steps Free Session 100 patterns auto accompaniment in accordance with selected chord progression Memory Function Songs 2 Recording Tracks 6 2 through 6 are melody tracks Recording Methods Real time Step Memory Capacity Approximately 5 200 notes total for two songs Edit Function Equipp...

Page 51: ...4 Inch Phone Jack sustain sostenuto soft rhythm start stop Power Supply 9V DC Jack Headphones Stereo Standard Jack Output Impedance 150 Ohms Output Voltage 3 5 V RMS MAX at 47K ohm load Power Sources DC 6 D batteries AC 9V with AC adapter Power Consumption 7 7 W Dimensions HWD 515 16 377 16 1413 16 Inches 15 2 94 5 37 6 cm Weight Without Batteries 12 lbs 5 5 kg Included Accessory Sheet Music Stand...

Page 52: ...52 APPENDIX NOTE TABLE 42 4041 fm Page 52 Tuesday August 3 1999 6 56 AM ...

Page 53: ...lled Oscillator 4 Range type 5 Recommended sound range for General MIDI Tones without scale The following shows maximum polyphone for synthesized tones 128 through 159 141 BASS SLIDE 24 notes Other tones 12 notes 42 4041 fm Page 53 Tuesday August 3 1999 6 56 AM ...

Page 54: ...54 FREE SESSION CHORD PROGRESSION CHART 42 4041 fm Page 54 Tuesday August 3 1999 6 56 AM ...

Page 55: ...55 42 4041 fm Page 55 Tuesday August 3 1999 6 56 AM ...

Page 56: ...56 DRUM ASSIGNMENT LIST 42 4041 fm Page 56 Tuesday August 3 1999 6 56 AM ...

Page 57: ...57 FINGERED CHORD CHART 42 4041 fm Page 57 Tuesday August 3 1999 6 56 AM ...

Page 58: ...1 16 1 16 1 Held in memory with power supplied Mode Default Messages Altered Mode 3 X Mode 3 X Note Number True voice 24 96 0 127 1 108 2 2 See Note Table on Page 52 Velocity Note ON Note OFF O 9nH v 1 127 X 9nH v 0 O 9nH v 1 127 X 9nH v 0 8nH v XX XX no relation After Touch Keys Channels X X X O Pitch Bender O O 3 Control Change 0 32 1 6 38 7 10 11 64 66 67 100 101 120 121 O X O 4 O O O O 5 O 5 O...

Page 59: ...59 NOTES 42 4041 fm Page 59 Tuesday August 3 1999 6 56 AM ...

Page 60: ...g the warranty period take the product and the RadioShack sales receipt as proof of purchase date to any RadioShack store RadioShack will at its option un less otherwise provided by law a correct the defect by product repair without charge for parts and labor b replace the product with one of the same or similar design or c refund the purchase price All replaced parts and products and products on ...

Reviews: