background image

Optelec                                                         

FarView 


English  


Page 48 


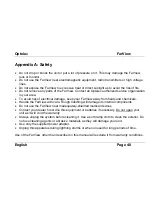
Appendix A: Safety 


  Do not drop or knock the unit or put a lot of pressure on it. This may damage the FarView, 

lens or monitor.


  Do not use the FarView near electromagnetic equipment, radio transmitters or high voltage 

lines. 


  Do not expose the FarView to excessive heat or direct sunlight as to avoid the risk of fire.


  Do not remove any parts of the FarView. Contact an Optelec authorized service organisation 

in your area. 

  To avoid risk of electrical damage, keep your FarView away from fluids and chemicals. 

  Handle the FarView with care. Rough handling will damage its internal components. 

  Do not use the FarView near inadequately-shielded medical devices. 

  Contact your dealer to service this equipment or batteries if necessary. Do not open your 

unit as it will void the warranty.  

  Always unplug the system before cleaning it. Use a soft damp cloth to clean the exterior. Do 

not use cleaning agents or abrasive materials as they will damage your unit. 

  Use only the supplied power adapter. 

  Unplug this apparatus during lightning storms or when unused for long periods of time. 

 
Use of the FarView other than described in this manual will exclude it from warranty conditions. 
 

Summary of Contents for FarView

Page 1: ......

Page 2: ...over to the specified collection point for recycling of such hazardous waste Isolated collection and proper recovery of your electronic and electrical waste equipment at the time of disposal will all...

Page 3: ...re designed to provide reasonable protection against harmful interference in a residential installation This equipment generates uses and can radiate radio frequency energy and if not installed and us...

Page 4: ...nges or modifications not expressly approved by the party responsible for compliance could void the user s authority to operate this equipment Declaration of Conformity Trade name Optelec Model No FAR...

Page 5: ...Page 5 FarView User Manual FarView Version 1 0 2008 Optelec the Netherlands All rights reserved Optelec P O Box 399 2990 AJ Barendrecht The Netherlands Phone 31 0 88 678 34 44 E mail info optelec nl I...

Page 6: ...t side 12 Left side 13 Top side 15 Back side Camera side 17 3 Power and battery use 19 Charging the batteries 19 Turning the power on and off 20 Battery indicator 20 Stand by mode and system auto off...

Page 7: ...s and documents 29 6 Picture Playback Mode 31 Picture selection and adjustment 32 7 Using the FarView Menu 34 Opening the menu 34 Modifying settings in the menu 35 8 Connecting the FarView to other eq...

Page 8: ...allow you to store and recall up to 100 images The FarView is designed for every day use in any location Stored images can be recalled at any moment with a simple press of a button Ergonomically plac...

Page 9: ...evice What s in the box The FarView s packaging contains the following The FarView video magnifier A shoulder strap A protection and carrying pouch A power cable with power adapter An USB cable The us...

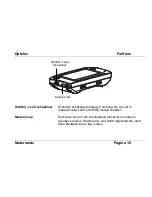
Page 10: ...correctly in front of you when the display is facing towards you and the plus shaped button is located on the left side of the screen Front side Display side The following figure shows the front side...

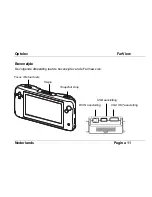
Page 11: ...es and the FarView menu 4 3 wide screen display The 4 3 wide screen displays text and images Zoom button Pressing the zoom button allows you to change the magnification Bottom side The following figur...

Page 12: ...Contrast adjustment button Rotating the adjustment button allows you to increase or decrease the contrast Color mode button Rotating the color mode button allows you to change the foreground and backg...

Page 13: ...power button for approximately two seconds to turn the power on and off When switching the unit on the power light located on the right side of the screen will light up This light automatically goes...

Page 14: ...ce viewing mode Moving the switch towards you will set the unit to distance mode Moving the switch away from you will set the unit to close up view Mode selector button Pressing the mode selector butt...

Page 15: ...following figure shows the top side of the FarView Focus Return button Pressing the return button allows you to focus the camera on the object or text you wish to magnify Focus Return button Cover Sna...

Page 16: ...USB port The USB port allows you to connect the FarView to a PC with Windows 2000 XP or Vista operating system VGA out connector This connector can be used to connect the FarView to an external VGA m...

Page 17: ...Optelec FarView English Page 17 Back side Camera side The following figure shows the back side or camera side of the FarView Camera Lights Reading stand Reading stand...

Page 18: ...ewing Light The lights can be switched on and off The lights will automatically be switched on when the unit is switched into close up viewing mode Reading stand Pull and place the reading stand for e...

Page 19: ...s are fully charged the FarView s operating time is approximately 2 5 hours in live mode and 4 hours in playback mode To charge the batteries plug in the adapter that was supplied with the unit into t...

Page 20: ...pter to charge the batteries Stand by mode and system auto off This feature will switch the FarView into stand by mode when not used for about 3 minutes While in stand by mode the LCD display will swi...

Page 21: ...displayed on the screen can be captured using the snapshot button Alternatively information can be viewed and magnified in real time Playback mode Images stored in the internal memory can be recalled...

Page 22: ...up mode by moving the view mode selector switch to close up mode The view mode selector is located on the left side of the unit 2 Unfold the reading stand and place the FarView over your reading mater...

Page 23: ...whereas pressing the smaller part of the button will decrease the magnification Selecting a viewing mode Rotating the color mode button located right on the right of the bottom side of the unit allows...

Page 24: ...low Blue mode reading in high contrast yellow text on blue background Blue Yellow mode reading in high contrast blue text on yellow background Contrast settings Rotating the contrast adjustment button...

Page 25: ...ewing mode by setting the view mode selector switch to close up mode 2 Place the unit on the paper with the display facing up 3 Press the FarView down on the cursor button side 4 Press the focus retur...

Page 26: ...tance mode The view mode selector is located on the left side of the unit 2 Direct the unit to the text or object that you wish to look at and use the zoom contrast and color settings buttons to adjus...

Page 27: ...s you to increase the magnification whereas pressing the smaller side of the button will decrease the magnification Selecting a viewing mode Rotating the color mode button located on the right of the...

Page 28: ...t yellow text on black background Yellow Blue mode reading in high contrast yellow text on blue background Blue Yellow mode reading in high contrast blue text on yellow background Contrast settings Ro...

Page 29: ...memory for later reference Note This function also allows you to capture a complete A4 or Letter size document or multiple pages of a book or magazine Store the pages in the internal memory and recall...

Page 30: ...ew English Page 30 Please note that when the number of pictures exceeds the allowed 100 images the first picture will automatically be deleted To protect pictures from automatic deletion please refer...

Page 31: ...the screen 1 Switch the unit into playback mode by pressing the mode selector button on the left side of the unit 2 Use the cursor buttons located on the left side of the screen to navigate through th...

Page 32: ...use the skew settings return stop position setting and scroll speed setting Please keep in mind that the image displayed on the screen can only be scrolled when the image is magnified FarView feature...

Page 33: ...of the line or column To cancel the return and stop position press and hold respectively the focus return or snapshot button Please note that the automatic scrolling feature will be disabled when dis...

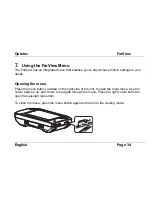
Page 34: ...t in settings to your needs Opening the menu Press the menu button located on the right side of the unit to open the main menu Use the cursor buttons up and down to navigate through the menu Press the...

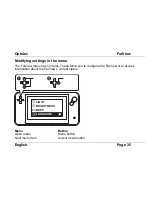
Page 35: ...ings in the menu The FarView menu has 12 items These allow you to configure the FarView or to access information about the FarView s current status LIGHT BRIGHTNESS BEEP LANGUAGE Menu Button Open menu...

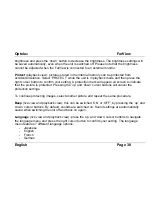
Page 36: ...sing the color mode button Please note that the unit automatically returns to the AUTO setting when the unit is switched off and back on again Light live view the light can be to set on or off in the...

Page 37: ...e adjusted to your needs by pressing up and down cursor buttons Pressing the up button will increase the scrolling speed Pressing the down button will decrease the scrolling speed Skew playback view w...

Page 38: ...ection mark will appear on screen to indicate that the picture is protected Pressing the up and down cursor buttons will cancel the protection settings To continue protecting images select another pic...

Page 39: ...the maximum number of images that can be stored in the FarView s internal memory You can select 30 images or 100 images Press the up and down cursor buttons followed by the right cursor button to sel...

Page 40: ...ther end of the VGA cable to the external monitor or TV Please make sure that the power is switched off when connecting the unit to an external VGA monitor or TV When connecting the FarView to a TV ma...

Page 41: ...on the screen Unplugging the USB cable will switch the unit back into the previous used mode The FarView s drive can be found in the My Computer folder on your PC To exit the PC mode please follow th...

Page 42: ...te file Please connect AC adapter When connecting the unit to a PC via a USB cable make sure that the AC adapter is plugged in Accessing Please do not unplug the USB cable or AC adapter when accessing...

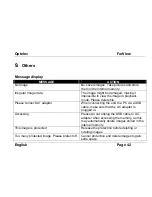
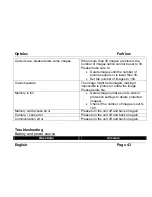
Page 43: ...The image might be damaged making it impossible to protect or rotate the image Please delete file Memory is full Delete images make sure to cancel protection settings to delete protected images Check...

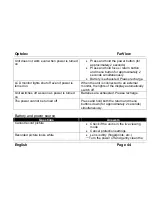
Page 44: ...is connected to an external monitor the lights of the display automatically switch off Unit switches off as soon as power is turned on Batteries are exhausted Please recharge The power cannot be turne...

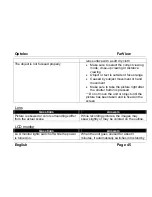
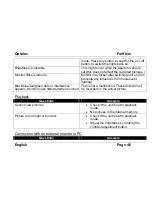
Page 45: ...icture right after the shutter button is pressed Do not move the unit or object until the picture has been taken and is fixed on the screen Lens Questions Answers Picture is skewed or color surroundin...

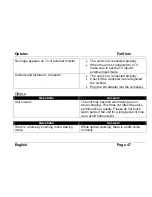
Page 46: ...es from fluorescent lighting Black blue red green dots or interference appears Monitor looks distorted when touched This is not a malfunction These dots will not be recorded on the actual picture Play...

Page 47: ...properly Check if the computer has recognized the camera Plug the AC adapter into the computer Others Questions Answers Unit is warm The unit may become warm during use or while charging This does not...

Page 48: ...arView away from fluids and chemicals Handle the FarView with care Rough handling will damage its internal components Do not use the FarView near inadequately shielded medical devices Contact your dea...

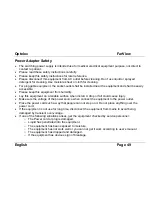
Page 49: ...s equipment on a reliable surface when install A drop or fall could cause injury Make sure the voltage of the power source when connect the equipment to the power outlet Place the power cord such a wa...

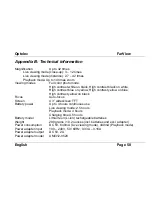
Page 50: ...yellow High contrast yellow on blue High contrast yellow on black Focus Auto focus Screen 4 3 widescreen TFT Battery power Up to 4 hours continuous use Live viewing mode 2 5 hours Playback mode 4 hour...

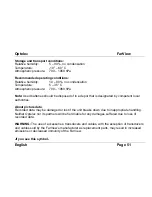
Page 51: ...in a depot that is designated by competent local authorities About picture data Recorded data may be damaged or lost if the unit breaks down due to inappropriate handling Neither Optelec nor its partn...

Page 52: ...European Union If you wish to discard this product please contact your local authorities or dealer and ask for the correct method of disposal TYPE B APPLIED PART This product complies with the safety...

Page 53: ...kershandleiding FarView Versie 1 0 2008 Optelec the Netherlands All rights reserved Optelec BV P O Box 399 2990 AJ Barendrecht The Netherlands Phone 31 0 88 678 34 44 E mail info optelec nl Internet w...

Page 54: ...e 7 Rechterzijde 8 Linkerzijde side 9 Bovenzijde 11 Achterzijde Camerazijde 13 3 Netstroom en batterijgebruik 15 De batterijen laden 15 Aan uitschakelen van de FarView 16 Batterij indicator 16 Stand b...

Page 55: ...lden en documenten opslaan 25 6 Weergave modus 27 Beeldselectie en aanpassing 28 7 Het FarView Menu gebruiken 30 Het menu openen 30 Instellingen in het menu wijzigen 31 8 De FarView aansluiten op exte...

Page 56: ...shot functie en het ge ntegreerde menu maken het mogelijk een maximum van 100 beelden op te slaan en op ieder tijdstip te bekijken Opgeslagen beelden kunnen met behulp van n enkele toets op ieder mome...

Page 57: ...lvorens u het product gaat gebruiken Inhoud van de verpakking De FarView verpakking bevat de volgende onderdelen De FarView beeldschermloep Een halskoord Een bescherm en draagtas Een netsnoer en adapt...

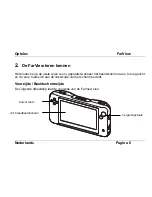
Page 58: ...e juiste wijze voor u geplaatst wanneer het beeldscherm naar u toe is gericht en de plus toets zich aan de linkerzijde van het scherm bevindt Voorzijde Beeldschermzijde De volgende afbeelding laat de...

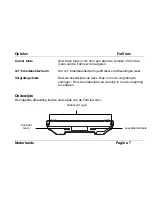
Page 59: ...4 3 breedbeeldscherm Het 4 3 breedbeeldscherm geeft tekst en afbeeldingen weer Vergrotingstoets Druk de bovenzijde van deze knop in om de vergroting te verhogen Druk de onderzijde van de knop in om de...

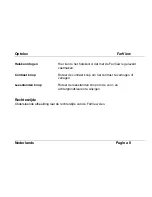
Page 60: ...met de FarView is geleverd vastmaken Contrast knop Roteer de contrast knop om het contrast te verhogen of verlagen Leesstanden knop Roteer de leesstanden knop om de voor en achtergrondkleuren te wijzi...

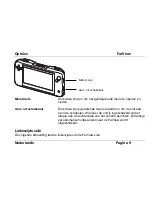
Page 61: ...knop gedurende twee seconden in om de unit aan en uit te schakelen Wanneer de unit is ingeschakeld zal het lampje aan de rechterzijde van het scherm oplichten Dit lampje zal automatisch uitgaan wannee...

Page 62: ...elaar omlaag of omhoog om de unit in respectievelijk veraf of dichtbij modus te zetten Modus knop Druk deze knop in om te schakelen tussen live modus en weergave modus Wanneer de unit wordt ingeschake...

Page 63: ...telec FarView Nederlands Pagina 11 Bovenzijde De volgende afbeelding laat de bovenzijde van de FarView zien Focus Retour toets Klepje Snapshot knop VGA OUT aansluiting DC IN aansluiting USB aansluitin...

Page 64: ...aansluiting Wij raden u aan enkel de bijgeleverde adapter te gebruiken om het apparaat op te laden USB aansluiting Via de USB aansluiting verbind u de FarView met een PC met het Windows 2000 XP of Vis...

Page 65: ...Optelec FarView Nederlands Pagina 13 Achterzijde Camerazijde Onderstaande afbeelding laat de achterzijde van de FarView zien Camera Verlichting Leesstand Leesstand...

Page 66: ...or dichtbij en veraf gebruikt kan worden Verlichting De verlichting kan in en uitgeschakeld worden In dichtbij modus zal de verlichting automatisch worden ingeschakeld Leesstand Schuif de leesstand ui...

Page 67: ...eer de batterijen volledig zijn opgeladen kunt u de FarView minimaal 2 5 uur in live modus en 4 uur in weergavemodus gebruiken Om de batterijen te laden dient u de bijgeleverde adapter aan te sluiten...

Page 68: ...uit de unit met behulp van de AC adapater aan op een stopcontact om de batterijen te laden Stand by modus en automatisch uitschakelen Deze functie schakelt de FarView automatisch in stand by mode wann...

Page 69: ...en dichtbij bekijken en vergroten Bovendien kan het op het beeldscherm weergegeven beeld worden vastgelegd en opgeslagen Weergave modus Beelden die in het interne geheugen zijn opgeslagen kunnen op ie...

Page 70: ...elen De unit zal standaard starten in live leesmodus 1 Selecteer de dichtbij modus door de schakelaar aan de linkerzijde van de unit omhoog te schuiven Op de unit wordt de close up modus middels een t...

Page 71: ...via het menu aanpassen De vergrotingstoets gebruiken Druk de vergrotingsknop aan de rechterzijde van het scherm in om de vergroting te wijzigen Druk het kleinere gedeelte van deze toets in om de verg...

Page 72: ...ntrast zwarte tekst op witte achtergrond Geel Zwart modus lezen in hoog contrast gele tekst op zwarte achtergrond Geel Blauw modus lezen in hoog contrast gele tekst op blauwe achtergrond Blauw Geel mo...

Page 73: ...van de unit omhoog te schuiven De dichtbij modus is middels een tulp icoon gemarkeerd 2 Plaats de unit over het papier scherm naar boven 3 Druk de FarView naar beneden aan de zijde van de cursor toet...

Page 74: ...or de schakelaar aan de linkerzijde van de unit in veraf modus te schuiven De veraf modus wordt middels een icoon in de vorm van een berg aangegeven 2 Richt de tekst op het object dat u wenst te vergr...

Page 75: ...van deze toets in om de vergroting te verlagen Wanneer u het grotere gedeelte van deze toets indrukt zal de vergroting verhogen Een leesstand selecteren Roteer de leesstandenknop rechts aan de onderzi...

Page 76: ...in hoog contrast gele tekst op zwarte achtergrond Geel Blauw modus lezen in hoog contrast gele tekst op blauwe achtergrond Blauw Geel modus lezen in hoog contrast blauwe tekst op gele achtergrond Het...

Page 77: ...atisch opgeslagen in het ge ntegreerde geheugen en kunnen ieder gewenst moment worden bekeken via de weergavemodus N B Via deze functie kunt u eenvoudig een compleet A4 document of meerdere pagina s v...

Page 78: ...en opgeslagen in het interne geheugen van de FarView Voor meer informatie over het opslaan van beelden verwijzen wij u door naar hoofdstuk 7 N B Wanneer u meer dan 100 beelden opslaat zal het eerste b...

Page 79: ...ken op het beeldscherm 1 Selecteer de weergave modus door de knop aan de linkerzijde van de unit in te drukken 2 Gebruik de cursor toetsen aan de linkerzijde van het scherm om door de opgeslagen beeld...

Page 80: ...eelduitlijning retour stop positie instellingen en scrollsnelheid kunt u het lezen met FarView verder optimaliseren Houdt er rekening mee dat u enkel door een tekst of beeld kunt scrollen wanneer u de...

Page 81: ...isch terug te scrollen naar het begin van de regel Om de start stop positie te verwijderen drukt u achtereenvolgens de focus retour knop en snapshot knop in De automatische scroll functie wordt automa...

Page 82: ...u openen Om het menu te activeren drukt u de rechthoekige toets aan de rechterzijde van de unit in Gebruik vervolgens de cursor toetsen omhoog en omlaag om door de verschillende menu items te lopen Dr...

Page 83: ...n het menu wijzigen Het FarView menu telt 12 items Hiermee kunt u de FarView configureren of informatie over de huidige status van de FarView bekijken LIGHT BRIGHTNESS BEEP LANGUAGE Menu Knop Menu ope...

Page 84: ...te slaan Auto contrast wordt automatisch aangepast Handmatig contrast wordt aangepast aan uw behoeftes door middel van het roteren van de contrast knop Wanneer de unit wordt aan en uitgeschakeld zal...

Page 85: ...van het indrukken van de rechter cursor toets Beschermde beelden zullen niet worden verwijderd wanneer u ALLES WISSEN heeft geselecteerd Om beschermde beelden te verwijderen dient u de instellingen i...

Page 86: ...te passen wanneer de FarView is aangesloten op een externe monitor of PC Bescherm weergave modus Opgeslagen beelden kunnen worden beschermd tegen ongewenst verwijderen Selecteer BESCHERM in weergave...

Page 87: ...beelden live modus Via deze instelling kunt u het maximum aantal beelden dat kan worden opgeslagen in het interne geheugen van de FarView wijzigen U heeft de keuze tussen 30 of 100 beelden Gebruik de...

Page 88: ...g aan de bovenzijde van de unit Verbind de andere zijde van de VGA kabel met uw externe monitor of PC Schakel de FarView uit wanneer u deze aansluit op een externe monitor of PC Wanneer u de FarView a...

Page 89: ...gegeven op het scherm van de FarView Wanneer u de USB kabel loskoppelt zal de FarView terugkeren in de voorgaande modus De FarView driver zal in de folder Deze Computer op uw PC worden weergegeven Om...

Page 90: ...uiten A U B Gebruik de AC adapter wanneer u het apparaat via de USB kabel aansluit op een PC Vraagt toegang Koppel de USB kabel of AC adapter niet los wanneer het apparaat verbinding maakt met een PC...

Page 91: ...Selecteer de optie 100 beelden Niet uitvoerbaar Het beeld is mogelijk beschadigd en kan niet beschermd of geroteerd worden Verwijder het bestand Geheugen is vol Verwijder beelden hef beschermingsinste...

Page 92: ...atterijen zijn leeg Laad de batterijen op LCD monitor schakelt uit wanner het apparaat is ingeschakeld Wanneer het apparaat is verbonden met een externe monitor schakelt de verlichting van het beeldsc...

Page 93: ...het object Controleer of de juiste modus is geselecteerd dichtbij of veraf modus Object of tekst bevindt zich buiten de focus range Het object is bewogen Controleer of de foto is genomen nadat de snap...

Page 94: ...t door de sluitertijd en heeft geen effect op genomen foto s Monitorbeeld trilt Dit wordt veroorzaakt door vals licht Zwarte blauwe rode groene puntjes verschijnen in het scherm Dit is geen storing en...

Page 95: ...externe video kanaal geselecteerd te worden Kan geen beelden naar een PC versturen Controleer of het apparaat correct is aangesloten Controleer of de PC het apparaat herkend Verbind het apparaat met...

Page 96: ...er aan door Optelec geautoriseerd personeel of uw leverancier Vermijd contact met vocht chemicali n of andere vloeistoffen Gebruik de FarView niet in de omgeving van medische apparatuur Neem contact o...

Page 97: ...og contrast blauw op geel Hoog contrast geel op blauw Hoog contrast geel op zwart Focus Auto focus Scherm 4 3 breedbeeld TFT Batterij Tot 4 uur continu gebruik Live modus 2 5 uur Weergave modus 4 uur...

Page 98: ...d op de daarvoor bestemde locaties Over foto bestanden Opgeslagen data kan beschadigen wanneer het apparaat door incorrect gebruik defect raakt Optelec en haar partners kunnen niet verantwoordelijk ge...

Page 99: ...Union If you wish to discard this product please contact your local authorities or dealer and ask for the correct method of disposal TYPE B APPLIED PART Dit product voldoet aan de bepalingen en EMC s...

Page 100: ......

Page 101: ...FarView Manuel de l utilisateur FarView Version 1 0 2008 Optelec Pays Bas Tous droits r serv s Optelec BV P O Box 399 2990 AJ Barendrecht Pays Bas T l phone 31 0 88 678 34 44 Courriel info optelec nl...

Page 102: ...ur FarView 10 Front side Display side 10 Bottom side 11 Right side 12 Left side 13 Top side 15 Back side Camera side 17 3 Power and battery use 19 Charging the batteries 19 Turning the power on and of...

Page 103: ...elec FarView Fran ais Page 4 Contrast settings 24 Using the FarView for writing 25 5 Using the FarView for distance viewing 26 26 Using the zoom button 27 Selecting a viewing mode 27 Contrast settings...

Page 104: ...ng settings in the menu 35 8 Connecting the FarView to other equipment 40 Viewing images on an external monitor or TV with VGA terminal 40 Connecting the FarView to a PC 40 9 Others 42 Message display...

Page 105: ...terijen laden 15 Aan uitschakelen van de FarView 16 Batterij indicator 16 Stand by modus en automatisch uitschakelen 16 Modus knop 17 4 De FarView in dichtbij modus 18 De vergrotingstoets gebruiken 19...

Page 106: ...iew Fran ais Page 7 22 De vergrotingstoets gebruiken 23 Een leesstand selecteren 23 Het contrast instellen 24 Foto s nemen met de FarView Documentleesmodus 25 Beelden en documenten opslaan 25 6 Weerga...

Page 107: ...De FarView aansluiten op een PC 36 9 Overig 38 Meldingen 38 Problemen en Oplossingen 40 Bijlage A Veiligheid 44 Bijlage B Technische informatie 45 1 Introduction 17 A propos de ce manuel 19 Contenu de...

Page 108: ...1 Mise en veille et mise en sommeil automatique 31 La touche de s lection de mode 32 4 Utilisation du FarView pour rapprocher les images 33 Utiliser le bouton zoom 34 S lection d un mode de visualisat...

Page 109: ...le bouton zoom 38 S lection d un mode de visualisation 38 R gler le contraste 39 Utiliser le FarView pour prendre des photos Mode de lecture de document 40 Conserver des images ou des documents 40 6...

Page 110: ...terne ou sur la t l vision avec connecteur VGA52 Connecter le FarView un ordinateur 52 9 Autres 54 Messages affich s 54 D pannage 56 Annexe A S curit 61 Annexe B Informations techniques 62 1 Introduzi...

Page 111: ...o 16 Indicatore batteria 17 Modalit pausa e spegnimento automatico 17 Pulsante selezione modalit 17 4 Usare FarView per la visione da vicino 19 Usare il pulsante zoom 20 Selezionare una modalit di vis...

Page 112: ...Fran ais Page 13 23 Usare il pulsante zoom 24 Selezionare una modalit di visualizzazione 24 Impostazioni Contrasto 25 Fare fotografie con FarView 26 Memorizzare immagini e documenti 26 6 Modalit Foto...

Page 113: ...n monitor esterno o TV con terminale VGA 37 Collegare FarView a un PC 37 9 Varie 39 Messaggi sul display 39 Come risolvere alcuni problemi 41 Appendice A Sicurezza 45 Appendice B Informazioni tecniche...

Page 114: ...anzeige 17 Standby Modus und automatisches Abschalten 17 Modus Taste 17 4 Betrachten von Objekten in der Nahdistanz 19 Verwenden der Zoom Taste 20 Auswahl des Lesemodus 20 Kontrasteinstellungen 21 Sch...

Page 115: ...cken Sie die Zoom Taste auf der rechten Seite des Bildschirms um die Vergr erung einzustellen Wenn Sie auf das gro e Ende dr cken wird die Vergr erung erh ht Ein Druck auf das kleine Ende reduziert di...

Page 116: ...31 Einstellungen im Men vornehmen 32 8 Verbinden des FarView mit anderen Ger ten 37 Bilder auf einem Monitor oder Fernseher mit VGA Eingang anzeigen 37 Verbinden des FarView mit einem PC 37 9 Weitere...

Page 117: ...nt gr e d images instantan es ainsi que la m moire interne vous permettent de conserver et de r cup rer jusqu 100 photos Le FarView a t con u pour usage quotidien et pour tout endroit Si vous avez des...

Page 118: ...ballage La bo te d emballage de la loupe FarView contient Le t l agrandisseur FarView Un cordon amovible Un sac de transport et de protection Un c ble d alimentation et un adaptateur Le manuel d utili...

Page 119: ...que l appareil est dans la bonne position devant vous lorsque l cran pointe vers le haut et que le bouton en forme d un plus se trouve la gauche de l cran Le devant de l appareil cran L illustration s...

Page 120: ...rand angle de 4 3 L cran de grand angle de 4 3 affiche des textes ainsi que des images Bouton Zoom Le bouton Zoom vous permet de modifier le grossissement Le bas de l appareil L illustration suivante...

Page 121: ...u Bouton de r glage du contraste Vous pouvez augmenter ou r duire le contraste l aide de ce bouton Bouton mode couleur Vous pouvez modifier les couleurs de l avant et de l arri re plan de l cran du Fa...

Page 122: ...Off Appuyez et maintenez une pression sur cette touche pendant quelques secondes pour allumer ou teindre le FarView Lorsque vous allumez l appareil le voyant d alimentation qui se trouve sur le c t dr...

Page 123: ...Optelec FarView Fran ais Page 24 Le c t gauche de l appareil L illustration suivante montre le c t gauche du FarView S lecteur de mode de visualisation S lection de mode...

Page 124: ...lectionner le mode de visualisation loign glissez la touche vers vous Pour rapprocher la visualisation loign e glissez la touche dans le sens contraire S lection de mode Cette touche vous permet de b...

Page 125: ...lec FarView Fran ais Page 26 Le dessus de l appareil L illustration suivante montre le dessus du FarView Touche retour Couvercle Touche d images instantann es Port de sortie VGA Prise femelle DC Port...

Page 126: ...dans cette prise Veuillez utiliser uniquement le mod le d adaptateur AC qui a t fourni avec votre FarView Port USB Le port USB vous permet de connecter le FarView un ordinateur avec Windows 2000 XP ou...

Page 127: ...Optelec FarView Fran ais Page 28 L arri re de l appareil cam ra L illustration suivante montre l arri re du FarView Cam ra Lumi res Tablette de lecture...

Page 128: ...res Les lumi res peuvent tre allum es et teintes Elles s allument automatiquement lorsque l appareil est r gl au mode de visualisation rapproch Tablette de lecture Tirez et placez la tablette de lectu...

Page 129: ...utilisation des piles pleinement charg es est environ 3 heures Pour recharger les piles branchez l adaptateur fourni avec l appareil la prise femelle DC qui se trouve l arri re de l appareil Ensuite...

Page 130: ...fois les piles puis es l indicateur vacillera et l appareil mettra un signal sonore Branchez l adaptateur AC dans l appareil pour recharger les piles Mise en veille et mise en sommeil automatique La f...

Page 131: ...FarView comprend deux modes de visualisation le mode de visualisation en temps r el et le mode de visualisation d images en m moire Mode de visualisation en temps r el Ce mode vous permet de visualis...

Page 132: ...tion en temps r el en appuyant sur la touche rectangulaire qui se trouve sur le c t gauche de l appareil 1 Pour rapprocher l image glissez le s lecteur de mode de visualisation et s lectionnez le mode...

Page 133: ...nibles dans le menu Contraste et luminosit Utiliser le bouton zoom Pour modifier le grossissement appuyez sur le bouton zoom qui se trouve sur le c t droit de l cran En appuyant sur la grosse partie d...

Page 134: ...texte noir sur fond blanc Mode bleu jaune lecture haut contraste texte bleu sur fond jaune Mode jaune bleu lecture haut contraste texte jaune sur fond bleu Mode jaune noir lecture haut contraste texte...

Page 135: ...utilisant la touche de s lection de mode qui se trouve sur le c t gauche de l appareil 2 Positionnez l appareil sur la feuille en vous assurant que l afficheur pointe vers le haut 3 Baissez le FarView...

Page 136: ...la touche de s lection de mode qui se trouve sur le c t gauche de l appareil 2 Dirigez l appareil vers le texte ou vers l objet visualiser et servez vous des boutons zoom de contraste et de couleur po...

Page 137: ...le c t droit de l cran En appuyant sur la grosse partie de la touche vous pouvez augmenter le grossissement Pour le diminuer appuyez sur la petite partie de la touche S lection d un mode de visualisat...

Page 138: ...noir sur fond blanc Mode Bleu jaune lecture haut contraste texte bleu sur fond jaune Mode jaune Bleu lecture haut contraste texte jaune sur fond bleu background Mode jaune noir lecture haut contraste...

Page 139: ...isez la photo sur l cran du FarView Nota Cette fonction vous permet galement d enregistrer plusieurs pages d un livre ou d un magazine Conservez les pages dans la m moire interne et r cup rez les pour...

Page 140: ...oncernant le r glage du nombre maximal de photos pouvant tre enregistr es veuillez lire le chapitre 7 Veuillez prendre note que lorsque le nombre de photos d passe 100 photos la premi re photo sera su...

Page 141: ...1 S lectionnez le mode de visualisation d images en m moire l aide de la touche de s lection de mode qui se trouve sur le c t gauche de l appareil 2 Faire d filer les images en vous servant des touch...

Page 142: ...lez vous rappeler que l image affich e l cran peut tre d fil e seulement lorsqu elle est affich e en gros plan L une des caract ristiques du FarView est le d placement automatique du texte au d but de...

Page 143: ...visualisation en temps r el est activ Le FarView est branch un moniteur VGA externe ou un ordinateur Appuyez sur la touche Image instantan e pour ramener l image agrandit sa grandeur originale Appuyez...

Page 144: ...es selon vos besoins Ouvrir le menu Appuyez sur la touche Menu qui se trouve sur le c t droit de l appareil pour ouvrir le menu principal Utilisez les touches fl ch es haut et bas pour vous d placer d...

Page 145: ...enu du FarView comprend 12 options qui vous permettent de configurer votre appareil ou qui pr sentent des renseignements sur l tat actuel de votre FarView LIGHT BRIGHTNESS BEEP LANGUAGE Menu Touche Me...

Page 146: ...selon vos besoins en vous servant du bouton mode couleur Veuillez prendre note que l appareil revient automatiquement au r glage AUTO lors d un prochain d marrage Lumi re L option lumi re peut tre ac...

Page 147: ...te que les images prot g es ne pourront tre supprim es lorsque vous s lectionnez l option de supprimer toutes les images Pour supprimer les images prot g es vous devez d abord annuler la protection en...

Page 148: ...es de luminosit s enregistrent automatiquement et seront sauvegard s chaque d marrage Prot ger Les images conserv es dans la m moire interne peuvent tre prot g es contre une suppression non intentionn...

Page 149: ...nol l italien le hollandais Le r glage de la langue sera automatiquement sauvegard chaque d marrage La langue par d faut est l anglais Nombre d images Cette option vous permet de d terminer le nombre...

Page 150: ...n ais Page 51 Restaurer Cette fonction permet de restaurer l appareil dans sa configuration initiale Ceci restaurera tous les r glages par d faut de l appareil contraste luminosit vitesse de d filemen...

Page 151: ...sortie VGA qui se trouve sur le dessus de l appareil Branchez l autre bout du c ble VGA dans le moniteur externe ou dans la connecteur VGA de votre t l vision Assurez vous que l appareil est bien tei...

Page 152: ...l ordinateur un message s affiche l cran indiquant ordinateur branch Le d branchement du c ble USB remettra l appareil au dernier mode utilis Le lecteur du FarView s affichera dans le dossier Poste d...

Page 153: ...image en mode de visionnement Veuillez supprimer le fichier Veuillez brancher l adaptateur AC Lorsque vous branchez l appareil l ordinateur en utilisant un c ble USB assurez vous de brancher l adapta...

Page 154: ...squ ce que le nombre soit de 30 photos ou moins R glez le nombre de photos 100 Operation annul e L image peut tre endommag ne permettant pas la protection ou le d filement de l image Veuillez supprime...

Page 155: ...u moniteur ACL s teignent m me lorsque l appareil est allum Lorsque l appareil est branch un moniteur externe les lumi res du moniteur ACL s teignent automatiquement L appareil s teint aussit t allum...

Page 156: ...isant une linge doux et sec Mise au point de l objet est incorrecte Assurez vous de bien s lectionner le bon mode de visualisation L objet ou le texte est l ext rieur de la plage de mise au point Caus...

Page 157: ...eille automatiquement Appuyez sur n importe quel bouton autre que la touche On Off pour rallumer les lumi res La luminosit n est pas constante Cela peut se pr senter quand la valeur d ouverture du dia...

Page 158: ...moire Ajustez la luminosit en tournant le bouton de contraste Connexion un moniteur externe ou un ordinateur Questions R ponses Il n y a aucune image affich e la t l vision ou l ecran externe L appare...

Page 159: ...elec FarView Fran ais Page 60 Autres Questions R ponses L appareil est chaud L appareil peut devenir l g rement chaud lors de son utilisation Ceci n affecte pas la performance ou la qualit de l appare...

Page 160: ...ant le FarView loin de toute substance liquide et chimique Le FarView exige une manutention d licate La manutention brutale endommagera ses composantes internes vitez d utiliser le FarView pr s de tou...

Page 161: ...r noir Mise au point Mise au point automatique cran cran plat de grand angle de 4 3 Piles Jusqu au 4 heures de dur e continue Mode de visualisation en temps r el 2 5 heures Mode de visualisation d ima...

Page 162: ...de votre localit propos des donn es photographiques Les donn es conserv es peuvent tre endommag es si l appareil est bris en raison d une manutention incorrecte Optelec et ses partenaires ne seront en...

Page 163: ...Union europ enne Si vous d sirez vous d barrasser de ce produit veuillez communiquer avec votre municipalit ou avec votre distributeur pour vous renseigner sur les proc dures suivre TYPE B APPLIED PAR...

Page 164: ...na 2 FarView Manuale Utente FarView Versione 1 0 2008 Optelec Paesi Bassi Tutti i diritti riservati Optelec BV P O Box 399 2990 AJ Barendrecht Paesi Bassi Telefono 31 0 88 678 34 44 e mail info optele...

Page 165: ...istro 10 Lato superiore 12 Pannello posteriore Lato telecamera 14 3 Alimentazione e batterie 16 Caricare le batterie 16 Accensione e spegnimento 16 Indicatore batteria 17 Modalit pausa e spegnimento a...

Page 166: ...menti 26 6 Modalit Foto Memorizzate 28 Selezione e regolazione immagine 29 7 Usare il menu FarView 31 Aprire il menu 31 Modificare le impostazioni nel menu 32 8 Collegare FarView ad altri dispositivi...

Page 167: ...da utilizzare La funzione integrata di fermo immagine e la memoria interna permettono all utente di memorizzare e rivedere fino a 100 immagini FarView stato progettato per essere utilizzato in ogni si...

Page 168: ...nfezione di FarView contiene il videoingranditore tascabile FarView un cordino staccabile una custodia di protezione per il trasporto un cavo di alimentazione e un alimentatore il manuale utente Se al...

Page 169: ...del dispositivo importante posizionarlo in modo corretto con lo schermo rivolto verso di voi e il pulsante a forma di alla sinistra dello schermo Pannello frontale Lato schermo La figura che segue mo...

Page 170: ...e nelle immagini e nel menu di FarView Schermo TFT da 4 3 Schermo da 4 3 che visualizza testi e immagini Pulsante Zoom Premendo il pulsante zoom si modifica l ingrandimento Lato inferiore La figura ch...

Page 171: ...Regolazione Contrasto Ruotando questo pulsante possibile aumentare o diminuire il contrasto Modalit Colore Ruotando questo pulsante possibile modificare il colore dello sfondo e del primo piano sullo...

Page 172: ...ndere e spegnere il dispositivo premere e tenere premuto per circa due secondi questo pulsante Quando FarView acceso la luce sul lato destro dello schermo accesa Quando si spegne il dispositivo anche...

Page 173: ...la di visione a distanza Spostando il pulsante verso di voi il dispositivo verr impostato per la visione a distanza Spostandolo nella direzione opposta si imposter per la visione da vicino Selezione M...

Page 174: ...a figura che segue mostra il lato superiore di FarView Pulsante Focus Premendo questo pulsante possibile mettere a fuoco l oggetto o il testo che volete ingrandire visualizzare Pulsante Focus Coperchi...

Page 175: ...modello di alimentatore fornito con FarView porta USB La porta USB permette di collegare FarView ad un PC con installato Windows 2000 XP o Vista connettore VGA out Questo connettore pu essere usato pe...

Page 176: ...Optelec FarView Italiano Pagina 14 Pannello posteriore Lato telecamera La figura che segue mostra il pannello posteriore di FarView Telecamera Luci Supporto lettura Supporto lettura...

Page 177: ...possono essere accese e spente Si accendono automaticamente quando il dispositivo viene impostato per la visione da vicino Supporto lettura Estraete e posizionate il supporto lettura per leggere pi c...

Page 178: ...terie collegate l alimentatore in dotazione al jack DC IN che trovate sulla parte superiore del dispositivo Inserite quindi la spina in una presa di corrente l indicatore luminoso a destra dello scher...

Page 179: ...aticamente posto in modalit pausa In questa modalit lo schermo TFT viene spento e l indicatore di accensione inizia a lampeggiare Premendo qualsiasi pulsante eccetto quello di accensione FarView torna...

Page 180: ...presente sullo schermo pu essere fotografata mediante il pulsante Foto Modalit immagini memorizzate Le immagini presenti in memoria interna possono essere richiamate e visualizzate sullo schermo di Fa...

Page 181: ...lit da vicino spostando il selettore per la modalit di visualizzazione nella posizione da vicino Il selettore collocato a sinistra dell unit 2 Aprite il supporto lettura e posizionate FarView sul test...

Page 182: ...posto alla destra dello schermo per modificare l ingrandimento Premendo la parte pi larga del pulsante si aumenta l ingrandimento mentre premendo la parte pi piccola l ingrandimento diminuisce Selezio...

Page 183: ...sto nero su sfondo bianco Modalit blu giallo lettura ad alto contrasto con testo blu su sfondo giallo Modalit giallo blu lettura ad alto contrasto con testo giallo su sfondo blu Modalit giallo nero le...

Page 184: ...nte il selettore apposito 2 Posizionate l unit sul foglio con lo schermo rivolto verso l alto 3 Premete FarView verso il basso sul lato dei pulsanti cursore vedi figura 4 Premere il pulsante focus per...

Page 185: ...ito collocato sul lato sinistro dell unit 2 Orientate l unit verso il testo o l oggetto che desiderate vedere e usate i pulsanti per impostare lo zoom il contrasto ed il colore per regolare l immagine...

Page 186: ...are l ingrandimento Premendo la parte pi larga del pulsante si aumenta l ingrandimento mentre premendo la pi piccola l ingrandimento diminuisce Selezionare una modalit di visualizzazione Ruotando il p...

Page 187: ...sto nero su sfondo bianco Modalit blu giallo lettura ad alto contrasto con testo blu su sfondo giallo Modalit giallo blu lettura ad alto contrasto con testo giallo su sfondo blu Modalit giallo nero le...

Page 188: ...e permette anche di memorizzare pi pagine di un libro o di una rivista Conservate le pagine nella memoria interna e richiamatele quando viaggiate o siete comodamente seduti in poltrona Memorizzare imm...

Page 189: ...arView Italiano Pagina 27 Quando le immagini memorizzate superano il numero di 100 la prima immagine verr automaticamente cancellata Per evitare la cancellazione automatica delle immagini si veda il c...

Page 190: ...schermo dell unit 1 Attivate la modalit Foto Memorizzate premendo l apposito pulsante di selezione a sinistra dell unit 2 Usate i pulsanti di scorrimento posti alla sinistra dello schermo per navigar...

Page 191: ...zzare al meglio questa funzione seguire questi passaggi 1 Visualizzare la posizione nel testo che avete scelto come punto di ritorno 2 Premere per circa 2 secondi il pulsante Focus finch l unit emette...

Page 192: ...e il pulsante cursore sinistro e destro per continuare a navigare nelle immagini salvate nella memoria interna Per migliorare la comodit durante la lettura possibile usare le impostazioni per inclinaz...

Page 193: ...ferenze Aprire il menu Premete il pulsante menu posto sul lato destro dell unit per aprire il menu principale Usate i pulsanti di scorrimento su e gi per navigare nel menu Premete il pulsante per lo s...

Page 194: ...ioni nel menu Il menu di FarView ha 12 opzioni Queste vi permettono di configurare FarView od avere informazioni sullo stato corrente di FarView LIGHT BRIGHTNESS BEEP LANGUAGE Menu Pulsante Apri Menu...

Page 195: ...contrasto si regola secondo le proprie necessit mediante il pulsante modalit colore Fate attenzione che l unit torna automaticamente in automatico quando viene spenta e poi riaccesa La Luce pu essere...

Page 196: ...rotette non saranno cancellate Per cancellare anche le immagini protette necessario eliminare le impostazioni di protezione nel sottomenu PROTEZIONE Scorrimento La velocit si pu regolare premendo i pu...

Page 197: ...mpostazione Sullo schermo apparir un indicazione della protezione che conferma che quella foto protetta Premete i pulsanti di scorrimento Su e Gi per cancellare la protezione Per proteggere altre foto...

Page 198: ...mo di immagini che si possono salvare nella memoria interna di FarView Si possono selezionare 30 oppure 100 foto Premete i pulsanti di scorrimento Su e Gi seguiti dal pulsante di scorrimento destro pe...

Page 199: ...to superiore dell unit Collegare l altra estremit del cavo VGA al monitor esterno o al televisore con terminale VGA Se fate questo collegamento accertatevi che gli apparecchi siano spenti Collegando F...

Page 200: ...i scollega il cavo USB l unit torner alla modalit usata prima del collegamento FarView sar presente nella cartella Risorse del Computer del PC Per uscire dalla modalit PC seguite le indicazioni riport...

Page 201: ...ellare il file Collegare alimentatore Collegando l unit al PC via cavo USB assicurarsi di aver collegato l alimentatore Accesso in corso Non disconnettere il cavo USB o l alimentatore perch potrebbe v...

Page 202: ...ibile operare L immagine potrebbe essere danneggiata rendendo impossibile la protezione o la rotazione Cancellare il file Memoria piena Cancellare alcune immagini assicurarsi di cancellare la protezio...

Page 203: ...ato ad un monitor esterno le luci dello schermo si spengono automaticamente L unit si spegne subito dopo essere stata accesa Le batterie sono scariche Ricaricarle L unit non si spegne Premere e tenere...

Page 204: ...ibilit di regolazione del focus Il soggetto si muove oppure si muove la mano Assicurarsi di mantenere l immagine inquadrata dopo aver premuto il pulsante Foto Non spostate l unit o l oggetto finch l i...

Page 205: ...fallio se usato in un ambiente interno Pu succedere dopo l accensione evita l influenza di lampade fluorescenti Appaiono interferenze o punti neri blu rossi verdi Lo schermo sembra distorto quando vie...

Page 206: ...ben collegata Quando l unit collegata a un televisore assicurarsi di impostare sul televisore l ingresso corretto Impossibile inviare immagini al computer L unit non ben collegata Verificare che il c...

Page 207: ...e FarView lontano da liquidi e sostanze chimiche Maneggiate FarView con molta cura poich si potrebbero danneggiare i componenti interni Non usate FarView vicino ad apparecchiature elettromedicali non...

Page 208: ...u giallo alto contrasto giallo su blu alto contrasto giallo su nero Messa a fuoco Autofocus Schermo 4 3 TFT Batterie 3 ore in uso continuo Modalit reale 2 5 ore Modalit Foto Memorizzate 4 ore tempo ri...

Page 209: ...700 1060 hPa Nota le batterie usate vanno smaltite secondo le indicazioni date dalle autorit locali competenti Immagini memorizzate I dati memorizzati potrebbero essere danneggiati in caso di caduta...

Page 210: ...l Unione Europea Se dovete eliminare questo prodotto contattate il servizio locale di raccolta e smaltimento rifiuti oppure il distributore presso il quale avete acquistato il prodotto TYPE B APPLIED...

Page 211: ......

Page 212: ...arView Bedienungsanleitung FarView Version 1 0 2008 Optelec the Netherlands Alle Rechte vorbehalten Optelec BV P O Box 399 2990 AJ Barendrecht Die Niederlande Telefon 31 0 88 678 34 44 e mail info opt...

Page 213: ...7 Unterseite 8 Rechte Seite 9 Linke Seite 10 Oberseite 12 R ckseite Kameraseite 14 3 Netz und Batteriebetrieb 16 Laden der Akkus 16 Ein und Ausschalten 16 Batterieanzeige 17 Standby Modus und automati...

Page 214: ...us 26 Speichern von Bildern oder Dokumenten 26 6 Bildwiedergabe Modus 28 Bild ausw hlen und anpassen 29 7 Verwenden des FarView Men s 31 ffnen des Men s 31 Einstellungen im Men vornehmen 32 8 Verbinde...

Page 215: ...icherma en zum Lesen von Texten aus geringen sowie gro en Abst nden eignet und dem modernen Design ist der FarView ihr t glicher Begleiter in jeder Situation ber seine erweiterte Snapshot Funktion k n...

Page 216: ...verwenden Lieferumfang Der FarView wird mit folgenden Komponenten geliefert Der FarView Ein abnehmbares Umh ngeband Eine Schutzh lle zum Transportieren Ein Netzteil mit Netzanschlusskabel Das gedruckt...

Page 217: ...as Ger t liegt korrekt vor Ihnen wenn das Display nach oben zeigt und die wie ein Plus geformte Taste sich auf der linken Seite befindet Vorderseite Displayseite Die folgende Abbildung zeigt die Vorde...

Page 218: ...des Bildes sowie im FarView Men 4 3 Wide Screen Display Auf dem Display werden Text und Bilder angezeigt Zoom Taste Mit der Zoom Taste k nnen Sie die Vergr erung w hlen Unterseite Die folgende Abbildu...

Page 219: ...Umh ngeband befestigen Kontrast Regler Durch drehen dieses Knopfes wird der Kontrast erh ht oder reduziert Farbwahl Regler Durch Drehen des Knopfes k nnen Sie die Forder und Hintergrundfarben w hlen R...

Page 220: ...nd halten Sie diese Taste f r ca 2 Sekunden um den FarView Ein Aus zu schalten Nach dem Einschalten leuchtet die Power Anzeige auf der rechten Seite des Bildschirms Nach dem Ausschalten geht dieses Li...

Page 221: ...ernung betrachten Wenn Sie den Schalter zu sich ziehen ist der Ansichtsmodus auf Ferndistanz Wenn der Schalter von Ihnen weg zeigt Auf Nahdistanz eingestellt Mode Taste Mit dieser Taste schalten Sie z...

Page 222: ...Optelec FarView Deutsch Page 12 Oberseite Die folgende Abbildung zeigt die Oberseite des FarView Fokus Return Taste Abdeckung Snapshot Taste VGA Ausgang Netzteilbuchse USB Anschluss...

Page 223: ...hlie en Sie das Netzteil an Verwenden Sie nur das mitgelieferte Netzteil USB Anschluss ber den USB Anschluss k nnen Sie den FarView an einen PC anschlie en der unter den Betriebssystemen Windows 2000...

Page 224: ...Optelec FarView Deutsch Page 14 R ckseite Kameraseite Die folgende Abbildung zeigt die R ckseite des FarView Kamera Beleuchtung Lesest nder Lesest nder...

Page 225: ...ndet werden kann Beleuchtung Die Beleuchtung kann ein bzw Ausgeschaltet werden Wenn der Modus Schalter auf Nahdistanz eingestellt ist wird die Beleuchtung automatisch aktiviert Lesest nder Zum bequeme...

Page 226: ...er t ca 3 Stunden Netzunabh ngig verwendet werden Zum Laden der Akkus verbinden Sie das Netzteil mit dem Stromnetz und stecken das Anschlusskabel in den Netzanschluss an Ihrem FarView Eine blinkende L...

Page 227: ...ird Das Display wird abgeschaltet und die Power LED beginnt zu blinken Dr cken Sie auf irgendeine Taste au er dem Ein Aus Schalter um zum vorherigen Modus zur ckzukehren Wenn das Ger t f r weitere 4 M...

Page 228: ...edergabemodus Bilder aus dem internen Speicher k nnen abgerufen und auf dem 4 3 Wide Screen Display des FarView angezeigt werden Durch Dr cken der Modus Taste k nnen Sie zwischen Live Bild und Wiederg...

Page 229: ...en Sie falls n tig den Live Bild Modus indem Sie den l nglichen Knopf auf der linken Seite dr cken 1 Stellen Sie den Ansichtsmodus auf Nahdistanz ein indem Sie den Schalter zu sich ziehen Er befindet...

Page 230: ...die entsprechenden Optionen im Men anpassen Verwenden der Zoom Taste Dr cken Sie die Zoom Taste auf der rechten Seite des Bildschirms um die Vergr erung einzustellen Wenn Sie auf das gro e Ende dr cke...

Page 231: ...Text auf wei em Hintergrund Blau Gelb Modus hoher Kontrast blauer Text auf gelbem Hintergrund Gelb Blau Modus hoher Kontrast gelber Text auf blauem Hintergrund Gelb Schwarz Modus hoher Kontrast gelbe...

Page 232: ...Ansichtsmodus auf Nahdistanz ein 2 Legen Sie das Ger t mit dem Display nach oben auf das Dokument 3 Dr cken Sie den FarView auf der Seite mit den Pfeiltasten nach unten 4 Fokus Return Taste dr cken um...

Page 233: ...der linken Seite des Ger tes von sich weg dr cken 2 Richten Sie das Ger t auf den Text oder das Objekt das Sie betrachten m chten und verwenden Sie die Tasten zum Einstellen der Vergr erung der Farben...

Page 234: ...s Bildschirms um die Vergr erung einzustellen Wenn Sie auf das gro e Ende dr cken wird die Vergr erung erh ht Ein Druck auf das kleine Ende reduziert die Vergr erung Auswahl des Lesemodus Sie k nnen e...

Page 235: ...Text auf wei em Hintergrund Blau Gelb Modus hoher Kontrast blauer Text auf gelbem Hintergrund Gelb Blau Modus hoher Kontrast gelber Text auf blauem Hintergrund Gelb Schwarz Modus hoher Kontrast gelbe...

Page 236: ...s Bild auf dem Display des FarView Hinweis Diese Funktion erm glicht es Ihnen mehrere Seiten eines Buches oder Magazins im internen Speicher abzulegen und sie sp ter unterwegs oder bequem im Sessel si...

Page 237: ...sch Page 27 Beachten Sie dass nach Erreichen der maximalen Anzahl von 100 Bildern das lteste Bild automatisch gel scht wird Wie Sie Bilder vor dem automatischen L schen sch tzen k nnen erfahren Sie eb...

Page 238: ...Bildschirm angezeigt werden 1 Schalten Sie das Ger t in den Wiedergabemodus indem Sie die Modus Taste auf der linken Seite dr cken 2 Verwenden Sie die Pfeiltasten nach links und rechts auf der linken...

Page 239: ...n des Bildes die R cklauf und Stop Position sowie f r die Geschwindigkeit beim Scrollen ver ndern Beachten Sie dass das Bild nur in der Vergr erung gescrollt werden kann Automatische Scrollhilfe FarVi...

Page 240: ...urn Taste oder Snapshot Taste Beachten Sie bitte dass diese automatische Funktion ausgeschaltet ist wenn 1 Andere Bilder angezeigt werden 2 Umschalten in den Echtzeitmodus 3 Anschluss des FarView an e...

Page 241: ...rfnisse anpassen k nnen ffnen des Men s Dr cken Sie die Men taste auf der rechten Seite des Ger ts um ins Hauptmen zu gelangen Mit den Pfeiltasten nach oben und unten bewegen Sie sich innerhalb des Me...

Page 242: ...instellungen im Men vornehmen Das FarView Men besitzt 12 Eintr ge ber die Sie das Ger t konfigurieren sowie Statusinformationen abrufen k nnen LIGHT BRIGHTNESS BEEP LANGUAGE Men Taste Men ffnen Men ta...

Page 243: ...e k nnen den Kontrast mit Hilfe des Farbmodus Reglers an Ihre Bed rfnisse anpassen Beachten Sie bitte dass nach dem erneuten Einschalten des Ger tes wieder die automatische Kontrasteinstellung aktivie...

Page 244: ...amit Sie diese Bilder l schen k nnen m ssen Sie zun chst den Schutz im Men Schutz deaktivieren Scrollgeschwindigkeit Die Scrollgeschwindigkeit k nnen Sie mit Hilfe der Tasten Pfeil auf ab an Ihre Bed...

Page 245: ...echts Ein entsprechendes Symbol erscheint auf dem Bildschirm damit Sie sehen dass das Bild gesch tzt ist Mit Pfeil auf oder ab heben Sie den Schutz wieder auf Wenn Sie weitere Bilder sch tzen m chten...

Page 246: ...Anzahl Bilder Hier k nnen Sie angeben wie viele Bilder Ihr FarView maximal speichern soll Sie k nnen 30 oder 100 Bilder w hlen Dr cken Sie Pfeil rechts zum Speichern der Auswahl Die Standardeinstellu...

Page 247: ...s andere Ende des Kabels verbinden Sie mit dem Monitor oder Fernseher Stellen Sie sicher dass das Ger t ausgeschaltet ist wenn Sie die Verbindung herstellen Beim Anschluss an einen Fernseher m ssen Si...

Page 248: ...Sie die Verbindung wieder trennen schaltet das Ger t in den zuvor gew hlten Modus zur ck Der interne Speicher des FarView wird als Laufwerk auf Ihrem PC eingebunden Zum Trennen der Verbindung klicken...

Page 249: ...Netzteil anschlie en Stellen Sie sicher dass das Ger t mit dem Stromnetz verbunden ist bevor Sie es an einen PC anschlie en Verarbeitung Trennen Sie nicht die USB oder Stromverbindung da die gespeich...

Page 250: ...h digt und kann deshalb nicht gedreht oder gesch tzt werden Speicher voll L schen Sie Bilder und stellen Sie sicher dass der Schutz aufgehoben ist berpr fen Sie ob die Einstellung f r die maximale Anz...

Page 251: ...n wieder aus Batterien sind leer bitte aufladen Ger t l sst sich nicht ausschalten Dr cken und halten Sie die Men taste und die Fokustaste Kamera und Speicher Fragen Antworten Bilder werde nicht gespe...

Page 252: ...ich aus obwohl das Ger t eingeschaltet ist Wenn das Ger t f r l nger als 3 Minuten nicht genutzt wird schaltet sich die Beleuchtung automatisch aus Dr cken Sie irgendeine Taste mit Ausnahme des Ein Au...

Page 253: ...nden Sie den Kontrast Knopf zum Verbessern der Bildqualit t Verbindung mit einem externen Monitor oder PC Fragen Antworten Auf dem Fernseher oder Monitor erscheint kein Bild Das Ger t wurde nicht korr...

Page 254: ...Um elektrische Sch den zu vermeiden halten Sie das Ger t von S uren und anderen Chemikalien fern Behandeln Sie den FarView sorgf ltig Ein roher Umgang mit dem Ger t kann interne Komponenten besch dig...

Page 255: ...gelb Hoher Kontrast gelb auf blau Hoher Kontrast gelb auf schwarz Fokus Autofokus Display 4 3 Wide Screen TFT Akku 3 Stunden kontinuierliche Verwendung Live bild Modus 2 5 Stunden Wiedergabemodus 4 S...

Page 256: ...m ssen fachgerecht an den entsprechenden Sammelstellen entsorgt werden ber gespeicherte Bilddateien Abgespeicherte Bilder k nnen besch digt oder zerst rt werden wenn das Ger t aufgrund unsachgem er Be...

Page 257: ...Falls Sie au erhalb der EU entsorgen m chten informieren Sie sich bitte bei Ihrem H ndler oder der Kommunalverwaltung ber die korrekte Entsorgung TYPE B APPLIED PART Dieses Produkt ist mit den Sicherh...

Page 258: ...3555 www optelec com www optelec com www optelec nl Optelec Limited Optelec NV Tieman GmbH 2 Millfield House Baron Ruzettelaan 29 Fritzlarer Strasse 25 Woodshots Meadow 8310 Brugge 34613 Schwalmstadt...

Page 259: ......

Reviews: