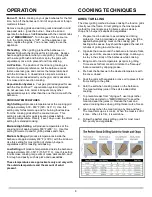
Onward 9581 Owner'S Manual Download Page 4

CHANGING A GAS CYLINDER - BUTANE 

This appliance may be used with butane at an operating pressure of 28 - 30 mbar. 

NEVER

 use an unregulated gas supply or a regulator for other operating pressures. 

WARNING:

 Changing a cylinder must be carried out in a flame free environment. 

BUTANE cylinders have various types of connections - 

a) Screw-On Connection.   

The most important part is the 
black sealing washer.  Always 
check that it is present and not 
damaged when changing 
cylinders.  Some screw on 
connections have a hand 
wheel to tighten and some 
require a spanner to tighten.  
Tighten firmly (left hand 
thread).  When using a 
spanner, do not over tighten 
as this can damage the 
washer. 


b) Switch-On Connection.   

No tools are required for this 
type.  On/Off control of the gas 
supply is provided by a switch 
on the Regulator or on a 
special adapter.  If you use an 
adapter with an old type 
threaded regulator, please 
ensure that the union nut is 
tightened firmly to the adapter 
with a spanner.


Connecting a Cylinder 

SCREW-ON CONNECTION 

SWITCH-ON CONNECTION 

1. Check that the cylinder valve is 
OFF by turning clockwise. 

1.  Remove 
the orange 
safety cap 
by pulling 
the lanyard 
out, then up.  
Do not use 
tools, leave 
the cap 
hanging. 


2.  Remove protective cap and 
keep for later use. 

3.  Inspect the black washer for 
damage before connecting. 


2.  Make 
sure that:                 

-All taps on 
the gas 
appliance 
are closed. 

-The switch 
is in the off 
position. 


4.  Fit the connecting nut to the 
cylinder, using the correct spanner 
or connecting hand wheel.  (Left 
hand thread). 

Do not over tighten Butane 
cylinder connectors. 


3.  Place the 
“Quick On” 
regulator on 
to the valve 
and push 
down firmly.  
A “click” 
sound 
should be 
heard to 
ensure the 
switch is 
securely 
latched. 


5.  When gas is required turn the 
cylinder valve anti-clockwise. 


4.  When 
gas is 
required turn 
the switch 
upward to 
the ON (12 
o’clock) 
position. 


Leak test all connections 

before

 operating the appliance. 

Disconnecting a Cylinder. 


SCREW-ON CONNECTION 

SWITCH-ON CONNECTION 

1. Turn the cylinder valve OFF 
(Clockwise rotation). 


1.  Turn the switch to the OFF (3 
o'clock) position. 


2.  Turn off the gas taps on the appliance.  WAIT until the burner has 
gone out. 


IF THE FLAME DOES NOT GO OUT-TURN THE VALVE OR 
SWITCH BACK TO ON.  LEAVE THE APPLIANCE ALIGHT AND 
CALL YOUR GAS SUPPLIER. 

3.  NEVER REMOVE the 

regulator (or connecting nut) 
with the cylinder valve open. 

4.  REMOVE the regulator (or 

connecting nut) with the 
spanner or connecting hand 
wheel.  (Left hand thread).  


3. Remove the “Quick On” 
regulator by pressing 
horizontally on the switch and 
pulling upwards at the same 
time.    


4.  REPLACE the plug or cap onto 
the empty cylinder or part full 
cylinder if not in use. 


4.  REPLACE the seal cap onto 
the empty cylinder, or part full 
cylinder if not in use.                                      


Summary of Contents for 9581

Page 1: ...SAFETY 2 REGULATOR LP GAS HOSE 3 VENTURI TUBES 3 BUTANE 4 PROPANE 5 LEAK TESTING 6 LIGHTING 7 OPERATION 8 COOKING TECHNIQUES 8 MAINTENANCE 10 TROUBLE SHOOTING 11 WARRANTY 12 READ ALL INSTRUCTIONS CAR...

Page 2: ...4 7 kW 1796 g h 0 87mm 0 79mm 0 99mm 9571 9575 9576 9896 9976 83 24 7 kW 1796 g h 0 87mm 0 79mm 0 99mm 9887 9888 53 13 2 kW 960 g h 0 90mm 9887 9888 9889 83 21 15 kW 1538 g h 0 90mm 0 79mm 1 15mm 1962...

Page 3: ...P 30 30 mbar 30 mbar ES I 3 28 30 37 28 30 mbar 37 mbar PT I 3 28 30 37 28 30 mbar 37 mbar IT I 3 28 30 37 28 30 mbar 37 mbar SE I 3B P 30 30 mbar 30 mbar NO I 3B P 30 30 mbar 30 mbar FI I 3B P 30 30...

Page 4: ...ct the black washer for damage before connecting 2 Make sure that All taps on the gas appliance are closed The switch is in the off position 4 Fit the connecting nut to the cylinder using the correct...

Page 5: ...keep to replace later 2 Inspect the connection for damage before connecting Fit the connecting nut left hand thread to the cylinder a Connecting Nut for use with Spanner Using the correct spanner tigh...

Page 6: ...cylinder 2 Check that all control knobs are turned to OFF 3 Prepare a soap solution of one part water one part liquid detergent 4 Open cylinder valve all the way 5 Brush the soap solution on each conn...

Page 7: ...h and rotate left main burner control knob to Hi 9b For Side Burner Push and turn side burner control knob to Hi Push and hold the ignitor button Burner should ignite within 5 seconds Note To light bu...

Page 8: ...and chops Medium Setting will produce temperatures inside the barbecue of approximately 450 F 230 C with the lid down Use this setting for most grilling of chicken burgers vegetables and for roasting...

Page 9: ...LB MED LOW 3 5 HRS TURKEY OR CHICKEN 2 5 LB MED LOW 2 4 HRS TURKEY OR CHICKEN 5 10 LB MED LOW 3 5 HRS When using rotisserie burner set heat at Med High ROTISSERIE COOKING Follow the steps for Indirec...

Page 10: ...gas cylinder valve to OFF turn the control knobs to OFF When the barbecue is cool remove the foil and grids Scrape the Flav R Wave clean and remove then clean the interior of the bottom oven by scrapi...

Page 11: ...device to activate 7 Leak test connections to determine loose fitting Tighten fitting Leak test system 8 Venturi blocked 8 Remove burner clean venturi See Venturi Tubes 9 Venturi not aligned with val...

Page 12: ...urner at the following discounts from current price During 3rd year 50 4th year 40 5th year 25 Shipping and handling charges are the responsibility of the owner PORCELAIN COOKING GRIDS Most OMC cookin...

Reviews: