


2
SAFETY
This appliance is designed in accordance with CE Standards.
Use outdoors only.
Read the instructions before using the appliance.
Warning: accessible parts may be very hot. Keep young
children away.
Do not move the appliance during use.
Use caution when handling or transporting this product.
Metal edges can present a hazard. Use appropriate gloves
when lifting or handling. Before lifting, remove side shelves
and grids and grates.
Turn off the gas supply at the cylinder after use.
Use protective gloves when handling hot components.
The aeration adjustments on the main burners, rear burner
and side burner have been adjusted, set and sealed at the
factory and should not be adjusted /manipulated.
Any modification of the appliance may be dangerous.
In the event of a gas leak, shut off gas supply.
If you smell gas:
1. Shut off gas to the appliance.
2. Extinguish any open flame.
3. Open lid.
4. If odor continues, immediately call your gas supplier.
LOCATION
Maintain a minimum of 76cm from the appliance to any
combustible construction.
Do not locate under an unprotected combustible ceiling or cover.
Keep the area around this appliance clear from any combustible
materials, petrol, and other flammable vapors and liquids.
Do not obstruct the flow of combustion and ventilating air.
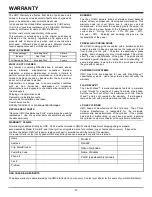
SPECIFICATIONS
MODEL
TOTAL
HEAT
INPUT
TOTAL
HEAT
INPUT
JET SIZE
MAIN
BURNER
JET SIZE
SIDE
BURNER
JET SIZE
REAR
BURNER
4312 / 4412 / 9312 / 9412-53
8.8 kW
640 g/h
0.84mm
4312 / 4412 / 9312 / 9412-63
11.5 kW
836 g/h
0.84mm
0.79mm
9312-83
15.0 kW
1091 g/h
0.84mm
0.79mm
0.94mm
2012 / 6113 / 9013 / 9113 / 9219 /
9611 / 9815-53
8.8 kW
640 g/h
0.85mm
2122 / 9123-53
11.4 kW
829 g/h
0.85mm
9013 / 9113 / 9611 / 9219 / 9619-
63
11.5 kW
836 g/h
0.85mm
0.79mm
2122 / 5023 / 5123 / 6123 / 9023 /
9123 / 9229 / 9621 / 9629-63
14.1 kW
1025 g/h
0.85mm
0.79mm
5023 / 5123 / 9023 / 9123 / 9229 /
9621. / 9825-83
18.5 kW
1345 g/h
0.85mm
0.79mm
1.04mm
5133 / 6133 / 9033 / 9133 / 9239 /
9631 / 9639-83
20.3 kW
1476 g/h
0.85mm
0.79mm
1.04mm
9576-43
24.7 kW
1796 g/h
0.87mm
0.79mm
0.99mm
9571 / 9575 / 9576 / 9896 / 9976-
83
24.7 kW
1796 g/h
0.87mm
0.79mm
0.99mm
9887 / 9888-53
13.2 kW
960 g/h
0.90mm
9887 / 9888 / 9889-83
21.15 kW
1538 g/h
0.90mm
0.79mm
1.15mm
1962 / 9462-53
11.4 kW
829 g/h
0.91mm
0.79mm
9561 / 9761-53
13.2 kW
960 g/h
0.91mm
9462-63
14.1 kW
1025 g/h
0.91mm
0.79mm
5861 / 9561 / 9565 / 9761 / 9861-
63
15.9 kW
1156 g/p
0.91mm
0.79mm
9565-43
20.3 kW
1476 g/h
0.91mm
0.79mm
0.99mm
5861 / 9561 / 9565 / 9761 / 9866-
83
20.3 kW
1476 g/h
0.91mm
0.79mm
0.99mm
9585-43
23.1 kW
1680 g/h
0.91mm
0.79mm
1.02mm
9581 / 9585 / 9586 / 9785 / 9986-
83
23.1 kW
1680 g/h
0.91mm
0.79mm
1.02mm
9865 / 9867 / 9868 / 9869-53
11.4 kW
829 g/h
0.97mm
9865-63
14.1 kW
1025 g/h
0.97mm
0.79mm
9865 / 9867 / 9868 / 9869-83
18.5 kW
1345 g/h
0.97mm
0.79mm
1.02mm
9875 / 9877-53
12.0 kW
873 g/h
0.99mm
9877 / 9878-83
19.95 kW
1451 g/h
0.99mm
0.79mm
1.15mm
CYLINDER
Cylinders up to and including the 15 kg size may be used. Do
not use cylinders larger than 15 kg.
Always treat a cylinder with care. Never store it on its side
because the valve could become damaged, resulting in a leak
which could be serious. Always use the cylinder upright.
Horizontally, liquid fuel could get into the supply pipes with
damaging results.
Always place the cylinder in an accessible location to facilitate
changing and emergency shut off. Always disconnect the gas
cylinder before moving the appliance.
Never subject a cylinder to heat. The pressure inside the
cylinder could build up and exceed the designed safety limit.
Never store cylinders in cellars, adjacent to open drains and
basement areas or below ground level. Propane is heavier
than air. If there is a leak, the gas will collect at low level and
become dangerous in the presence of a spark or flame.
Never store butane or propane cylinders indoors.
STORAGE
When storing the appliance for long periods of time, remove
the cylinder and cover the barbecue. Store the cylinder
outdoors in a well ventilated place.
SERVICING
This gas appliance should not be altered or interfered with.
Any adjustment or servicing should be carried out by a
qualified engineer.
Regular maintenance is recommended.
See maintenance instructions.


