


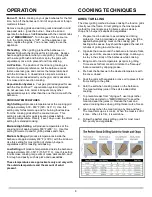


10
MAINTENANCE
PERIODIC MAINTENANCE
After you have finished, prepare for the next cookout by
burning off any residue of food from the grid and Flav-R-
Wave™ in the following manner:
Cooking Grids
Remove all food from the grids, turn the control knobs to
“HIGH”, and operate the barbecue with the lid closed for 5
to 10 minutes or until smoking stops. Turn the gas cylinder
valve to OFF, then the control knobs to OFF.
Use a long-handled
brass
wire brush to clean the grids.
Remember that the barbecue is hot, so wear kitchen mitts
or use a pot-holder to handle the brush.
You do not have to wash the grids and upper cooking rack
after each cookout, but if you wish to do so, use a mild soap
and water solution, then rinse them thoroughly. Never use a
commercial oven cleaner.
Porcelain Coating
Most OMC cooking grids are coated with a durable
porcelain enamel to assist in cleaning and reduce the
tendency of food sticking to the grid. Some chipping may
occur if mishandled. This will not affect the use or
performance of the grids. If some rust appears, remove the
rust with a scrub pad and coat the grid with cooking oil
.
Flav-R-Wave™
If any residue begins
to accumulate on the
Flav-R-Wave™,
remove cooking
grids and scrape
excess residue with
back of barbecue
brush.
Grease Tray
The grease tray is
located immediately below the hole through which grease
will drain and is accessible from the rear of the barbecue.
The grease tray should be checked and cleaned or replaced
regularly to prevent grease from overflowing onto your patio
(Accessory #50416).
General Cleaning
When the barbecue is cold, remove the grids. Cover three
quarters of the cooking grids with aluminum foil, shiny side
down. Ignite the burners; operate the barbecue on HIGH
with the lid closed for 10 minutes or until smoking stops.
Turn the gas cylinder valve to OFF, turn the control knobs to
OFF. When the barbecue is cool, remove the foil and grids.
Scrape the Flav-R-Wave™ clean and remove, then clean
the interior of the bottom oven by scraping the sides and
vacuuming.
ANNUAL MAINTENANCE
To ensure safe and efficient performance, the following
components should be inspected and cleaned at least once
per year or after any period of storage exceeding one month.
Burner
Remove burner and inspect for cracks and deterioration.
Clean venturi tubes using a pipe cleaner or venturi brush to
eliminate any blockages caused by spiders or insects. See
"Venturi Tubes".
While burner is removed, clean interior of bottom oven by
scraping the sides and vacuuming.
Hose
Inspect and replace if necessary. See "Hose and Regulator".
Exterior Finish
If white oxidation spots appear, wash the outside of the
housing with a mild soap and water solution. Rinse the
surfaces thoroughly, then wipe them with a cloth dipped in
cooking oil to restore the luster.
For repair of paint scratches and scuffs, use a good quality
HIGH temperature (600°F) spray paint for touch-up.
Rusting is a natural oxidation process and may appear on
cast-iron and steel parts. Rust will not affect short term
performance of your grill.
Stainless Steel
Wash with soap and water. Use stainless steel cleaner to
polish as well as remove stains and marks (Accessory
#70395 or #44395). Weathering and extreme heat can cause
a stainless steel lid to turn a tan color. This is discoloration
and is not considered a manufacturing defect.
Perma-Mold Side Shelves
Wash with soap and water. To enhance luster, coat lightly
with cooking oil.
Replacement Parts
If a problem is found with the regulator, hose, burner, or
control valves,
do not
attempt repair. See your dealer,
approved service centre, or contact the factory for repairs or
replacement parts. To ensure optimum performance, use
only original OMC replacement parts.
Leak Test
After reconnecting gas cylinder, be sure to check for leaks.
See "Leak Testing"


