background image

7

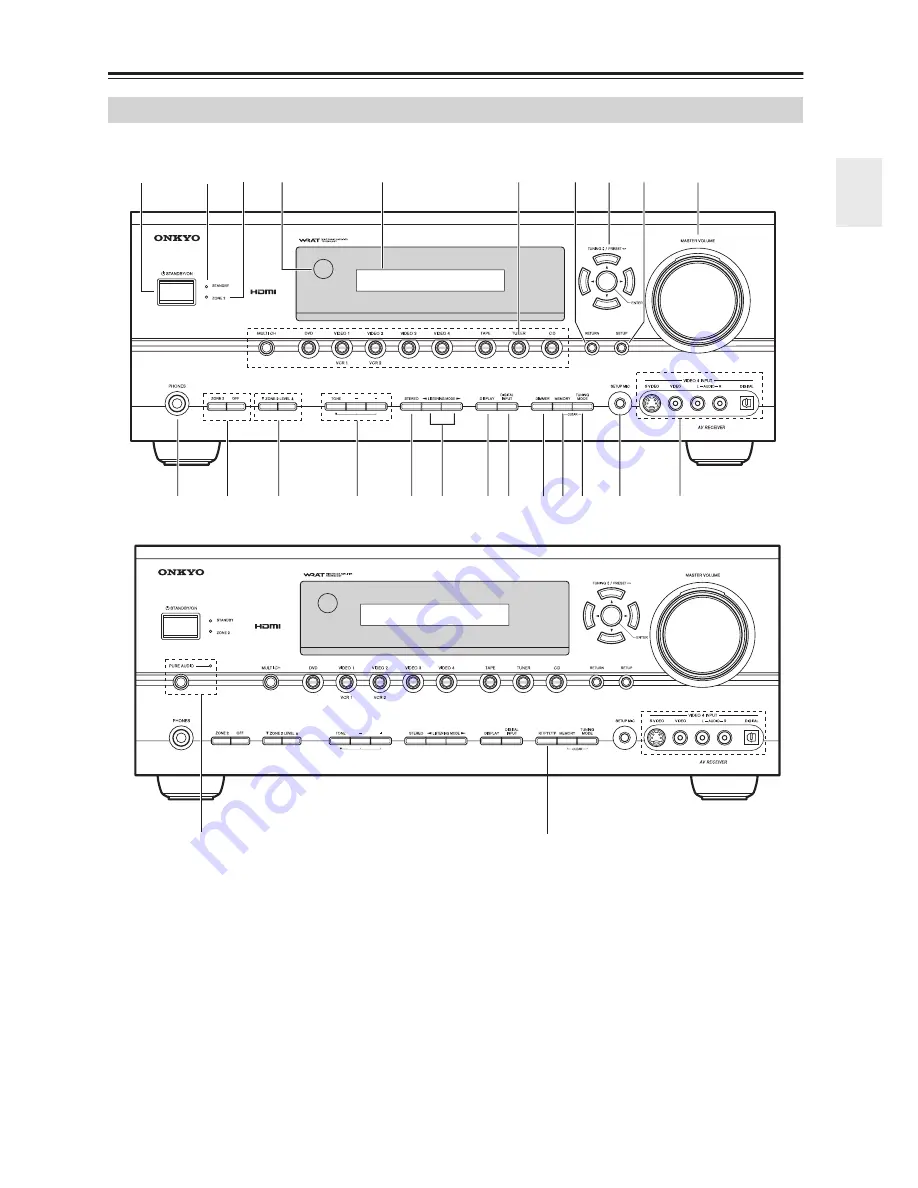
Front & Rear Panels

The page numbers in parentheses show where you can find the main explanation for each item.

A

STANDBY/ON button (37)

This button is used to set the AV receiver to On or 
Standby.

B

STANDBY indicator (37)

This indicator lights up when the AV receiver is in 
Standby mode, and it flashes while a signal is being 
received from the remote controller.

C

ZONE 2 indicator (81)

This indicator lights up when Zone 2 is selected.

D

Remote control sensor (12)

This sensor receives control signals from the remote 
controller.

E

Display

See “Display” on page 9.

F

Input selector buttons (49)

These buttons are used to select from the following 
input sources: MULTI CH, DVD, VIDEO 1, 
VIDEO 2, VIDEO 3, VIDEO 4, TAPE, TUNER or 
CD.

The [MULTI CH] button selects the DVD analog 
multichannel input.

G

RETURN button

This button is used to return to the previously dis-
played onscreen setup menu.

Front Panel

M

L

K

I

J

7

8

0

A

B

C

D

F

H

E

G

9

1

5

2

3

4

6

E

N

North American models

Other models

(European models only)

Summary of Contents for TX-SR604

Page 1: ...ing in the unit Following the instructions in this manual will enable you to obtain optimum performance and listening enjoyment from your new AV Receiver Please retain this manual for future reference Contents Introduction 2 Connections 18 First Time Setup 38 Basic Operations 49 Advanced Operations 66 Advanced Setup 67 Zone 2 79 Controlling Other Components 83 Specifications 86 Troubleshooting 87 ...

Page 2: ...paratus does not operate normally by following the operating instructions Adjust only those controls that are covered by the operating instructions as an improper adjustment of other controls may result in damage and will often require extensive work by a qualified technician to restore the apparatus to its normal operation E If the apparatus has been dropped or damaged in any way and F When the a...

Page 3: ...ause they may leave marks on the case This unit s top and rear panels may get warm after prolonged use This is normal If you do not use this unit for a long time it may not work properly the next time you turn it on so be sure to use it occasionally For U S models FCC Information for User CAUTION The user changes or modifications not expressly approved by the party responsible for compliance could...

Page 4: ...roduct name indicates the color Specifications and operations are the same regardless of color Declaration of Conformity We ONKYO EUROPE ELECTRONICS GmbH LIEGNITZERSTRASSE 6 82194 GROEBENZELL GERMANY GROEBENZELL GERMANY ONKYO EUROPE ELECTRONICS GmbH K MIYAGI declare in own responsibility that the ONKYO product described in this instruction manual is in compliance with the corresponding technical s...

Page 5: ...stortion FTC rating VLSC 8 Vector Linear Shaping Circuitry on the front left and right channels 1 Manufactured under license from Dolby Laboratories Dolby Pro Logic and the double D symbol are registered trademarks of Dolby Laboratories 2 DTS DTS 96 24 DTS ES and Neo 6 are trademarks of DTS Inc 3 Neural Surround name and related logos are trademarks owned by Neural Audio Corporation 4 HDMI the HDM...

Page 6: ...uting the AV Receiver 51 Using the Sleep Timer 51 Using Headphones 51 Using the Tuner 52 Presetting AM FM Stations XM Channels 53 Using RDS European models only 54 Listening to XM Satellite Radio North American models only 56 Selecting Listening Modes 61 Listening Mode Table 62 About the Listening Modes 63 Recording 65 Advanced Operations Using the Late Night Function Dolby Digital only 66 Using t...

Page 7: ...tor lights up when Zone 2 is selected D Remote control sensor 12 This sensor receives control signals from the remote controller E Display See Display on page 9 F Input selector buttons 49 These buttons are used to select from the following input sources MULTI CH DVD VIDEO 1 VIDEO 2 VIDEO 3 VIDEO 4 TAPE TUNER or CD The MULTI CH button selects the DVD analog multichannel input G RETURN button This ...

Page 8: ...dio presets O DIMMER or RT PTY TP button 51 55 DIMMER is used to adjust the display brightness On the European model this is the RT PTY TP but ton and it s for RDS Radio Data System See Using RDS European models only on page 54 P DIGITAL INPUT button 44 77 This button is used to assign the digital inputs and to specify the format of digital input signals Q DISPLAY button 50 This button is used to ...

Page 9: ... AV receiver is tuned into a radio station AUTO 52 This indicator lights up when the Auto Tuning mode is selected and disappears when the Manual Tuning mode is selected RDS European models only 54 This indi cator lights up when tuned to a radio station that supports RDS Radio Data System XM North American models only 56 This indicator lights up when XM radio is selected MEMORY 53 This indicator li...

Page 10: ...S Video or composite video jack should be connected to a video input on your TV or projector H FRONT CENTER SURROUND SURROUND BACK SPEAKERS 20 These terminal posts are for connecting your front center surround and surround back speakers I ZONE 2 SPEAKERS 79 These terminals are for connecting speakers in Zone 2 J VOLTAGE SELECTOR only some models This voltage selector provides compatibility with po...

Page 11: ...ite video and analog audio T TAPE IN OUT This analog audio input and output are for connect ing a recorder with an analog audio input and output cassette Mini Disc etc U CD IN This analog audio input is for connecting a CD player s analog audio output V COMPONENT VIDEO OUT This component video output can be used to con nect a TV or projector with a component video input W COMPONENT VIDEO IN 1 2 3 ...

Page 12: ...pe is used in the same room or the AV receiver is installed close to equipment that uses infrared rays the remote con troller may not work reliably Don t put anything such as a book on the remote con troller because the buttons may be pressed inadvert ently thereby draining the batteries The remote controller may not work reliably if the AV receiver is installed in a rack behind colored glass door...

Page 13: ... com ponents RECEIVER TAPE mode is used to control the AV receiver It can also be used to control an Onkyo cassette recorder connected via Buttons 1 2 3 and 4 are used when the TUNER or TAPE input is selected Using the Remote Controller 1 Press one of the REMOTE MODE buttons to select a mode 2 Use the buttons supported by that mode to control the compo nent RECEIVER TAPE mode see right column DVD ...

Page 14: ...for the currently selected mode lights up L SLEEP button 51 Used with the Sleep function M VOL button 49 Adjusts the volume of the AV receiver regardless of the currently selected remote controller mode N MUTING button 51 Mutes or unmutes the AV receiver O SETUP button Used to access the setup menus P CINE FLTR button 66 Used with the CinemaFILTER function Q L NIGHT button 66 Used with the Late Ni...

Page 15: ...nd so on K CLR button Cancels functions and clears entered numbers L MENU button Displays a DVD s menu M SETUP button Used to access the DVD player s onscreen setup menus N RANDOM button Used with the random playback function O REPEAT button Used with the repeat playback functions P VCR DVD and HDD buttons Used to select VCR HDD hard disk drive or DVD playback on a VCR DVD recorder with a built in...

Page 16: ...utton Used to navigate menus on an HDD compatible component I PLAYLIST buttons Selects the previous or next playlist on an HDD compatible component J RANDOM button Used with the random shuffle playback function K REPEAT button Used with the repeat playback functions L PLAY MODE button Used to select play modes on components with selectable play modes CD MD CDR HDD Mode CD 9 TAPE 7 V3 3 To select t...

Page 17: ...bwoofer handles the bass sounds of the LFE Low Frequency Effects channel The volume and quality of the bass output from your subwoofer will depend on its position the shape of your listening room and your listening posi tion In general a good bass sound can be obtained by installing the subwoofer in a front corner or at one third the width of the wall as shown Tip To find the best position for you...

Page 18: ...log audio Composite video Left white Right red Yellow Right Wrong Video Cable Jack Description Component video cable Component video separates the luminance Y and color difference signals PR PB providing the best picture quality some TV manufacturers label their component video sockets slightly differently S Video cable S Video separates the luminance and color signals and provides better picture ...

Page 19: ...ing a Powered Subwoofer Using a suitable cable connect the AV receiver s PRE OUT SUBWOOFER to an input on your powered sub woofer as shown If your subwoofer is unpowered and you re using an external amplifier connect the PRE OUT SUBWOOFER to an input on the amp Attaching the Speaker Labels The AV receiver s positive speaker terminals are color coded for ease of identification the negative speaker ...

Page 20: ...ong way around the sound will be out of phase and will sound unnatural Unnecessarily long or very thin speaker cables may affect the sound quality and should be avoided If you use 4 or 5 speakers connect each of the two surround speakers to the SURROUND SPEAKERS terminals Do not connect them to the SURROUND BACK SPEAKERS terminals Be careful not to short the positive and negative wires Doing so ma...

Page 21: ...AV receiver is ready for use you ll need to tune into an FM radio station and adjust the position of the FM antenna to achieve the best possible reception 2 Use thumbtacks or something similar to fix the FM antenna into position Caution Be careful that you don t injure yourself when using thumbtacks AM antenna push terminals FM antenna connector FM 75 Insert the plug fully into the jack FM 75 Inse...

Page 22: ...must be grounded in accordance with local regulations to prevent electrical shock haz ards Using a TV FM Antenna Splitter It s best not to use the same antenna for both FM and TV reception as this can cause interference problems If cir cumstances demand it use a TV FM antenna splitter as shown Connecting an Outdoor AM Antenna If good reception cannot be achieved using the supplied AM loop antenna ...

Page 23: ...to upconvert composite video and S Video input signals and output them from the COMPONENT VIDEO OUT see page 46 For details on the HDMI jacks see page 32 Depending on the settings made on the AV receiver the composite video to S Video and S Video to composite video conversions may not work see page 46 Audio Connection Formats Audio equipment can be connected to the AV receiver by using any of the ...

Page 24: ...ity COMPONENT VIDEO OUT Component video input Best MONITOR OUT S S Video input Better MONITOR OUT V Composite video input Standard VIDEO 3 IN L R Analog audio L R output DIGITAL COAXIAL IN 2 Digital coaxial output DIGITAL OPTICAL IN 2 Digital optical output Step 1 Video Connection Choose a video connection that matches your TV or and then make the connection A B C Step 2 Audio Connection Choose an...

Page 25: ...ard DVD IN FRONT Analog audio L R output DIGITAL COAXIAL IN 1 Digital coaxial output DIGITAL OPTICAL IN 3 Digital optical output Step 1 Video Connection Choose a video connection that matches your DVD player or and then make the connection You must connect the AV receiver to your TV via the same type of connection A B C Step 2 Audio Connection Choose an audio connection that matches your DVD playe...

Page 26: ...multichannel analog audio cable or several normal audio cables to connect the AV receiver s DVD IN FRONT L R CENTER SURROUND L R SURR BACK L R and SUBWOOFER jacks to the 7 1 channel analog audio output on your DVD player If your DVD player has a 5 1 channel analog audio output don t connect anything to the AV receiver s SURR BACK L R jacks R FRONT L L R SURROUND CENTER SUB WOOFER FRONT SURROUND DV...

Page 27: ... 1 IN V Composite video output Standard VIDEO 1 IN L R Analog audio L R output DIGITAL COAXIAL IN 2 Digital coaxial output DIGITAL OPTICAL IN 1 Digital optical output Hint Step 1 Video Connection Choose a video connection that matches your VCR or DVD recorder or and then make the connection You must connect the AV receiver to your TV via the same type of connection A B C Step 2 Audio Connection Ch...

Page 28: ...nput the recordingVCR must be connected to a composite video output Similarly video signals connected to S Video inputs can only be recorded via S Video outputs If your TV VCR is connected to an S Video input the recording VCR must be connected to an S Video output Connecting a VCR or DVD Recorder for Recording Connection AV receiver Signal flow VCR or DVD recorder Picture quality VIDEO 1 OUT S S ...

Page 29: ...tput Better VIDEO 3 IN V Composite video output Standard VIDEO 3 IN L R Analog audio L R output DIGITAL COAXIAL IN 2 Digital coaxial output DIGITAL OPTICAL IN 2 Digital optical output Hint Step 1 Video Connection Choose a video connection that matches the video source or and then make the connection You must connect the AV receiver to your TV via the same type of connection A B C Step 2 Audio Conn...

Page 30: ...VIDEO 4 INPUT DIGITAL Digital optical output Step 1 Video Connection Choose a video connection that matches the camcorder or console or and then make the connection A B Step 2 Audio Connection Choose an audio connection that matches the camcorder or console or and then make the connection a b DIGITAL S VIDEO OPTICAL OUT AUDIO VIDEO L R S VIDEO OUT AUDIO OUT VIDEO OUT L R VIDEO 4 INPUT VIDEO 4 INPU...

Page 31: ...gital DTS Your DVD player must also support HDMI output of the above audio formats About Copyright Protection The AV receiver supports HDCP High bandwidth Digital Content Protection 2 a copy protection system for digital video signals Other devices connected to the AV receiver via HDMI must also support HDCP Commercially available HDMI cables supplied with some components should be used to connect...

Page 32: ...through the HDMI OUT see page 45 Audio Signal Flow Chart Digital audio signals received at HDMI IN 1 or 2 are output by the speakers and headphones connected to the AV receiver They re also output by the OPTICAL OUT and can be output by the HDMI OUT by setting the HDMI Audio Out set ting to On see page 76 To listen to audio received at HDMI IN 1 and 2 through your TV speakers set the HDMI Audio Ou...

Page 33: ...er or Turntable Connection AV receiver Signal flow CD or turntable CD IN L R Analog audio L R output DIGITAL COAXIAL IN 2 Digital coaxial output DIGITAL OPTICAL IN 3 Digital optical output IN L R L R CD AUDIO OUTPUT OPTICAL OUT AUDIO OUT L R COAXIAL OUT L R IN IN 2 COAXIAL IN 3 OPTICAL CD b c a a Step 1 Choose a connection that matches your CD player or Use connection for a turntable with a built ...

Page 34: ... S jack The example shown below is for con nection with the DS A1 For HDD compatible components that don t support video Connect your HDD compatible component s analog audio output jacks to the AV receiver s TAPE IN L R jacks Connecting a HDD compatible Component AUDIO OUT L R S VIDEO OUT AUDIO OUT L R Notes Connect the Remote Interactive Dock with an cable see page 36 Set the Remote Interactive D...

Page 35: ...low Cassette CDR MD or DAT recorder TAPE IN L R TAPE OUT L R Analog audio L R output Analog audio L R input DIGITAL COAXIAL IN 2 Digital coaxial output DIGITAL OPTICAL IN 3 Digital optical output DIGITAL OPTICAL OUT Digital optical input COAXIAL OUT AUDIO IN L R OPTICAL OUT OPTICAL IN L R IN TAPE AUDIO OUT L R L R TAPE OPTICAL IN 2 COAXIAL IN 3 OPTICAL b c a a d Step 1 Choose a connection that mat...

Page 36: ... jacks You can con nect either one to the AV receiver The other jack is for connecting additional capable components Connect only Onkyo components to jacks Con necting other manufacturer s components may cause a malfunction Some components may not support all functions Refer to the manuals supplied with your other Onkyo components The AV receiver has an AC outlet on its rear panel for connecting t...

Page 37: ...nd the STANDBY indicator goes off To turn the AV receiver off press the STANDBY ON button or press the remote controller s ON STANDBY button The AV receiver will enter Standby mode To prevent any loud surprises when you turn on the AV receiver always turn down the volume before you turn it off RECEIVER STANDBY ON ON STANDBY Remote controller AV receiver or Smooth Operation in a Few Easy Steps To e...

Page 38: ...ea C Third measurement point The left side of the listening area The distances between points 1 and 2 and points 1 and 3 must be at least 1 meter From the examples below choose the listening area that best matches yours and place the microphone accord ingly when prompted Automatic Speaker Setup Audyssey2EQ TV TV TV TV TV TV TV TV TV listening area listening position 1 Turn on the AV receiver and t...

Page 39: ...3 Press ENTER The automatic speaker setup starts A test tone is output by each speaker in turn as the Audyssey2EQ function determines which speakers are con nected This takes a few minutes Note If any extraneous noise is picked up by the microphone the automatic setup may not work correctly so don t make any noise Auto Speaker Setup Please place microphone at center of listening area at ear height...

Page 40: ... Retry Return to step 2 and try again Cancel Cancel the automatic speaker setup Auto Speaker Setup Please place microphone at right end of listening area at ear height Push Enter Next Auto Speaker Setup Please place microphone at left end of listening area at ear height Push Enter Next Auto Speaker Setup Measuring finished Next Calculate Retry Cancel 8 When the calculations are com plete the follo...

Page 41: ...l the automatic speaker setup Reviewing the Results Auto Speaker Setup Ambient noise is too high Retry Cancel Auto Speaker Setup Speaker Detect Error FL Yes FR No SL SR SBL SBR C Yes SW Retry Cancel Auto Speaker Setup Speaker Detect Error FL Yes FR Yes SL Yes SR No SBL Yes SBR Yes C Yes SW Yes Retry Cancel Auto Speaker Setup Speaker Detect Error FL Yes FR Yes SL No SR No SBL Yes SBR Yes C Yes SW Y...

Page 42: ...on the SP Detect Result screen as No increase the subwoofer s volume set it to its highest crossover frequency and then try running the automatic speaker setup again Note that if the vol ume is set too high and the sound distorts it may not be detected so use an appropriate volume level If the sub woofer has a low pass filter switch set it to Off or Direct Refer to your subwoofer s instruction man...

Page 43: ...ft d SurrRight 7ft e SurrBack R 7ft f SurrBack L 7ft g SurrLeft 7ft h Subwoofer 12ft 3 Level Calibration a Left 0dB b Center 0dB c Right 0dB d SurrRight 0dB e SurrBack R 0dB f SurrBack L 0dB g SurrLeft 0dB h Subwoofer 0dB 4 Equalizer Settings a Equalizer Off 5 Audio Adjust a Multiplex Main b Mono Input Ch L R c PL x Panorama Off d PL x Dimension 0 e PL x Center Width 3 f Neo 6 CenterImage 2 g Dolb...

Page 44: ...UNER input source 2 Press the DIGITAL INPUT but ton The current assignment appears DIGITAL INPUT Input selector buttons VIDEO 4 CD VIDEO 3 DVD VIDEO 1 VCR 1 VCR 2 VIDEO 2 TAPE DIGITAL INPUT 3 Press the DIGITAL INPUT but ton repeatedly to select COAX1 COAX2 OPT1 OPT2 OPT3 or analog An input selector that has been assigned to IN1 or IN2 in the HDMI Video Setup page 45 can be set to HDMI here There a...

Page 45: ... buttons to select TX SR604 604E 8460 only IN1 Select if the video component is connected to HDMI IN 1 IN2 Select if the video component is connected to HDMI IN 2 No Select when not using the HDMI output RECEIVER SETUP 0 Video Input Component Video a DVD IN1 b VIDEO1 c VIDEO2 d VIDEO3 HDMI e DVD No f VIDEO1 No g VIDEO2 No h VIDEO3 No 0 Video Input Component Video a DVD IN1 b VIDEO1 c VIDEO2 d VIDE...

Page 46: ...ain menu appears onscreen MUTING PREVIOUS MENU GUIDE TOP MENU SETUP RETURN PLAYLIST CAT PLAYLIST CAT TAPE MD CDR HDD CABLE ON STANDBY DIMMER ENT D TUN SLEEP 10 11 12 INPUT SELECTOR REMOTE MODE ZONE2 V1 V4 V2 V3 CD TAPE TUNER DVD MULTI CH LISTENING MODE TV VOL VOL SAT VCR TV DVD RECEIVER CD INPUT 10 0 CLR 1 2 3 4 5 6 7 8 9 ENTER CH DISC ALBUM 1 4 2 3 2 1 RECEIVER SETUP 2 Use the Up and Down buttons...

Page 47: ...hold down the TAPE or VIDEO 3 input selector but ton about 3 seconds to change the setting Repeat this step to select MD CDR or HDD For the TAPE input selector the setting changes in this order TAPE MD CDR HDD For theVIDEO 3 input selector the set ting changes in this order VIDEO 3 HDD 1 2 1 2 TAPE VIDEO 3 TAPE VIDEO 3 Minimum Speaker Impedance not North American models 1 Press the RECEIVER button...

Page 48: ...ct theTV system from the video input signals NTSC Select if the TV system in your area is NTSC PAL Select if the TV system in your area is PAL 4 Press the SETUP button Setup closes RECEIVER SETUP 8 Hardware Setup a SP Impedance 6ohms b PoweredZone2 NotAct c TV Format Auto d AM Freq Step 9kHz e Remote ID 1 f HDMI Audio Out Off g SW Input Sensitivity 0dB SETUP AM Frequency Step Setup on some models ...

Page 49: ...ELECTOR buttons On the remote controller the V1 V2 V3 and V4 buttons select the VIDEO 1 VIDEO 2 VIDEO 3 and VIDEO 4 input sources respectively 2 Start playback on the source component When you select DVD or another video component on your TV you ll need to select the video input that s connected to the AV receiver s COMPONENT VIDEO OUT HDMI OUT or MONITOR OUT On some DVD players you may need to tu...

Page 50: ... the input signal is analog no format information is displayed If the input signal is PCM the sampling fre quency is displayed If the input signal is digital but not PCM the signal format is displayed Information is displayed for about three seconds then the previously displayed information reappears Interpreting Surround Channel Values A The number of front channels 3 means front left front right...

Page 51: ...udio can be heard in the headphones To adjust the headphone level press the CH SEL button on the remote controller and then press the LEVEL LEVEL buttons You can adjust the level between 12 dB and 12 dB Setting the Display Brightness Press the RECEIVER button and then press the DIMMER button repeatedly to select Normal VOLUME light on Normal VOLUME light off Dim VOLUME light off Dimmer VOLUME ligh...

Page 52: ...g the Tuner Use the TUNER input selector button to select either AM or FM In this example FM has been selected Each time you press the TUNER but ton the input source changes between AM and FM Actual display depends on country 1 Press the TUNING MODE button so that the AUTO indicator appears on the display 2 Press the TUNING Up or Down button Searching stops when a station is found TUNER Band Frequ...

Page 53: ...l is stored and the preset number stops flashing Repeat this procedure for all of your favoriteAM FM radio stations and XM channels 3 2 4 MEMORY TUNING PRESET ENTER MEMORY To select a preset use the PRE SET buttons or the remote controller s CH but ton 1 Select the preset that you want to delete See the previous section 2 While holding down the MEM ORY button press the TUNING MODE button The prese...

Page 54: ... stations by type see page 55 TP Traffic Program This allows you to search for RDS radio stations that broadcast traffic information see page 55 Notes In some cases the text characters displayed on the AV receiver may not be identical to those broadcast by the radio station Also unexpected characters may be dis played when unsupported characters are received This is not a malfunction If the signal...

Page 55: ...u want See the table on page 54 RT PTY TP RT PTY TP 2 3 5 1 TUNER RT PTY TP TUNING PRESET ENTER 4 To start the search press ENTER The AV receiver searches until it finds a station of the type you specified at which point it stops briefly before con tinuing with the search 5 When a station you want to listen to is found press ENTER If no stations are found the message Not Found appears 1 Use the TU...

Page 56: ...th the XM Satellite Radio sys tem Furthermore the AMBE voice compression soft ware included in this product is protected by intellectual property rights including patent rights copyrights and trade secrets of Digital Voice Systems Inc The user of this or any other software contained in an XM Radio is explicitly prohibited from attempting to copy decom pile reverse engineer or disassemble the objec...

Page 57: ... Down buttons to select SAT Radio and then use the PRESET buttons to select XM Pressing the PRESET but tons cycles through the following SAT options None XM None Select if you are not using sat ellite radio XM Select to use XM satellite radio 4 Press the SETUP button Press the TUNER input selector button repeatedly to select XM If CHECK ANTENNA appears on the display make sure the XM Passport Syst...

Page 58: ...E MD CDR HDD CABLE ON STANDBY DIMMER ENT D TUN SLEEP 10 11 12 INPUT SELECTOR REMOTE MODE ZONE2 V1 V4 V2 V3 CD TAPE TUNER DVD MULTI CH TV VOL VOL SAT VCR TV DVD RECEIVER CD INPUT 10 0 CLR 1 2 3 4 5 6 7 8 9 ENTER CH DISC ALBUM RETURN ENTER D TUN RECEIVER SETUP RETURN ENT Number buttons Channel name Channel number 1 Press the RECEIVER button followed by the ENTER button to select Category Search mode...

Page 59: ...lect any channel In Category Search mode you can only select channels from the currently selected category To listen to the previously selected XM channel press the RETURN button TUNING MODE DISPLAY RETURN ENTER TUNING TUNING MODE ENTER TUNING PRESET RETURN RETURN Remote controller AV receiver Press the DISPLAY button repeatedly to cycle through the available information SETUP RETURN PLAYLIST CAT ...

Page 60: ...CEIVER button fol lowed by the SETUP button The main menu appears onscreen 2 Use the Up and Down buttons to select 6 Input Setup and then press ENTER The Input Setup menu appears 3 Adjust the position of the XM Passport System so that the SAT TER signal strength bar is as long as possible MUTING PREVIOUS MENU GUIDE TOP MENU SETUP RETURN PLAYLIST CAT PLAYLIST CAT TV VOL VOL INPUT ENTER CH DISC ALBU...

Page 61: ... with the Remote Controller SURROUND button This button selects the Dolby Digital and DTS lis tening modes and the Neural Surround listening mode North American models only STEREO button This button selects the Stereo listening mode LISTENING MODE buttons Pressing these buttons repeatedly cycles through all of the listening modes that can be used with the cur rent input source Selecting Listening ...

Page 62: ...and DTS 96 24 DTS 96 24 sources are processed as normal DTS Multich analog Multich PCM 3 2 1 2 2 1 2 0 1 0 1 1 Other 3 2 1 2 2 1 2 0 DTS ES Discrete Matrix CD TV radio cassette etc DVD DTV etc DVD CD etc DVD Pure Audio not North American models Direct Stereo Mono Multich PLIIx Movie Music Game 3 Neo 6 Cinema Neo 6 Music 3 If the Surr Back parameter is set to None or the ZONE 2 SPEAKERS terminals a...

Page 63: ...mat and it ll put you right in the middle of the action just like being in a movie theater or concert hall Dolby Digital EX DTS Dolby EX These modes expand 5 1 channel Dolby Digital and DTS sources for 6 1 7 1 chan nel playback They re especially suited to Dolby Digital EX soundtracks that include a matrix encoded surround back channel The additional channel adds an extra dimension and provides an...

Page 64: ...ultichannel surround play back Onkyo Original DSP Modes Mono Movie This mode is suitable for old movies and other mono sources The center speaker outputs the sound as it is while reverb is applied to the sound output by the other speakers giving presence to even mono material Orchestra Suitable for classical or operatic music this mode emphasizes the surround channels in order to widen the stereo ...

Page 65: ...nected to the to VIDEO 1 OUT or VIDEO 2 OUT jacks See pages 23 to 36 for hookup information Recording Separate AV Sources Here you can record audio and video from completely separate sources allowing you to overdub audio onto your video recordings This function takes advantage of the fact that when an audio only input source i e TAPE TUNER or CD is selected the video input source remains unchanged...

Page 66: ...guration cannot be adjusted Using the Late Night Function Dolby Digital only Press the RECEIVER button and then press the L NIGHT button repeatedly to select Off Late Night function off Low Small reduction in dynamic range High Big reduction in dynamic range RANDOM SUBTITLE PLAY MODE AUDIO REPEAT RC 651M HDD DVD VCR LISTENING MODE DISPLAY TESTTONE CH SEL SURROUND STEREO CINE FLTR LEVEL LEVEL L NIG...

Page 67: ... Speaker Setup function see page 38 MUTING PREVIOUS MENU GUIDE TOP MENU SETUP RETURN PLAYLIST CAT PLAYLIST CAT TAPE MD CDR HDD CABLE ON STANDBY DIMMER ENT D TUN SLEEP 10 11 12 INPUT SELECTOR REMOTE MODE ZONE2 V1 V4 V2 V3 CD TAPE TUNER DVD MULTI CH TV VOL VOL SAT VCR TV DVD RECEIVER CD INPUT 10 0 CLR 1 2 3 4 5 6 7 8 9 ENTER CH DISC ALBUM 1 11 2 10 2 1 RECEIVER SETUP 2 Use the Up and Down buttons to...

Page 68: ...t and Right buttons to select a crossover frequency If no surround back speakers are con nected select None Notes If the Surround setting in step 6 is set to None this setting cannot be selected If the Surround setting in step 6 is set to anything other than Full Band Full Band cannot be selected here 8 Use the Up and Down buttons to select f SurrBack Ch and then use the Left and Right buttons to ...

Page 69: ...u appears Note Speakers that you set to No or None on the Speaker Configuration page page 67 cannot be selected This setting is set automatically by the Automatic Speaker Setup function see page 38 MUTING PREVIOUS MENU GUIDE TOP MENU SETUP RETURN PLAYLIST CAT PLAYLIST CAT TAPE MD CDR HDD CABLE ON STANDBY DIMMER ENT D TUN SLEEP 10 11 12 INPUT SELECTOR REMOTE MODE ZONE2 V1 V4 V2 V3 CD TAPE TUNER DVD...

Page 70: ...AT TAPE MD CDR HDD CABLE ON STANDBY DIMMER ENT D TUN SLEEP 10 11 12 INPUT SELECTOR REMOTE MODE ZONE2 V1 V4 V2 V3 CD TAPE TUNER DVD MULTI CH TV VOL VOL SAT VCR TV DVD RECEIVER CD INPUT 10 0 CLR 1 2 3 4 5 6 7 8 9 ENTER CH DISC ALBUM 1 5 2 3 2 1 RECEIVER SETUP 2 Use the Up and Down buttons to select 3 Level Cali bration and then press ENTER The Level Calibration menu appears and the pink noise test t...

Page 71: ... 11 12 INPUT SELECTOR REMOTE MODE ZONE2 V1 V4 V2 V3 CD TAPE TUNER DVD MULTI CH TV VOL VOL SAT VCR TV DVD RECEIVER CD INPUT 10 0 CLR 1 2 3 4 5 6 7 8 9 ENTER CH DISC ALBUM 1 7 2 6 2 1 RECEIVER SETUP Be sure to select this set ting after having per formed the Automatic Speaker Setup Manual You can adjust the EQ of each speaker manually If you select Manual continue with this procedure If you select O...

Page 72: ...tton The main menu appears onscreen 2 Use the Up and Down buttons to select 8 Hardware Setup and then press ENTER Use the Up and Down buttons to select SW Input Sen sitivity and use the Left and Right buttons to select a value 3 Press the SETUP button Setup closes RECEIVER SETUP SETUP Audio Adjust Functions 1 Press the RECEIVER button fol lowed by the SETUP button The main menu appears onscreen 2 ...

Page 73: ...e center channel sound is output by only the center speaker If you are not using a center speaker the center channel sound will be distributed to the front left and right speakers to create a phantom center This setting controls the front left right and center mix allowing you to adjust the weight of the center channel sound It can be adjusted from 0 to 7 default is 3 Neo 6 Music Mode Setting Cent...

Page 74: ...Valid e D F 2ch Last Valid f Mono Last Valid g MCH Ana Last Valid V1 V2 V3 CD TAPE TUNER DVD 1 2 3 6 7 8 9 V4 4 The Last Valid option means that the listening mode selected last will be used b Ana PCM With this setting you can specify the listening mode to be used when an analog CD TV LD VHS MD turntable radio cassette cable satellite etc or PCM digital CD DVD etc audio signal is played c Dolby D ...

Page 75: ...the Up and Down buttons to select a IntelliVolume If a component is too loud compared to your other components use the Left button to adjust the level If it s too quiet use the Right button The level can be set from 12 dB to 12 dB SETUP RECEIVER 6 Input Setup DVD MCH a IntelliVolume 0dB Listening Mode Preset b Ana PCM Last Valid c Dolby D Last Valid d DTS Last Valid e D F 2ch Last Valid f Mono Las...

Page 76: ...e same room If you change the AV receiver s remote control ID be sure to set the same ID on both the AV receiver and remote controller see page 78 The default ID for both is 1 This preference determines whether audio received at the HDMI IN is output by the HDMI OUT You may want to turn this preference on if your TV is connected to the HDMI OUT and you want to listen to the audio from a component ...

Page 77: ...f try setting the format to PCM If noise is produced when fast forwarding or reversing a DTS CD try setting the format to DTS Lock Setup 1 Press the RECEIVER button fol lowed by the SETUP button The main menu appears onscreen 2 Use the Up and Down buttons to select 9 Lock Setup and then press ENTER RECEIVER SETUP 9 Lock Setup a Lock Unlocked Digital Input Signal Formats 1 Press and hold the AV rec...

Page 78: ...you want to correct This can be the DVD VIDEO 1 VIDEO 2 VIDEO 3 or VIDEO 4 input source 3 Use the Left and Right buttons to adjust the delay from 0 to 100 milliseconds in 10 milli second steps MUTING PREVIOUS MENU GUIDE TOP MENU SETUP RETURN PLAYLIST CAT PLAYLIST CAT TAPE MD CDR HDD CABLE ON STANDBY DIMMER ENT D TUN SLEEP 10 11 12 INPUT SELECTOR REMOTE MODE ZONE2 V1 V4 V2 V3 CD TAPE TUNER DVD MULT...

Page 79: ...cable to connect the AV receiver s ZONE 2 LINE OUT L R jacks to an analog audio input on your receiver integrated amp Connect the Zone 2 speakers to the speaker terminals on the receiver integrated amp Using Only Speakers in Zone 2 With this connection method you can use 5 1 surround sound in the main room and play a different AV source in Zone 2 The volume for Zone 2 is set on the AV receiver Set...

Page 80: ...up menu appears 3 Use the Up and Down buttons to select Powered Zone 2 and use the Left and Right buttons to select Not Act ZONE 2 SPEAKERS termi nals deactivated Act ZONE 2 SPEAKERS termi nals activated When Zone 2 is activated and turned on see page 81 the speakers connected to the ZONE 2 SPEAKERS terminals output sound but the speakers con nected to the SURROUND BACK SPEAKERS terminals do not w...

Page 81: ...one 2 Sel Source appears 2 To turn off Zone 2 press the ZONE 2 OFF button 1 2 ZONE 2 OFF 1 Press the ZONE 2 button then point the remote controller at the AV receiver and press the ON STANDBY button Zone 2 turns on and the ZONE 2 12V TRIGGER OUT goes high 12 V 2 To select an input source for Zone 2 press the ZONE 2 but ton followed by an INPUT SELECTOR button To select AM FM or XM press the TUNER ...

Page 82: ...Niles and Xantech These kits can also be used when the AV receiver is not in line of sight of the remote controller for example when it s installed inside a cabinet Using a Multiroom Kit with Zone 2 In the following diagram an IR receiver picks up the infrared signals from the remote controller in Zone 2 and feeds them to the AV receiver in the main room via the connecting block Connect the minipl...

Page 83: ...T PLAYLIST CAT RANDOM SUBTITLE PLAY MODE AUDIO REPEAT RC 651M TAPE MD CDR HDD CABLE ON STANDBY DIMMER ENT D TUN SLEEP 10 11 12 INPUT SELECTOR HDD DVD VCR REMOTE MODE ZONE2 V1 V4 V2 V3 CD TAPE TUNER DVD MULTI CH LISTENING MODE TV DISPLAY TESTTONE CH SEL SURROUND STEREO CINE FLTR LEVEL LEVEL L NIGHT VOL VOL SAT VCR TV DVD RECEIVER CD INPUT 10 0 CLR 1 2 3 4 5 6 7 8 9 ENTER CH DISC ALBUM REMOTE MODE R...

Page 84: ... cable RCA See page 36 for details 2 Enter the appropriate remote control code for the DVD or CD REMOTE MODE but ton DVD REMOTE MODE button 1612 Onkyo DVD player with CD MD CDR HDD REMOTE MODE button 1327 Onkyo CD player with 1808 Onkyo MD recorder with 1322 Onkyo CD recorder with 1993 HDD compatible component with See the previous page for how to enter remote control codes 3 Press the DVD or CD R...

Page 85: ...erates the VCR MUTING PREVIOUS MENU GUIDE TOP MENU SETUP RETURN PLAYLIST CAT PLAYLIST CAT RANDOM SUBTITLE PLAY MODE AUDIO REPEAT TAPE MD CDR HDD CABLE ON STANDBY DIMMER ENT D TUN SLEEP 10 11 12 INPUT SELECTOR HDD DVD VCR REMOTE MODE ZONE2 V1 V4 V2 V3 CD TAPE TUNER DVD MULTI CH LISTENING MODE TV DISPLAY TESTTONE CH SEL SURROUND STEREO CINE FLTR LEVEL LEVEL L NIGHT VOL VOL SAT VCR TV DVD RECEIVER CD...

Page 86: ...TREBLE Signal to Noise Ratio 106 dB LINE IHF A Speaker Impedance North American 6 Ω 16 Ω Others 4 Ω or 6 Ω 16 Ω Input Sensitivity Output Level and Impedance 1 Vp p 75 Ω Component and S VideoY 0 7 Vp p 75 Ω Component PB CB PR CR 0 28 Vp p 75 Ω S Video C 1 Vp p 75 Ω Composite Component Video Frequency Response 5 Hz 50 MHz Tuning Frequency Range North American 87 5 MHz 107 9 MHz Others 87 5 MHz 108 0...

Page 87: ...ch as those that support DVD the default setting is off With some DVD Video discs you need to select an audio output format from a menu If your turntable doesn t have a built in phono preamp you must connect one between it and the AV receiver If your turntable uses an MC cartridge you must connect an MC head amp or an MC transformer and phono equalizer Make sure that none of the connecting cables ...

Page 88: ...The DVD analog multichannel input doesn t work Check the DVD analog multichannel input connec tions page 26 To select the DVD analog multichannel input press the MULTI CH input selector button Check the audio output settings on your DVD player About DTS signals When DTS program material ends and the DTS bit stream stops the AV receiver remains in DTS listen ing mode and the DTS indicator remains o...

Page 89: ...eiver and that there s no obstruction between the remote controller and the AV receiver s remote control sensor page 12 Make sure that the AV receiver is not subjected to direct sunshine or inverter type fluorescent lights Relocate if necessary If the AV receiver is installed in a rack or cabinet with colored glass doors the remote controller may not work reliably when the doors are closed Make su...

Page 90: ...mal sounds The following settings can be made for the compo nent video S Video and composite video inputs You must use the buttons on the unit to make these set tings 1 While holding down the input selector button for the input source that you want to set press the SETUP button 2 Use the Left and Right buttons to change the setting 3 Press the SETUP button when you ve finished Video Attenuation Th...

Page 91: ...91 MEMO ...

Page 92: ...roebenzell GERMANY Tel 49 8142 4401 0 Fax 49 8142 4401 555 http www eu onkyo com ONKYO EUROPE UK Office Suite 1 Gregories Court Gregories Road Beaconsfield Buckinghamshire HP9 1HQ UNITED KINGDOM Tel 44 0 1494 681515 Fax 44 0 1494 680452 ONKYO CHINA LIMITED Unit 1 12 9 F Ever Gain PlazaTower 1 88 Container Port Road Kwai Chung N T Hong Kong Tel 852 2429 3118 Fax 852 2428 9039 http www ch onkyo com ...

Reviews: