background image

26

Front Panel

   Rear Panel

   Remote

Contents 


Connections


  Playback 

  Setup 


„

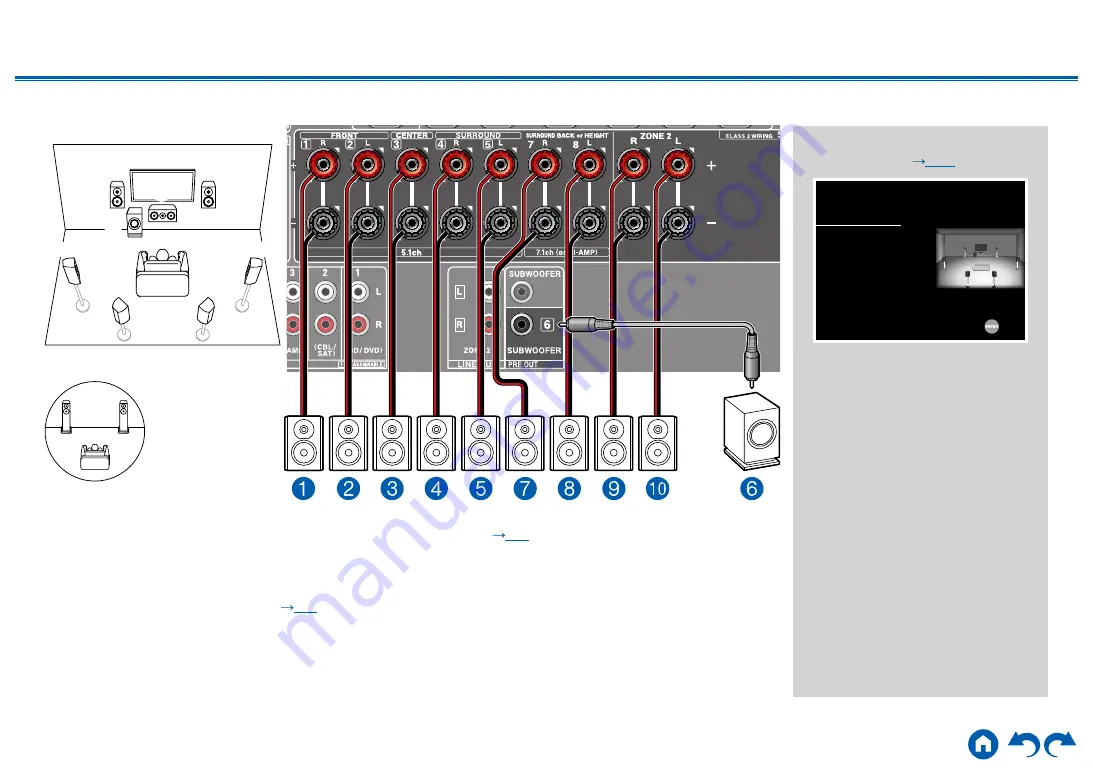
7.1 Channel ZONE SPEAKER

MAIN ROOM

1

2

5

4

8

7

3

6

MAIN ROOM:

 This is a 7.1 Channel System that consists of the basic 5.1 Channel System and added surround back 

speakers. For details of the speaker layout, refer to “Speaker Installation” (


p15

).

ZONE 2: 

You can enjoy 2-ch audio in the separate room (ZONE 2) while performing playback in the main room (where 

this unit is located). The same source can be played back in the main room and ZONE 2 simultaneously. Also, different 

sources can be played back in both rooms. To output audio from an externally connected AV component to ZONE 2, use 

an analog audio cable for connection. (


p36

)

• 

While ZONE 2 playback is being performed, surround back speakers installed in the main room cannot play audio.

„

  “Speaker Setup” settings during 

Initial Setup (


p110

)

Speaker Setup

Speaker Channels

Subwoofer
Height Speaker
Zone Speaker
Bi-Amp

Select how many speakers you have.

Next

7.1 ch < >

    Yes
      --- 
Zone 2
     No

• 

Speaker Channels: 

7.1 ch

• 

Subwoofer: 

Yes

• 

Height Speaker: 

---

• 

Zone Speaker: 

Zone 2

• 

Bi-Amp: 

No

ZONE 2

bk

9

Summary of Contents for TX-NR585

Page 1: ...Front Panel Rear Panel Remote AV RECEIVER Instruction Manual TX NR585 En Table of contents Connections Connecting Speakers Playback Setup Troubleshooting Appendix Supplementary Information...

Page 2: ...AV Component without HDMI Jack Mounted 34 Connecting an Audio Component 35 Connecting an AV Component in a Separate Room Multi zone Connection 36 Connecting a Pre main Amplifier ZONE 2 36 Connecting...

Page 3: ...65 Adjusting the tone 65 Listening Mode 66 Selecting a Listening mode 66 Listening Mode Effects 68 Selectable listening modes 71 Setup Setup Menu 80 Menu list 80 Menu operations 82 1 Input Output Assi...

Page 4: ...4 Front Panel Rear Panel Remote Contents Connections Playback Setup Appendix About HDMI 123 General Specifications 125...

Page 5: ...ord must be connected only after all other connections are completed We will not accept any responsibility for damage arising from the connection with equipment manufactured by other companies Network...

Page 6: ...6 Contents Connections Playback Setup Front Panel Rear Panel Remote Part Names Front Panel For details see p7...

Page 7: ...p8 9 SETUP button You can display advanced setting items on the TV and the display to have a more enjoyable experience with this unit p80 10 Cursor buttons and ENTER button Select an item with the cu...

Page 8: ...the NET input selector is selected a USB device is connected and the USB input is selected It will blink if the USB device is not properly connected HDMI HDMI signals are input and the HDMI input is s...

Page 9: ...9 Contents Connections Playback Setup Front Panel Rear Panel Remote Rear Panel For details see p10 180 90...

Page 10: ...O IN jacks Input AV component video signals with a component video cable Compatible only with 480i or 576i resolution 8 HDMI OUT jacks Transmit video signals and audio signals with an HDMI cable conne...

Page 11: ...button cannot be used with this unit 9 Play buttons Used for playback operations for the Music Server p52 or USB device p49 10 button Used for repeat random playback operations for the Music Server p...

Page 12: ...ons Playback Setup Connections Connecting speakers 13 Connecting the TV 30 Connecting Playback Devices 33 Connecting an AV Component in a Separate Room Multi zone Connection 36 Connecting Antennas 37...

Page 13: ...duces the sound design recorded in the Dolby Atmos audio format by installing Surround Back Speakers or Height Speakers Dolby Atmos enables the accurate placement of sound objects that have independen...

Page 14: ...akers create the back sound field Powered subwoofer reproduces the bass sound and creates the rich sound field The front speakers should be positioned at ear height while the surround speakers should...

Page 15: ...ound field and provides a more real sound field Furthermore by installing surround back speakers when the input format is Dolby Atmos you can select the Dolby Atmos listening mode which realizes the m...

Page 16: ...ting of the basic 5 1 Channel System p14 and added height speakers Select the height speakers that suit your speakers and usage environment from the following three types Front High Speakers Rear High...

Page 17: ...speakers when the input format is Dolby Atmos you can select the Dolby Atmos listening mode which realizes the most up to date 3D sound including overhead sound Front high speakers or rear high speak...

Page 18: ...lby Atmos you can select the Dolby Atmos listening mode which realizes the most up to date 3D sound including overhead sound Install the top front speakers on the ceiling anterior to the seating posit...

Page 19: ...abled speakers surround combined Dolby enabled speakers are special speakers designed to face the ceiling so that the sound is heard from overhead by bouncing the sound off the ceiling By installing s...

Page 20: ...ote controller and set 2 Speaker Configuration Speaker Impedance to 4ohms Connect the Speaker Cables 1 2 12 mm Make correct connection between the unit s jacks and speaker s jacks side to side and sid...

Page 21: ...Connections Playback Setup Connect the Subwoofer a a Subwoofer cable Connect a powered subwoofer with this unit using a subwoofer cable Up to two powered subwoofers can be connected The same signal i...

Page 22: ...tem For details of the speaker layout refer to Speaker Installation p14 Speaker Setup settings during Initial Setup p110 Speaker Setup Speaker Channels Subwoofer Height Speaker Zone Speaker Bi Amp Sel...

Page 23: ...re this unit is located The same source can be played back in the main room and ZONE 2 simultaneously Also different sources can be played back in both rooms To output audio from an externally connect...

Page 24: ...mprove the quality of the low and high pitched ranges Be sure to remove the jumper bar connecting between the woofer jacks and tweeter jacks of the Bi Amping supported speakers Refer to the instructio...

Page 25: ...l System and added surround back speakers For details of the speaker layout refer to Speaker Installation p15 Speaker Setup settings during Initial Setup p110 Speaker Setup Speaker Channels Subwoofer...

Page 26: ...ted The same source can be played back in the main room and ZONE 2 simultaneously Also different sources can be played back in both rooms To output audio from an externally connected AV component to Z...

Page 27: ...connection Front High Speakers Rear High Speakers Installation Example p17 Ceiling Speakers Installation Example p18 Dolby Enabled Speakers Dolby Speakers Installation Example p19 Speaker Setup setti...

Page 28: ...ZONE 2 while performing playback in the main room where this unit is located The same source can be played back in the main room and ZONE 2 simultaneously Also different sources can be played back in...

Page 29: ...SURROUND SURROUND BACK HEIGHT Bi AMP ZONE 2 ZONE SPEAKER 2 1 ch 1 1 3 1 ch 1 1 4 1 ch 1 1 5 1 ch 1 1 6 1 ch 2 7 1 ch 2 2 1 2 ch 3 3 1 2 ch 3 4 1 2 ch 3 5 1 2 ch 3 1 You can select either Bi AMP or ZO...

Page 30: ...or play the audio of the TV on this unit Connection with the TV differs depending on whether the TV supports the ARC Audio Return Channel function or not The ARC function transmits the audio signals o...

Page 31: ...the ARC function Select Yes for 5 ARC Setup in Initial Setup p109 For detailed settings for TV connection CEC function and audio output refer to the instruction manual of the TV ARC function This func...

Page 32: ...use a cable set top box etc connected to the input jack of this unit to watch TV without using a TV s built in tuner connection with a digital optical cable or analog audio cable is not required ARC...

Page 33: ...nction are automatically enabled if you select Yes for 5 ARC Setup in Initial Setup p109 If No Skip is selected settings are required in the Setup menu after Initial Setup is completed Press on the re...

Page 34: ...digital surround playback in formats such as Dolby Digital you need to make a connection for audio signals with a digital coaxial cable or a digital optical cable According to the illustration changi...

Page 35: ...ONO jack If the turntable has a built in phono equalizer connect it to any of the AUDIO IN jacks other than the PHONO jack Further if the turntable uses an MC type cartridge install a phono equalizer...

Page 36: ...o connect the ZONE 2 LINE OUT jack of this unit and the LINE IN jack of the pre main amplifier in the separate room The same source can be played back in the main room and ZONE 2 simultaneously Also d...

Page 37: ...etup Connecting Antennas Connect the antenna to this unit and set up the antenna at the best position for listening while receiving radio signals Attach the indoor FM antenna to the wall using push pi...

Page 38: ...h as Internet radio by network connection If connection is made by the wired LAN connect the router and the ETHERNET jack with the LAN cable as shown in the illustration To connect by Wi Fi select Wir...

Page 39: ...39 Front Panel Rear Panel Remote Contents Connections Playback Setup Connecting the Power Cord Connect the power cord after all the connections are completed a Power cord a...

Page 40: ...ent Playback 41 BLUETOOTH Playback 42 Internet Radio 43 Spotify 45 AirPlay 46 DTS Play Fi 47 FlareConnectTM 48 USB Storage Device 49 Playing back files on a PC and NAS Music Server 52 Play Queue 57 Li...

Page 41: ...selector whose name is the same as that of the jack to which the player is connected For example press BD DVD to play the player connected to the BD DVD jack Press TV to listen the sound of the TV Al...

Page 42: ...Onkyo TX NR585 XXXXXX To connect another BLUETOOTH enabled device press and hold the button until Now Pairing is displayed and then perform step 2 This unit can store the pairing information of up to...

Page 43: ...each service visit the website of each service Playing Back Perform the following procedure when this unit is on 1 Switch the input on the TV to the input connected to the unit 2 Pressing NET will dis...

Page 44: ...tunein com and log in it from this unit your favorite radio stations or programs you have followed on the website are automatically added to your My Presets on this unit My Presets is displayed on th...

Page 45: ...input is switched to NET and Spotify will start the streaming playback When 5 Hardware Power Management Network Standby is set to Off in the Setup menu turn this unit on manually and press NET on the...

Page 46: ...n the iOS device and select this unit from the displayed devices 3 Play the music file on the iOS device When 5 Hardware Power Management Network Standby is set to Off in the Setup menu turn this unit...

Page 47: ...Control App will automatically display compatible devices 4 Select this device from the compatible devices Then a list of applications such as a music streaming distribution service is displayed Selec...

Page 48: ...the same network 2 Download Onkyo Controller App from App Store or Google PlayTM Store 3 Connect the mobile device to the network where this unit is connected 4 Starting up Onkyo Controller App will a...

Page 49: ...B with the cursors and then press ENTER If the USB indicator blinks on the display check whether the USB storage device is plugged in properly Do not unplug the USB storage device while Connecting is...

Page 50: ...displayed Folder 1 Artist name Folder 1 1 Album name file 1 1 file 2 1 file 3 1 Folder 1 2 Album name file 1 2 file 2 2 file 3 2 jpg file jpg file Characters that cannot be displayed on this unit app...

Page 51: ...MPEG 1 MPEG 2 Audio Layer 3 Supported sampling rates 44 1 kHz 48 kHz Supported bitrates Between 8 kbps and 320 kbps and VBR WMA wma WMA Supported sampling rates 44 1 kHz 48 kHz Supported bitrates Betw...

Page 52: ...3 Select the Share my media check box and then click OK to display the compatible devices 4 Select this unit and then click Allow When it is clicked the corresponding icon is checked 5 Click OK to clo...

Page 53: ...12 or NAS device containing the music files to play 3 Make sure that the PC or NAS is properly connected to the same network as this unit 4 Press NET to display the network service list screen If the...

Page 54: ...12 To use the remote playback function of this unit with Windows Media Player 12 it must be configured beforehand Setting PC 1 Turn on your PC and start Windows Media Player 12 2 In the Stream menu se...

Page 55: ...Contents Connections Playback Setup It is playing a music file on a USB storage device Depending on the version of Windows Media Player the names of items to select may differ from the above descript...

Page 56: ...ain uncompressed PCM digital audio Supported sampling rates 44 1 kHz 48 kHz 88 2 kHz 96 kHz 176 4 kHz 192 kHz Quantization bit 8 bit 16 bit 24 bit AAC aac m4a mp4 3gp 3g2 AAC M4A MP4 3GP 3G2 Supported...

Page 57: ...it is removed from the outlet Initial Setup 1 Connect this unit to your home network by the network settings on this unit 2 Download Onkyo Controller App from App Store or Google PlayTM Store 3 Connec...

Page 58: ...n and enter the Play Queue service screen 2 Tap the icon of the track to sort and drag the icon to the destination 3 To delete a track tap the track and slide the trash icon to the left until the icon...

Page 59: ...owing procedure when this unit is on Tuning Automatically 1 Press TUNER repeatedly to select either AM or FM 2 Press MODE to display TunMode Auto on the display 3 When you press the cursors automatic...

Page 60: ...eception 1 Press TUNER repeatedly to select either AM or FM 2 Press MODE to display TunMode Manual on the display 3 While pressing the cursors select the desired radio station Each time you press the...

Page 61: ...ant to register perform the following procedure 1 Press MEMORY so that the preset number on the display blinks 2 While the preset number is blinking approx 8 seconds repeatedly press the cursors to se...

Page 62: ...s TUNER 2 Press the cursors to select a preset number Deleting a Preset Radio Station 1 Press TUNER 2 Press the cursors to select the preset number to delete 3 After pressing MEMORY press CLEAR while...

Page 63: ...AM FM broadcasts for the main room and separate room Switch remote control mode At the time of purchase the remote controller is in the mode to control playback in the main room To play a source in ZO...

Page 64: ...t the volume on the remote controller To do this on the main unit press ZONE 2 and then within 8 seconds adjust the volume using the MASTER VOLUME dial If you turn the unit to standby during multi zon...

Page 65: ...speakers 1 Press the TONE button on the main unit to select the setting to adjust from Bass and Treble Bass Enhances or moderates the low tone range of the front speakers Treble Enhances or moderates...

Page 66: ...ess the selected button repeatedly to switch the modes displayed on the display of the main unit Each of MOVIE TV MUSIC and GAME buttons stores the listening mode that was selected last If content inc...

Page 67: ...p Checking the input format and listening mode Pressing repeatedly will switch the display of the main unit in the following order Input source and volume Listening mode Input format The display is sw...

Page 68: ...wo front channels one center channel two surround channels and the LFE channel dedicated to the bass region sound elements for the subwoofer To enable transfer of this audio format connect via a digit...

Page 69: ...roduces the sound design recorded in the DTS Express audio format DTS Express is an optional audio format based on 5 1ch for Blu ray Discs It is possible to record a maximum of 7 1 channels with addit...

Page 70: ...ou hear is the same regardless of where you are within the listening room Game Action This mode is suitable for games with a lot of action Game Rock This mode is suitable for games with rock content G...

Page 71: ...stening Mode PCM Music files except DSD Dolby TrueHD Direct Mono DSur DTS Neural X TV Logic 1 AllCh Stereo 2 Full Mono 2 T D 1 Surround speakers or height speakers need to be installed 2 A center spea...

Page 72: ...cted when the input format is 2 ch 2 A center speaker or surround speakers need to be installed 3 Surround speakers or height speakers need to be installed 4 A center speaker surround speakers or heig...

Page 73: ...A center speaker or surround speakers need to be installed 3 Surround speakers or height speakers need to be installed 4 A center speaker surround speakers or height speakers need to be installed Inpu...

Page 74: ...ch 1 DSur DTS Neural X Orchestra 2 Unplugged 2 Studio Mix 2 AllCh Stereo 3 Full Mono 3 1 A center speaker or surround speakers need to be installed 2 Surround speakers or height speakers need to be in...

Page 75: ...rs or height speakers need to be installed 4 A center speaker surround speakers or height speakers need to be installed Input Format Listening Mode DTS Direct Stereo DTS 1 2 DSur DTS Neural X Orchestr...

Page 76: ...stra 3 Unplugged 3 Studio Mix 3 AllCh Stereo 4 Full Mono 4 1 This can only be selected when no surround back speaker is connected 2 Surround back speakers need to be installed 3 Surround speakers or h...

Page 77: ...led Input Format Listening Mode Dolby Atmos You can select the DD or DTHD listening mode if surround back speakers or height speakers are not connected Direct Dolby Atmos Game RPG Game Action Game Roc...

Page 78: ...rs or height speakers need to be installed 4 A center speaker surround speakers or height speakers need to be installed Input Format Listening Mode DTS Express Direct DTS Express 1 2 DSur DTS Neural X...

Page 79: ...rround back speaker is connected 2 Surround back speakers need to be installed 3 Surround speakers or height speakers need to be installed 4 A center speaker surround speakers or height speakers need...

Page 80: ...input assignment between the input selectors and AUDIO IN jacks p86 2 Speaker 1 Configuration Change the settings of connection environment of the speakers p86 2 Crossover Change the settings of cros...

Page 81: ...TV p93 5 Hardware 1 HDMI Change the settings for the HDMI functions p94 2 Network Change the settings for the Network functions p95 3 Bluetooth Change the settings for the Bluetooth function p97 4 Po...

Page 82: ...etup menu Setup 1 Input Output Assign 2 Speaker 3 Audio Adjust 4 Source 5 Hardware 6 Multi Zone 7 Miscellaneous 1 TV Out OSD 2 HDMI Input 3 Video Input 4 Digital Audio Input 5 Analog Audio Input Selec...

Page 83: ...is pressed the image display non display can be switched This setting cannot be selected if Impose OSD is set to Off Setting Item Default Value Setting Details Screen Saver 3 minutes Set the time to s...

Page 84: ...em Default Value Setting Details BD DVD COMPONENT 1 COMPONENT 1 COMPONENT 2 Assign the COMPONENT VIDEO IN jacks to the BD DVD button VIDEO 1 VIDEO 2 Assign a desired VIDEO IN jack to the BD DVD button...

Page 85: ...BL SAT COAXIAL OPTICAL 1 OPTICAL 2 Assign a desired DIGITAL IN jack to the CBL SAT button GAME COAXIAL OPTICAL 1 OPTICAL 2 Assign a desired DIGITAL IN jack to the GAME button STRM BOX COAXIAL OPTICAL...

Page 86: ...2 Speaker 1 Configuration Change the settings of connection environment of the speakers Setting Item Default Value Setting Details Speaker Channels 7 1 ch Select 2 1 ch 3 1 ch 4 1 ch 5 1 ch 6 1 ch 7 1...

Page 87: ...cy from 40Hz to 200Hz to start outputting frequencies for each channel Full Band Full band will be output If Configuration Subwoofer is set to No Front is fixed to Full Band and the low pitched range...

Page 88: ...subwoofer On Bass output is boosted Off Bass output is not boosted This function is not automatically set even if AccuEQ Room Calibration is performed 3 Distance Set the distance from each speaker to...

Page 89: ...dB Select a value between 12 dB and 12 dB in 1 dB increments A test tone will be output each time you change the value Select the desired level Surr Back Right 0 dB Select a value between 12 dB and 12...

Page 90: ...he speaker frequency between 25 Hz and 16 kHz with the cursors adjust the volume of that frequency between 6 0 dB and 6 0 dB with The setting cannot be changed if Configuration Zone Speaker is set to...

Page 91: ...certain level Note that when this setting is Off the Late Night function that allows you to enjoy surround at low volumes is fixed to off when playing Dolby Digital Plus Dolby TrueHD On When this func...

Page 92: ...ult Value Setting Details IntelliVolume 0 dB Select a value between 12 dB and 12 dB Set a negative value if the volume of the target device is larger than the others and a positive value if smaller To...

Page 93: ...AXIAL jack in the 1 Input Output Assign Digital Audio Input setting OPTICAL When giving priority to the input signal from DIGITAL IN OPTICAL jacks This item can be selected only when the input to be s...

Page 94: ...e not sure whether it is compatible set it to Off Setting Item Default Value Setting Details HDMI Standby Through Off When this is set to anything other than Off you can play the video and audio of an...

Page 95: ...correction function Off When not using the automatic correction function 2 Network Change the settings of the Network function When LAN is configured with a DHCP set DHCP to Enable to configure the se...

Page 96: ...n to input up to 31 characters A a Switches between upper and lower cases Pressing MODE on the remote controller also toggles between upper and lower cases Moves the cursor in the arrow direction Remo...

Page 97: ...ault Value Setting Details Pairing Information You can initialize the pairing information stored on this unit Pressing ENTER when Clear is displayed initializes the pairing information stored on this...

Page 98: ...the increase in power consumption is minimized by automatically entering the HYBRID STANDBY mode where only the essential circuits are operating Setting Item Default Value Setting Details Network Stan...

Page 99: ...Zone 2 Select when limiting the play zone to a particular room For example when playing only in the separate room select Zone 2 This function may not work if playback is already proceeding with the s...

Page 100: ...te via USB Press ENTER to select when updating the firmware via USB This setting cannot be selected if a USB storage device is not connected or there is no updatable firmware in the USB storage device...

Page 101: ...onfirm your selection Use the cursors to change the settings To return to the previous screen press To exit the settings press Q Tone Bass Enhances or moderates the low tone range of the front speaker...

Page 102: ...timizer Improve the quality of the compressed audio Playback sound of lossy compressed files such as MP3 will be improved The setting can be set for each input This works in signals whose sampling fre...

Page 103: ...browser 5 After changing the settings select Save to save the settings Device Information You can change the Friendly Name set an AirPlay Password etc Control4 Register this unit if you are using a Co...

Page 104: ...t Existing settings are guaranteed in either updating method When this unit is connected to the network notifications of firmware updates may be displayed To update the firmware select Update Now with...

Page 105: ...nd cannot be selected wait for a while until it starts up If there is no updatable firmware Update via NET cannot be selected 3 Press ENTER with Update selected and start update During the update the...

Page 106: ...Front Panel Rear Panel Remote Contents Connections Playback Setup Others After removing the power plug once insert it to the outlet and then start the operation from the beginning Updating via USB p1...

Page 107: ...irmware files are named as below ONKAVR _ zip Unzip the file on your PC The number of unzipped files and folders varies depending on the model 3 Copy all unzipped files and folders to the root folder...

Page 108: ...play of the unit represents an alphanumeric character Refer to the following descriptions and check Error Code 01 10 The USB storage device cannot be recognized Check if the USB storage device or USB...

Page 109: ...ired for startup using simple operations following on screen guidance 1 Switch the input of the TV to the input connected to the unit 2 Put batteries into the remote controller of this unit 3 Press on...

Page 110: ...ume during measurement so be careful of your surroundings Also keep the room as quiet as possible during measurement If you connect a subwoofer check the power and volume of the subwoofer Set the subw...

Page 111: ...word If the SSID of the access point is not displayed select Other with the cursor on the SSID list screen press ENTER and then follow the on screen instructions Keyboard Input To switch between upper...

Page 112: ...nal processing and control functions In very rare situations severe interference noise from an external source or static electricity may cause it to lockup In the unlikely event that this happens unpl...

Page 113: ...fault If the restart of the unit does not solve the problem reset the unit and restore all the settings to the factory default at the time of purchase This may solve the problem If the unit is reset y...

Page 114: ...he unit In such a case the power turns off repeatedly even if the power is turned on each time Secure sufficient ventilation space around the unit wait for a while until the temperature of the unit de...

Page 115: ...Bi Amping connection p20 The subwoofer produces no sound If the setting of the front speakers is Full Band the low range elements will be output from the front speakers instead of from the subwoofer...

Page 116: ...ct surround back speakers or height speakers to enjoy Dolby Atmos Also Dolby Atmos can be enjoyed only when the input signals are in Dolby Atmos formats If the audio in Dolby TrueHD Dolby Atmos or DTS...

Page 117: ...unction refer to Setup Menu 5 Hardware 1 HDMI Check if Resolution Error is displayed on the main unit display when video input via HDMI IN jack is not displayed In this case the TV does not support th...

Page 118: ...wave in the 2 4 GHz range A metallic object near the unit can affect on the radio wave and BLUETOOTH connection may not be possible Check the following if the problem persists after you have confirme...

Page 119: ...n is unavailable for listening check if he registered URL is correct and if the format distributed from the radio station is supported by this unit Depending on ISP setting the proxy server is require...

Page 120: ...rsists after you have confirmed the above Cannot access wireless LAN network The wireless LAN router setting may be switched to Manual Restore the setting to Auto Try the manual set up The connection...

Page 121: ...y an HDMI cable may not be supported Refer to Connecting an AV Component in a Separate Room Multi zone Connection and if input by an HDMI cable is not supported connect a supported cable The audio fro...

Page 122: ...er device from the outlet use different outlets for this unit and the device The message Noise Error appears during AccuEQ Room Calibration This can be caused by a malfunction in your speaker unit Che...

Page 123: ...rs up to 3 units Cable TV tuner terrestrial digital tuner and satellite broadcasting tuner up to 4 units Operation has been confirmed on the following devices As of January 2018 Toshiba brand televisi...

Page 124: ...pported sampling rates 2 8 MHz Your Blu ray Disc DVD player must also support the HDMI output of the above audio formats Supported resolutions HDMI IN1 to IN6 Copyright protection technology HDCP1 4 H...

Page 125: ...200 mV 2 3 k ZONE LINE OUT Phono Maximum Input Signal Voltage 70 mV MM 1 kHz 0 5 Frequency Response 10 Hz 100 kHz 1 dB 3 dB Direct Tone Control Characteristics 10 dB 20 Hz BASS 10 dB 20 kHz TREBLE Si...

Page 126: ...r Supply 120 V AC 60 Hz Power Consumption 460 W 0 15 W Full Standby mode 1 8 W Network Standby wired 2 W Network Standby wireless 1 7 W Bluetooth Wakeup 0 15 W HDMI CEC 2 1 W Standby mode ALL ON 55 W...

Page 127: ...Speaker Outputs FRONT L R CENTER SURROUND L R SURROUND BACK L R or HEIGHT L R ZONE 2 L R Banana plug ready Phones PHONES Front 6 3 mm 1 4 Others Setup Mic 1 Front USB 1 Ver 2 0 5 V 1 A Ethernet 1 Pow...

Page 128: ...H1802 0 SN 29403367_EN C Copyright 2018 Onkyo Pioneer Corporation Japan All rights reserved http www onkyo com privacy...

Reviews: