background image

54

First Time Setup

—Continued

With the supplied speaker setup microphone, the 
Audyssey MultEQ XT function can measure the number 
of speakers connected, their sizes, crossover frequencies, 
and the distance from each speaker to the listening posi-
tion and calculate the optimal speaker settings for your 
listening environment automatically.
Before using this function, connect and position all of 
your speakers.

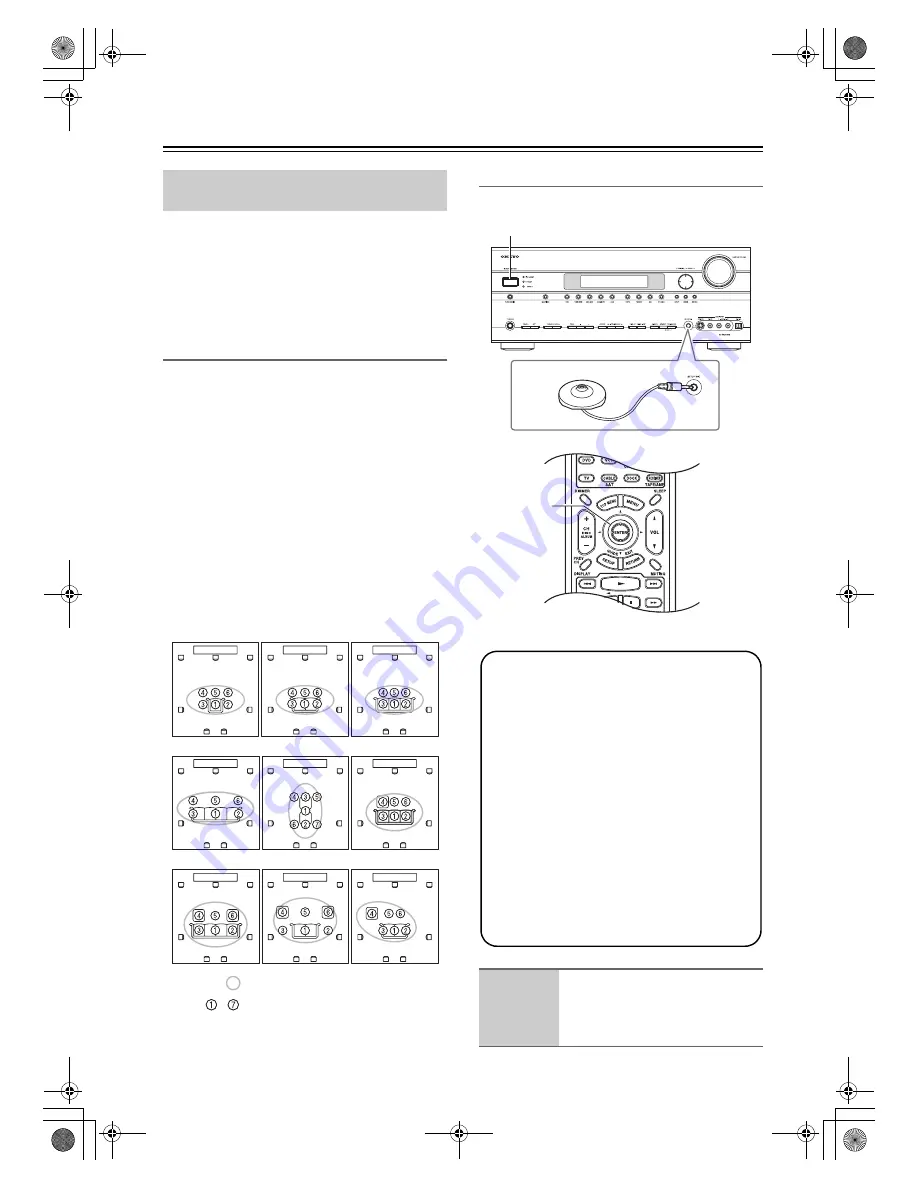
Measurement Positions

To create a listening environment in which several peo-
ple can enjoy your home theater simultaneously, Audys-
sey MultEQ XT takes measurements at up to eight 
positions within the listening area.

1st measurement point

This is the center position of your listening area, or 
the listening position if there’s only one listener.

2nd

8th measurement positions

These are the other listening positions (i.e., the 
places where the other listeners will sit). You can 
measure up to eight positions.

The following examples show some typical home theater 
seating arrangements. Choose the one that best matches 
yours, and position the microphone accordingly when 
prompted.

Using Audyssey MultEQ XT

Automatic Speaker Setup 
(Audyssey MultEQ XT)

TV

TV

TV

TV

TV

TV

TV

TV

TV

: listening area

: listening position

1

Turn on the AV receiver/AV 
amplifier and the connected TV.

On the TV, select the input to which the 
AV receiver/AV amplifier is connected.

1

3-9

2, 11

Notes:

• If any of your speakers is 4 ohms, change the 

Speaker Impedance setting before running the 
automatic speaker setup (see page 46).

• If the AV receiver/AV amplifier is muted, it will 

be unmuted automatically when the automatic 
speaker setup starts.

• Automatic speaker setup cannot be performed 

while a pair of headphones is connected.

• It takes about 15 minutes to complete the auto-

matic speaker setup for three positions. Total 
measurement time varies depending on the num-
ber of positions and speakers.

• Do not disconnect the speaker setup microphone 

during the automatic speaker setup, unless you 
want to cancel the setup.

• Do not connect or disconnect any speakers during 

the automatic speaker setup.

TX-SR705_En.book  Page 54  Monday, May 28, 2007  2:13 PM

Summary of Contents for SR705 - TX AV Receiver

Page 1: ...ctions in this manual will enable you to obtain optimum performance and listening enjoyment from your new AV Receiver AVAmplifier Please retain this manual for future reference Contents Introduction 2...

Page 2: ...rmally by following the operating instructions Adjust only those controls that are covered by the operating instructions as an improper adjustment of other controls may result in damage and will often...

Page 3: ...e This is normal If you do not use this unit for a long time it may not work properly the next time you turn it on so be sure to use it occasionally For U S models FCC Information for User CAUTION The...

Page 4: ...letter L or coloured red IMPORTANT The plug is fitted with an appropriate fuse If the fuse needs to be replaced the replacement fuse must approved by ASTA or BSI to BS1362 and have the same ampere ra...

Page 5: ...t Surround Right Surround Right Surround Back Right Surround Back Right Zone 2 Right Zone 2 Right Front Left Front Left SP B Zone 2 Left SP B Zone 2 Left Front Right Front Right SP B Zone 2 Right SP B...

Page 6: ...re registered trademarks of DTS Inc 96 24 is a trademark of DTS Inc 4 Neural Surround is a trademark owned by Neural Audio Cor poration THX is a trademark of THX Ltd which may be reg istered in some j...

Page 7: ...51 TV Format Setup not North American models 52 AM Frequency Step Setup on some models 53 Automatic Speaker Setup Audyssey MultEQ XT 54 Basic Operations Basic Operations 59 Selecting the Input Source...

Page 8: ...nal is being received from the remote controller 3 READY indicator 96 not North American models Enters Ready mode and lights up when the HDMI Power Control is set to Enable and the AV receiver AV ampl...

Page 9: ...used to select the Stereo listening mode bq LISTENING MODE buttons 66 These buttons are used to select the listening modes br DISPLAY button 60 This button is used to display various information abou...

Page 10: ...62 This indicator lights up when the AV receiver is tuned to a stereo FM station RDS European models only 64 This indi cator lights up when tuned to a radio station that supports RDS Radio Data System...

Page 11: ...American model TX SA705 Rear Panel bt cl cm co cp cq cs cr ck bpbq bo 1 2 3 bk bl bm 9 8 5 6 7 4 br cn bp co cq cr cs cp 1 bk 9 6 7 bm bl 8 bn 5 2 cl cm cn ck bt bo bqbr bp co cq cr cp br 1 bk 9 bm b...

Page 12: ...2 LINE OUT 99 This analog audio output can be connected to a line input on an integrated amplifier in Zone 2 bm ZONE 2 SPEAKERS 99 These terminals are for connecting speakers in Zone 2 bn AC INLET not...

Page 13: ...er cq 12V TRIGGER OUT This output can be connected to the 12 volt trigger input on a component in Zone 2 When Zone 2 is turned on on the AV receiver AV amplifier a 12 volt trigger signal is output cr...

Page 14: ...ceiver AV amplifier is installed close to equipment that uses infrared rays the remote controller may not work reliably Don t put anything such as a book on the remote con troller because the buttons...

Page 15: ...k with an connection you can control it by entering the appropriate remote control code see page 104 TV and VCR Modes With these modes you can control a TV and VCR You must enter the appropriate remot...

Page 16: ...rect tuning mode for radio bo REMOTE MODE buttons 15 Used to select the remote controller modes When you press a button the REMOTE MODE button for the currently selected mode lights up bp SLEEP button...

Page 17: ...tons From left to right Previous Play Next Rewind Pause Stop Fast Forward Slow Reverse and Slow Forward bk REPEAT button Used with the repeat playback functions bl AUDIO button Selects foreign languag...

Page 18: ...tons Used with some components 5 DISC button Selects discs on a CD changer 6 DISPLAY button Displays information about the current disc or track including elapsed time remaining time total time and so...

Page 19: ...s 7 Previous button Restarts the current song Press it twice to select the previous song 8 Pause button Pauses playback With 3rd generation iPods it works as a Play Pause button 9 Rewind button Press...

Page 20: ...from your subwoofer will depend on its position the shape of your listening room and your listening posi tion In general a good bass sound can be obtained by installing the subwoofer in a front corne...

Page 21: ...Description HDMI HDMI connections can carry uncompressed stan dard or high definition digital video and audio and offer the best picture and sound quality Component video cable Component video separa...

Page 22: ...using an external amplifier con nect the PRE OUT SUBWOOFER to an input on the amp Attaching the Speaker Labels The AV receiver AV amplifier s positive speaker ter minals are color coded for ease of id...

Page 23: ...phase and will sound unnatural Unnecessarily long or very thin speaker cables may affect the sound quality and should be avoided If you use 4 or 5 speakers connect each of the two surround speakers to...

Page 24: ...i amping the Front Speakers 1 Connect the AV receiver AV amplifier s FRONT SPEAKERS R positive terminal to the right speaker s positive tweeter high terminal And connect the AV receiver AV amplifier s...

Page 25: ...y for use you ll need to tune into an FM radio station and adjust the position of the FM antenna to achieve the best possible reception 2 Use thumbtacks or something similar to fix the FM antenna into...

Page 26: ...accordance with local regulations to prevent electrical shock haz ards Using a TV FM Antenna Splitter It s best not to use the same antenna for both FM and TV reception as this can cause interference...

Page 27: ...erally determines whether video signals are upconverted for the component video output or the HDMI output For optimal video performance THX recommends that video signals pass through the system withou...

Page 28: ...respective input signals as they are Audio Connection Formats Audio equipment can be connected to the AV receiver AV amplifier by using any of the follow ing audio connection formats analog optical co...

Page 29: ...ENT VIDEO OUT Component video input Best MONITOR OUT S S Video input Better MONITOR OUT V Composite video input Standard GAME TV IN L R Analog audio L R output DIGITAL COAXIAL IN 3 CBL SAT Digital coa...

Page 30: ...g audio L R output DIGITAL COAXIAL IN 1 DVD Digital coaxial output DIGITAL OPTICAL IN 1 GAME TV Digital optical output Step 1 Video Connection Choose a video connection that matches your DVD player or...

Page 31: ...udio cable or several normal audio cables to connect the AV receiver AV amplifier s DVD FRONT L R CENTER SURR L R SURR BACK L R and SUBWOOFER jacks to the 7 1 channel analog audio output on your DVD p...

Page 32: ...type of connection A B C Step 2 Audio Connection Choose an audio connection that matches your VCR or DVD recorder or and then make the connection a b c a b c a b a c Connection AV receiver AV amplifie...

Page 33: ...uts can only be recorded via S Video outputs If your TV VCR is connected to an S Video input the recording VCR must be connected to an S Video output Connecting a VCR or DVD Recorder for Recording Con...

Page 34: ...V Composite video output Standard CBL SAT IN L R Analog audio L R output DIGITAL COAXIAL IN 3 CBL SAT Digital coaxial output DIGITAL OPTICAL IN 1 GAME TV Digital optical output Hint Step 1 Video Conn...

Page 35: ...osite video output Standard GAME TV IN L R Analog audio L R output DIGITAL OPTICAL IN 1 GAME TV Digital optical output Step 1 Video Connection Choose a video connection that matches the game console o...

Page 36: ...AUX INPUT DIGITAL Digital optical output Step 1 Video Connection Choose a video connection that matches the camcorder or and then make the connection A B Step 2 Audio Connection Choose an audio conne...

Page 37: ...Master Audio Your DVD player must also support HDMI output of the above audio formats About Copyright Protection The AV receiver AV amplifier supports HDCP High bandwidth Digital Content Protection 2...

Page 38: ...off or the TV is set to another input source this may result in no sound from the AV receiver AV amplifier or the sound may be cut off To listen to audio received by the HDMI IN jacks through your TV...

Page 39: ...eed a commercially available MC head amp or MC transformer Connect your turntable to the head amp or transformer and connect that to the AV receiver AV amplifier s PHONO IN L R jacks You can also use...

Page 40: ...order TAPE IN L R TAPE OUT L R Analog audio L R output Analog audio L R input DIGITAL COAXIAL IN 3 CBL SAT Digital coaxial output DIGITAL OPTICAL IN 1 GAME TV Digital optical output DIGITAL OPTICAL OU...

Page 41: ...ave a powered sub woofer connect it to this AV receiver AV ampli fier s PRE OUT SUBWOOFER jack 1 Subwoofer 2 Front left speaker 3 Center speaker 4 Front right speaker 5 Surround left speaker 6 Surroun...

Page 42: ...er These com ponents can then be left turned on so that they turn on and off as and when the AV receiver is set to On or Standby Caution Make sure that the total capacity of the components that you co...

Page 43: ...h your other Onkyo components While Zone 2 is on the Auto Power On Standby and Direct Change functions do not work This port is for connecting the AV receiver AV amplifier to home automation equipment...

Page 44: ...r always turn down the volume before you turn it off or Remote controller AV receiver AV amplifier Smooth Operation in a Few Easy Steps To ensure smooth operation here s a few easy steps to help you c...

Page 45: ...Input Output Assign 2 Speaker Setup 3 Audio Adjust 4 Source Setup 5 Listening Mode Preset 6 Miscellaneous 7 Hardware Setup 8 Lock Setup ENTER ENTER Menu 1 Input Output Assign 2 Speaker Setup 3 Audio...

Page 46: ...etup menu appears 3 Use the Up and Down buttons to select 1 Speaker Set tings and then press ENTER The Speaker Settings menu appears If you change these settings you must run the auto matic speaker se...

Page 47: ...osite video S Video Composite video S Video Component video Component video IN OUT Composite video S Video component video Composite video S Video component video HDMI HDMI 1 Press the RECEIVER button...

Page 48: ...o be performed on the AV receiver AV amplifier by using its SETUP button arrow buttons and ENTER button Video Input Setup 1 Press the RECEIVER button fol lowed by the SETUP button The main menu appear...

Page 49: ...button arrow buttons and ENTER button Input selector VIDEO IN jack DVD IN 1 VCR DVR CBL SAT GAME TV AUX 1 Press the RECEIVER button fol lowed by the SETUP button The main menu appears onscreen 2 Use...

Page 50: ...ted for the TAPE input selector or GAME TV input selector but not both at the same time Changing the Input Display 1 Press the TAPE or GAME TV input selector button so that TAPE or GAME TV appears on...

Page 51: ...own buttons to select 1 Input Out put Assign and then press ENTER The Input Output Assign menu appears 3 Use the Up and Down buttons to select 4 Digital Input and then press ENTER The Digital Input me...

Page 52: ...p and Down buttons to select 2 OSD Setup and then press ENTER The OSD Setup menu appears 4 Use the Up and Down buttons to select TV Format and then use the Left and Right buttons to select Auto Select...

Page 53: ...appears onscreen 2 Use the Up and Down buttons to select 7 Hardware Setup and then press ENTER The Hardware Setup menu appears 3 Use the Up and Down buttons to select 3 Tuner and then press ENTER The...

Page 54: ...e theater seating arrangements Choose the one that best matches yours and position the microphone accordingly when prompted Using Audyssey MultEQ XT Automatic Speaker Setup Audyssey MultEQ XT TV TV TV...

Page 55: ...of listening area at ear height Push Enter Next Auto Speaker Setup AUDYSSEY Do not unplug microphone Please keep quiet Now Measuring 4 The speaker detect results appear Yes means that the speaker was...

Page 56: ...rs ENTER ENTER Auto Speaker Setup AUDYSSEY Please select Next when measuring next position and select finish when ending Next finish Calculate Auto Speaker Setup AUDYSSEY Calculating Auto Speaker Setu...

Page 57: ...speakers that cannot be detected are con nected property Retry Return to step 2 and try again Cancel Cancel the automatic speaker setup Writing Error This message appears if saving fails Try saving ag...

Page 58: ...ct Result screen as No increase the subwoofer s volume to the half way point set it to its highest crossover frequency and then try running the automatic speaker setup again Note that if the volume is...

Page 59: ...V you ll need to select the video input that s connected to the AV receiver AV amplifier s COMPONENT VIDEO OUT HDMI OUT or MONITOR OUT On some DVD players you may need to turn on the digital audio out...

Page 60: ...s procedure can also be performed on the AV receiver AV amplifier by using its DISPLAY button The following information can typically be displayed for input sources If the input signal is analog no fo...

Page 61: ...le also depend on the currently selected input source When the multichannel input is used only the front left and right audio can be heard in the headphones To adjust the headphone level press the CH...

Page 62: ...frequency Using the Tuner Use the TUNER input selector button to select either AM or FM In this example FM has been selected Each time you press the TUNER but ton the input source changes between AM a...

Page 63: ...to select a preset from 1 through 40 4 Press the MEMORY button again to store the station or channel The station or channel is stored and the preset number stops flashing Repeat this procedure for al...

Page 64: ...e page 65 TP Traffic Program This allows you to search for RDS radio stations that broadcast traffic information see page 65 Notes In some cases the text characters displayed on the AV receiver may no...

Page 65: ...type of program you want See the table on page 64 RT PTY TP 2 4 5 1 3 4 To start the search press ENTER The AV receiver searches until it finds a station of the type you specified at which point it s...

Page 66: ...ital and DTS listen ing modes and the Neural THX Surround listening mode LISTENING MODE buttons Pressing these buttons repeatedly cycles through all of the listening modes that can be used with the cu...

Page 67: ...Pro Logic II is used Dolby PLII Music Dolby PLIIx Music 2 Dolby PLII Game Dolby PLIIx Game 2 Dolby Digital EX Dolby EX Neo 6 Neo 6 Cinema Neo 6 Music Neural THX 5 1 Neural THX 7 1 THX THX Cinema 3 3...

Page 68: ...y PLII Movie Dolby PLIIx Movie 3 3 If there are no surround back speakers or Powered Zone 2 is being used Dolby Pro Logic II is used Dolby PLII Music Dolby PLIIx Music 3 Dolby PLII Game Dolby PLIIx Ga...

Page 69: ...re no surround back speakers or Powered Zone 2 is being used Dolby Pro Logic II is used Dolby PLII Music Dolby PLIIx Music 3 Dolby PLII Game Dolby PLIIx Game 3 Dolby Digital EX Dolby EX Neo 6 Neo 6 Ci...

Page 70: ...ne 2 is being used Dolby Pro Logic II is used 3 3 Depending on the source e g 96 kHz sources processing may be performed after DTS decoding 3 Dolby PLII Music Dolby PLIIx Music 2 3 3 Dolby PLII Game D...

Page 71: ...ides an enveloping surround sound experience perfect for rotating and fly by sound effects Dolby Digital Plus Developed for use with HDTV including the new video disc formats Blu ray and HD DVD this i...

Page 72: ...DSD stands for Direct Stream Digital and is the format used to store digital audio on Super Audio CDs SACD This mode can be used with SACDs that feature multi channel audio THX Founded by George Lucas...

Page 73: ...ound field with a powerful acous tic image like being at a club or rock concert TV Logic This mode adds realistic acoustics to TV shows pro duced in a TV studio surround effects to the entire sound an...

Page 74: ...on Recording Separate AV Sources Here you can record audio and video from completely separate sources allowing you to overdub audio onto your video recordings This function takes advantage of the fact...

Page 75: ...his function while the AV receiver AV amplifier is muted Speakers that are set to No or None in the Speaker Configuration cannot be adjusted Using the Late Night Function Dolby Digital Dolby Digital P...

Page 76: ...Config 3 Speaker Distance 4 Level Calibration 5 Equalizer Settings 6 THX Audio Setup 3 Audio Adjust 1 Tone Control 2 Multiplex Mono 3 PLIIx Neo 6 4 Dolby EX 5 Theater Dimensional 6 LFE Level 4 Source...

Page 77: ...r speaker s manuals to determine the optimum crossover frequencies Please note that any THX main speakers should be set to Small 80 Hz THX If you set up your speakers using the Automatic Speaker Setup...

Page 78: ...other than Full Band Full Band cannot be selected here 8 Use the Up and Down buttons to select Surr Back and then use the Left and Right buttons to select a crossover frequency If no surround back sp...

Page 79: ...eakers and a subwoofer If you re using THX certified speakers select Off THX Note This procedure can also be performed on the AV receiver AV amplifier by using its SETUP button arrow buttons and ENTER...

Page 80: ...appears 3 Use the Up and Down buttons to select 3 Speaker Dis tance and then press ENTER The Speaker Distance menu appears This setting is set automatically by the Automatic Speaker Setup function see...

Page 81: ...reen 2 Use the Up and Down buttons to select 2 Speaker Setup and then press ENTER The Speaker Setup menu appears This setting is set automatically by the Automatic Speaker Setup function see page 54 2...

Page 82: ...lect 5 Equalizer Settings and then press ENTER The Equalizer Settings menu appears 4 Use the Left and Right buttons to select Off Tone off response flat Audyssey The tone for each speaker is set autom...

Page 83: ...frequencies e g 6300 Hz affect treble sounds 7 Use the Up button to select Channel and then use the Left and Right buttons to select another speaker Repeat step 6 and 7 for each speaker 8 Press the S...

Page 84: ...ween 1 and 4 feet 0 3 1 2 m apart 4 ft 1 2 m Select this if your sur round back speakers are more than 4 feet 1 2 m apart Note This setting is only available if the Surr Back Ch setting in the Speaker...

Page 85: ...no Input Ch This setting specifies the channel to be used for playing any 2 channel digital source such as Dolby Digital or 2 channel analog PCM source in the Mono listening mode L R Both the left and...

Page 86: ...right channel output is attenuated by half 6 dB giving the impression that the sound is located centrally This setting works well when the listening position is considerably off center When set to 5 t...

Page 87: ...n be used with each input signal format can be selected The Last Valid option means that the listening mode selected last will be used Analog PCM With this setting you can specify the listening mode t...

Page 88: ...main menu appears onscreen 2 4 5 1 2 4 1 6 3 2 Use the Up and Down buttons to select 4 Source Setup and then press ENTER The Source Setup menu appears 3 Use the INPUT SELECTOR but tons on the remote...

Page 89: ...the RECEIVER button fol lowed by the SETUP button The main menu appears onscreen 2 Use the Up and Down buttons to select 4 Source Setup and then press ENTER The Source Setup menu appears 3 Use the IN...

Page 90: ...elliVolume 2 A V Sync 3 Name Edit DVD ENTER ENTER 4 3 Name Edit Display Default Name DVD ENT EDIT 5 Use the Up and Down buttons to select Display and use the Left and Right buttons to select Default T...

Page 91: ...US radio presets This procedure can also be performed on the AV receiver AV amplifier by using its SETUP ENTER and arrow buttons 8 When you ve finished use the arrow buttons to display the following s...

Page 92: ...0dB ENTER ENTER Muting Level This setting determines how much the output is muted when the Muting func tion is used see page 61 It can be set to dB fully muted or from 50 dB to 10 dB in 10 dB steps Ma...

Page 93: ...ayed Immediate Display This preference determines whether operation details are displayed onscreen when an AV receiver AV amplifier function is adjusted On Displayed default Off Not displayed Even whe...

Page 94: ...Remote Control menu appears 4 Use the Left and Right buttons to select a value Remote ID With this setting you can change the AV receiver AV amplifier s remote con trol ID You may need to change this...

Page 95: ...an check the amount of delay being applied by the HDMI Lip Sync function on the A V Sync screen see page 89 xvYCC If you set the xvYCC color function to Enable while a source and monitor that both sup...

Page 96: ...V amplifier enters Ready mode when set to Standby not North American models Refer to the connected component s instruction man ual for details TV Control Set to Enable when you want to control the AV...

Page 97: ...p and Down buttons to select 8 Lock Setup and then press ENTER The Lock Setup menu appears With this preference you can protect your settings by locking the setup menus When the setup menus are locked...

Page 98: ...troller s ID be sure to set the same ID on both the remote controller and AV receiver AV amplifier see Changing the AV Receiver AV Amplifier s ID on page 94 The default ID for both is 1 Changing the R...

Page 99: ...erminals on the receiver integrated amp Using Only Speakers in Zone 2 With this connection method you can use 5 1 surround sound in the main room and play a different AV source in Zone 2 The volume fo...

Page 100: ...pears 3 Use the Up and Down buttons to select 2 Zone2 and then press ENTER The Zone2 menu appears 4 Use the Left and Right buttons to select Not Act ZONE 2 SPEAKERS termi nals deactivated Act ZONE 2 S...

Page 101: ...conds Zone 2 turns on the ZONE 2 indicator lights up and the ZONE 2 12V TRIG GER OUT goes high 12 V To select AM or FM press the TUNER input selector button repeat edly TX SR705 only To select the sam...

Page 102: ...ing used listening modes that need surround back speakers i e Dolby Digital EX DTS ES and THX Select2 Cinema are unavailable While Zone 2 is on functions will not work You can t select different radio...

Page 103: ...receiver AV amplifier in the main room via the connecting block The miniplug cable from the connecting block should be connected to the AV receiver AV amplifier s IR IN jack as shown below Using a Mu...

Page 104: ...remote control code in the separate Remote Control Codes list The codes are organized by category e g DVD player TV etc RECEIVER REMOTE MODE STANDBY TV Number buttons Remote indicator 2 While holding...

Page 105: ...nd an analog audio cable RCA See page 43 for details 2 Enter the appropriate remote control code for the DVD or CD REMOTE MODE but ton DVD REMOTE MODE button 5002 Onkyo DVD player with CD REMOTE MODE...

Page 106: ...the cur rent remote controller mode Controlling a VCR 1 ON STANDBY Sets the VCR to Standby or On 2 Number buttons Select channels 3 CLEAR Cancels functions 4 CH Selects channels on the VCR 5 PREV CH...

Page 107: ...d commands will be lost and will have to be learned all over again so don t discard your other remote controllers Learning Commands 1 While holding down the REMOTE MODE button for the mode in which yo...

Page 108: ...roller mode you want to use at the start of the macro press MACRO button 1 2 or 3 The Remote indicator lights up For the CD example above you d press and hold the RECEIVER REMOTE MODE button and then...

Page 109: ...80 dB PHONO IHF A Speaker Impedance 4 or 6 16 Input Sensitivity Output Level and Impedance 1 Vp p 75 Component and S Video Y 0 7 Vp p 75 Component PB CB PR CR 0 28 Vp p 75 S Video C 1 Vp p 75 Composi...

Page 110: ...hones is connected to the PHONES jack no sound is output by the speakers page 61 If there s no sound from a DVD player connected to an HDMI IN check the DVD player s output settings and be sure to sel...

Page 111: ...18 dB 99 Check to see if a maximum volume has been set page 92 After the Automatic Speaker Setup function has been run or the volume level of each individual speaker has been adjusted page 81 the max...

Page 112: ...plifier is connected is selected The immediate display does not appear The immediate display appears on a device connected to the COMPONENT VIDEO OUT when the Com ponent Video Setup page 49 is set to...

Page 113: ...d off when the Pure Audio not North American models listening mode is selected How do I change the language of a multiplex source Use the Multiplex setting on the Audio Adjust menu to select Main or S...

Page 114: ...114 Memo TX SR705_En book Page 114 Monday May 28 2007 2 13 PM...

Page 115: ...115 Memo 7_Appendix_En fm Page 115 Tuesday May 29 2007 4 29 PM...

Page 116: ...142 4401 0 Fax 49 8142 4401 555 http www eu onkyo com ONKYO EUROPE UK Office Suite 1 Gregories Court Gregories Road Beaconsfield Buckinghamshire HP9 1HQ UNITED KINGDOM Tel 44 0 1494 681515 Fax 44 0 14...

Reviews: