background image

4

Features

Outstanding sonic performance

Front-panel digital optical input

Front-panel analog stereo/mono switch

3 digital inputs(2 optical,1 coaxial);1 digital optical output

24-bit D/A converter

Built-in sampling rate converter

Convenient jog dial for track selection & character input

Brushed aluminium front panel

z

 compatible full-function remote control

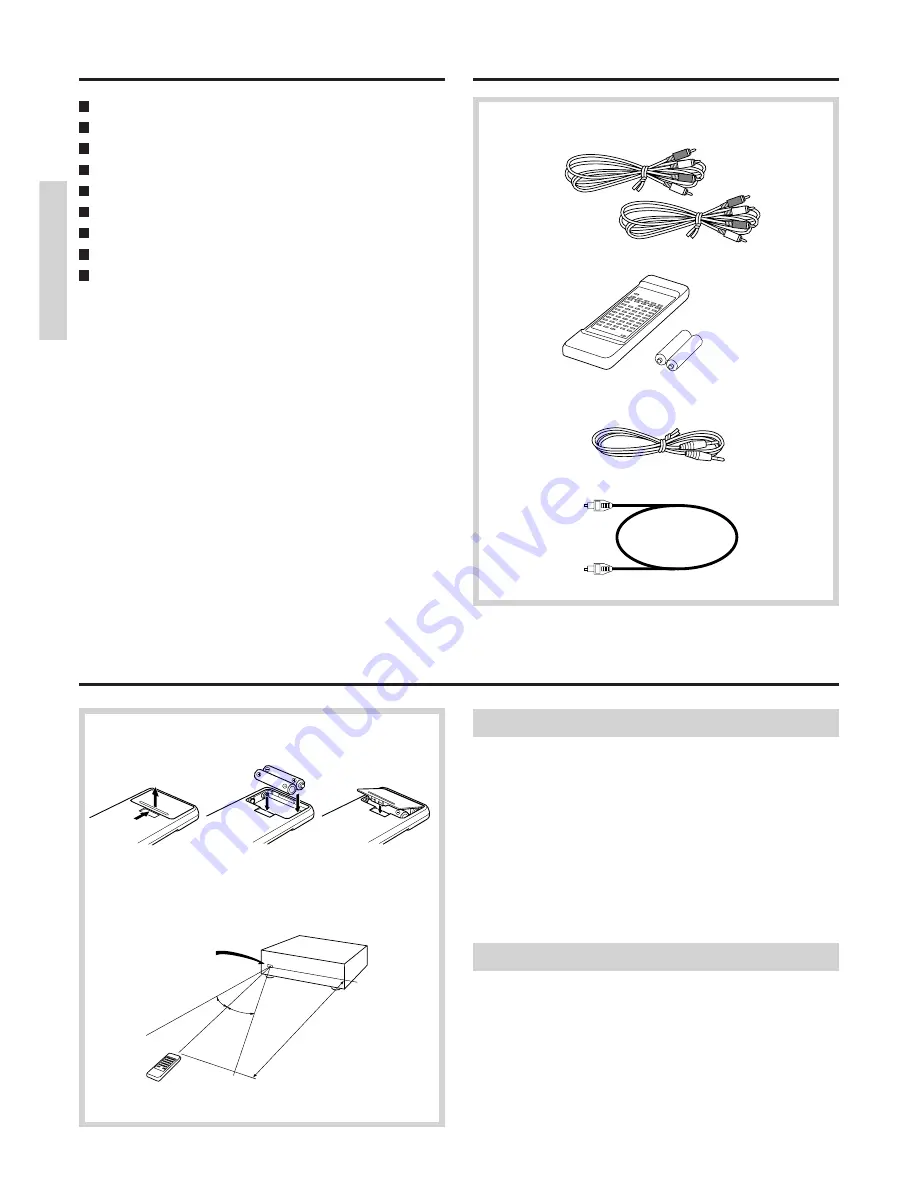
Supplied accessories

The number of accessories is indicated in brackets.
Check that the following accessories are supplied with this unit.

Before operating this unit

Inserting the remote controller batteries

Remove the battery compartment cover by opening it as shown in the
illustration. Load two R6 (UM-3) AA size batteries into the remote
controller with the plus (+) and minus (–) terminals positioned as indicated
by the diagram inside the battery compartment and close the cover.

• Remove dead batteries immediately to avoid corrosion damage.
• To avoid potential corrosion damage, never mix old batteries with

new ones.

• The manganese batteries supplied with this unit have a service life

of approximately six months, depending on frequency of usage.

• This unit comes equipped with R6 (UM-3) AA manganese

batteries, but we recommend that long-life alkaline batteries LR6

(AM-3) AA be used when replacing the batteries.

Using the remote controller

Direct the remote controller toward the remote sensor of the MD-2521.
Note that remote controller is not possible when there is an obstacle
between the remote controller and the sensor.
Note:

• Make sure that the unit's remote sensor is not exposed to strong

light such as direct sunlight and inverter fluorescent light.

• Using the remote controller near infrared-ray emitting equipment or

with other remote controllers may cause interference.

• Do not put a book or any other object on the remote controller.

Doing so may depress the buttons, consuming the batteries.

1

2

3

Remote control sensor

approx. 5m (16 feet)

MD-2521

30

°

30

°

Audio connection cable (2)

z

 cable (1)

Optical cable (1)

Remote controller (RC-339MD) (1)
Dry batteries UM-3 (2)

Summary of Contents for MD-2521

Page 1: ...tions and names 31 Specifications 32 Thank you for your purchase of the Onkyo MD 2521 MD Recorder Please read this manual thoroughly before making connections and plugging in the AC power cord Following the instructions in this manual will enable you to obtain optimum performance and maximum listening enjoyment from your new MD 2521 Please retain this manual for future reference PUSH ENTER qAMCSw ...

Page 2: ...r ventilation For example the appliance should not be situated on a bed sofa rug or similar surface that may block the ventilation openings or if placed in a built in installation such as a bookcase or cabinet that may impede the flow of air through the ventilation openings there should be free space of at least 5 cm 2 in and an opening behind the appliance 9 Heat The appliance should be situated ...

Page 3: ... remove the disc and leave the power ON for about one hour to remove the condensation When transporting this unit be careful not to bump it FOR EUROPEAN MODEL Precautions FOR CANADIAN MODEL POUR LE MODELE CANADIEN For models having a power cord with a polarized plug CAUTION TO PREVENT ELECTRIC SHOCK MATCH WIDE BLADE OF PLUG TO WIDE SLOT FULLY INSERT THIS DIGITAL APPARATUS DOES NOT EXCEED THE CLASS...

Page 4: ... potential corrosion damage never mix old batteries with new ones The manganese batteries supplied with this unit have a service life of approximately six months depending on frequency of usage This unit comes equipped with R6 UM 3 AA manganese batteries but we recommend that long life alkaline batteries LR6 AM 3 AA be used when replacing the batteries Using the remote controller Direct the remote...

Page 5: ...e Use the DIGITAL INPUT 1 terminal if you connect an Onkyo z compatible CD player for example DX 7511 and DX 7211 3 Connection to digital output terminal DIGITAL OUTPUT If your amplifier or receiver has a digital OPTICAL input terminal DIGITAL INPUT using this terminal provides clearer and more dynamic sound output Analog amplifier Digital equipment such as CD and DAT To AC outlet See Power connec...

Page 6: ... 9 10 11 12 13 Power connection Connecting the AC power cord and switching power on Insert the AC power cord into a wall outlet The STANDBY indicator will light Note To insert the AC power cord into an AC outlet on the rear panel of another components use the UNSWITCHED outlet Remote controller PUSH ENTER qAMCSw f r EJECT DISPLAY EDIT NO YES g PAUSE e STOP s PLAY d PHONES LEVEL PHONES REC LEVEL MA...

Page 7: ...procedures as soon as possible after power is restored Cartridge Shutte a Rear side b Record protect tab c Record protect hole d Front side The MD is housed in a cartridge so you can handle it without worrying about dust and fingerprints Even so a dirty or warped cartridge may cause malfunction Always remember the following precautions so you can enjoy high quality sound for a long time Do not tou...

Page 8: ... button or the s button on the remote controller The first track of the disc starts playing Note If the record protect tab is open while playing a recordable MD the display may show Protected You can ignore this message because it does not affect the playing of tracks Stopping play Press the e STOP button or the e button on the remote controller Stopping play temporarily Press the g PAUSE button o...

Page 9: ...g sequence Total number of tracks on the MD and its total playing time Time remaining for recording on the MD Disc name if it is a prerecorded MD software disc Disc name No Name when not set If the track name is too long to display You can scroll the track name by pressing the SCROLL button on the remote controller Press the SCROLL button when the track name is scrolling to stop the scrolling of t...

Page 10: ... During play you can change the track that is playing by turning the AMCS knob or by pressing the q and w buttons on the remote controller If the MD recorder is stopped turn the AMCS knob to select the track number you wish to play and press that knob With the remote controller use the q or w button to select the track then press the s button To play the next track or a later track Turn the AMCS k...

Page 11: ...that track Searching for a part to play Search play Searching for a part to play by sound at play During play hold down the d or f button and release it when the part you want to hear is playing Searching for a part to play by using displayed time at pause high speed search When playing is temporarily stopped paused keep pressing the d or f button and release it when the playing time of the part y...

Page 12: ...EAT button once or twice until the REPEAT indicator disappears To repeat a desired section of a track Remote controller only 1 While the track is playing specify the beginning of the section you wish to repeat playing by pressing the A B button on the remote controller Point A 2 While the track is still playing specify the end of the section by pressing the A B button on the remote controller Poin...

Page 13: ...n be entered by pressing the 10 button Ex To select the 30th track 25 3 10 To select the 100th track 25 25 1 10 10 3 Press the s PLAY button or the s button on the remote controller to start memory play When the playing of all programmed tracks is over the MD recorder stops while retaining the programmed tracks in memory Exiting the Memory play mode When the MD recorder is stopped press the MEMORY...

Page 14: ...wish to start recording The selected track number will flash The recording will be performed while erasing that track and if any the subsequent tracks as the recording time requires To record by erasing all of the existing tracks on a prerecorded MD Start recording with Track 1 selected using the AMCS knob or after erasing the whole contents of the MD see To erase all tracks of an MD on page 21 5 ...

Page 15: ... Press the g PAUSE button To resume recording press the s PLAY button again To stop recording and check the contents of recording Press the e STOP button When recording has been stopped the first of the newly recorded track numbers is shown in flashing display allowing you to playback the newly recorded contents from the beginning by pressing the s PLAY button To playback from the beginning of the...

Page 16: ...with DIGITAL OPTICAL output terminal for example DX 7511 4 Select the position track number of the MD where you wish to start recording If a new MD is used for recording or if you wish to record over the existing track s of an MD ignore this step and proceed to step 5 To record while erasing existing tracks on a prerecorded MD Turn the AMCS knob to select the track number from which you wish to st...

Page 17: ...nd then start playing the recording source immediately The MD recorder stops automatically when recording of the disc is completed up to the final track To stop recording temporarily Press the g PAUSE button To resume recording press the s PLAY button again To stop recording and check the contents of recording Press the e STOP button When recording has been stopped the first of the newly recorded ...

Page 18: ... player for example DX 7511 and DX 7211 you can start recording by simply pressing the PLAY button on the CD player 1 Set the MD recorder to the recording standby mode For how to set the MD recorder to the recording standby mode and the necessary preparatory steps see Recording to an MD on page 14 17 You can perform CD synchro recording only when the MD 2521 s DIGITAL IN 1 terminal is connected to...

Page 19: ... unit receivessignals from the recording source while Signal Wait is displayed 2 3 1 4 5 6 7 8 9 10 11 12 13 14 15 16 17 L R 40 30 20 10 4 2 0 DIGITAL SYNC IN 1 LEVEL INPUT DIGITAL 1 DIGITAL 2 DIGITAL 3 COAXIAL STEREO MONO ANALOG EDIT NO YES Recording to an MD 3 PUSH ENTER qAMCSw f r EJECT DISPLAY EDIT NO YES g PAUSE e STOP s PLAY d PHONES LEVEL PHONES REC LEVEL MAX MIN MINIDISC RECORDER MD 2521 o...

Page 20: ...ame with it 3 Plug in the AC power cord of the MD 2521 to the audio timer If the MD becomes full during recording the recording will stop immediately with the MD recorder entered in the STANDBY mode After using the audio timer for recording be sure to energize the MD recorder by plugging in its AC power cord to a wall outlet or the UNSWITCHED outlet of another system component within 2 weeks If th...

Page 21: ...vious track number For example if you erase track 2 track 3 will now be renumbered as track 2 track 4 will now be renumbered as track 3 and so on Note When Protected is shown on the display it indicates that the MD s record protect hole is open Before editing the MD close the record protect hole If the indicator is lit or flashing do not rock the unit or unplug the power cord To erase all tracks o...

Page 22: ...is completed Complete appears in the display When a track is divided the tracks following that divided track are moved backward each given a new number which is larger by one track than the previous track number For example if you divide track 2 into two parts the latter part will now be renumbered as track 3 the track 3 will now be renumbered as track 4 the track 4 will now be renumbered as track...

Page 23: ...S button to combine the tracks you have selected When the combining is completed Complete appears in the display When tracks are combined the tracks following those tracks are advanced each given a new number which is smaller by one track than the previous track number For example if you combine track 3 with track 2 track 4 will now be renumbered as track 3 track 5 will now be renumbered as track ...

Page 24: ...track 2 track 2 will now be renumbered as track 3 and so on If a track is moved during play the moved track will be played Note When Protected is shown on the display it indicates that the MD s record protect hole is open Before editing the MD close the record protect hole If the indicator is lit or flashing do not rock the unit or unplug the power cord Editing the contents of an MD TRACK 2 3 1 4 ...

Page 25: ...ursor appears Or with the remote controller press the NAME button When you name a track the TRACK indicator will turn on 3 Select the character input mode using the DISPLAY button You can enter upper case letters lower case letters numbers and symbols Each press of the DISPLAY button changes the type of characters you can enter as follows Upper case letter A B C Lower case letters a b c Numbers an...

Page 26: ...time If is lit or flashing in the display which indicates that the information is being stored do not disconnect the power cord turn off the main power or apply strong vibrations to the MD recorder Erasing the disc name and all track names at one time 1 Press the EDIT NO button to display Name Erase When the MD recorder is stopped press the EDIT NO button several times until Name Erase appears in ...

Page 27: ...o disc in the unit No Track The inserted disc has a disc title but no tracks Over In pause mode when playing is paused the f Fast Forward button was pressed to the end of the disc Protected The inserted disc is record protected Retry The first recording attempt failed due to a disturbance or scratch on the MD and a second recording is being made Retry Error The recording attempt failed due to a co...

Page 28: ...p from which you purchased the unit or your nearest ONKYO service station informing them of your name address phone number type of unit and the details of the problem The unit does not record Cause The disc is record protected Protected appears Remedy Close the record protect tab See page 7 Cause The unit is not connected properly to the sound source Remedy Make connections properly to the sound s...

Page 29: ...vals incrementing the track count and causing the Disc Full indication to light up The remaining recording time does not increase even after erasing numerous short tracks Tracks of under 12 seconds in length are not counted and so erasing them may not lead to an increase in the recording time Some tracks cannot be combined with others Track combination may become impossible when tracks are edited ...

Page 30: ...ut terminal Line analog output terminal Audio connecting cable Line analog input terminal Digital output terminal Digital input terminal MD recorder MD MD recorded via analog to digital connection MD recorder Optical cable or coaxial digital connecting cable MD recorder MD recorder Optical cable or coaxial digital connecting cable MD First generation MD recorded via digital to digital connection M...

Page 31: ...ndicator f MEMORY indicator g RANDOM indicator h A B repeat indicator i Input setting indicator j LEVEL SYNC indicator k A SPACE indicator l Peak level meter m TOC indicator n Track number display o REC indicator p Play indicator q Pause indicator If there is a protective film on the surface of the display which is making it difficult to read the display remove it For more information about a butt...

Page 32: ...er consumption 14 watts Dimensions W H D 435 121 310 mm 17 1 8 4 3 4 12 3 16 Weight 4 5 kg 9 9 lbs Specifications and features are subject to change without notice Printed in Japan D9806 1 Sales Product Planning Div 2 1 Nisshin cho Neyagawa shi OSAKA 572 8540 JAPAN Tel 0720 31 8111 Fax 0720 33 5222 ONKYO U S A CORPORATION 200 Williams Drive Ramsey N J 07446 U S A Tel 201 825 7950 Fax 201 825 8150 ...

Reviews: