


16
TRACK
2
3
1
4
5
6
7
8
9
10
11 12 13 14 15 16 17
L
R
-40
-30
-20
-10
-4
-2
0
-SYNC
LEVEL
DIGITAL IN 1
Flashing
2
3
1
4
5
6
7
8
9
10
11 12 13 14 15 16 17
L
R
-40
-30
-20
-10
-4
-2
0
DIGITAL
-SYNC
IN 1
LEVEL
Lights
2
3
1
4
5
6
7
8
9
10
11 12 13 14 15 16 17
L
R
-40
-30
-20
-10
-4
-2
0
-SYNC
LEVEL
DIGITAL IN 1
Total recorded time
Number of tracks on MD
1
2
3
4
5
STANDBY
STANDBY / ON
•
This MD recorder contains a digital input signal sampling rate
converter.
This converter can handle the following sampling frequencies:
44.1 kHz (CD player, etc.)
32 kHz (DAT, satellite broadcasting, etc.)
48 kHz (DAT, satellite broadcasting, etc.)
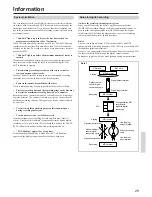
Recording to an MD
Recording from a digital source
1. Press the STANDBY/ON button.
The STANDBY indicator will go out.
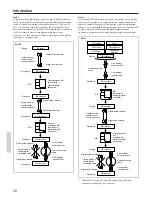
2. Load a recordable MD.
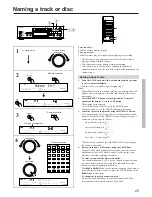
To check the time remaining for recording...
When the MD recorder is stopped, press the DISPLAY button.
Each press of the DISPLAY button changes the display as follows:
The number of tracks on MD and the total recorded time
→
Remaining recording time on MD
→
Disc name ("No Name" when
not set)
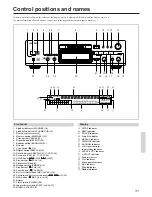
3. Select the "DIGITAL-1", "DIGITAL-2" or "DIGITAL-3
(COAXIAL)" mode using the INPUT selector switch.
The digital input source is now selected.
DIGITAL-1: Select if you have connected the recording source
equipment to DIGITAL IN 1.
DIGITAL-2: Select if you have connected the recording source
equipment to DIGITAL IN 2.
The DIGITAL INPUT 2 terminal is provided on both the front and
rear panel. The one on the front panel takes precedence if input is
simultaneously made to both terminals.
DIGITAL-3: Select if you have connected the recording source
equipment to DIGITAL IN 3.
Note:
If you attempt to perform digital recording using a digital input
terminal which is not connected, “D.In Unlock” will appear.
Use the DIGITAL IN 1 terminal if you connect the unit to an
Onkyo CD player with DIGITAL OPTICAL output terminal (for
example, DX-7511).
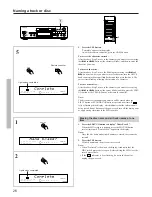
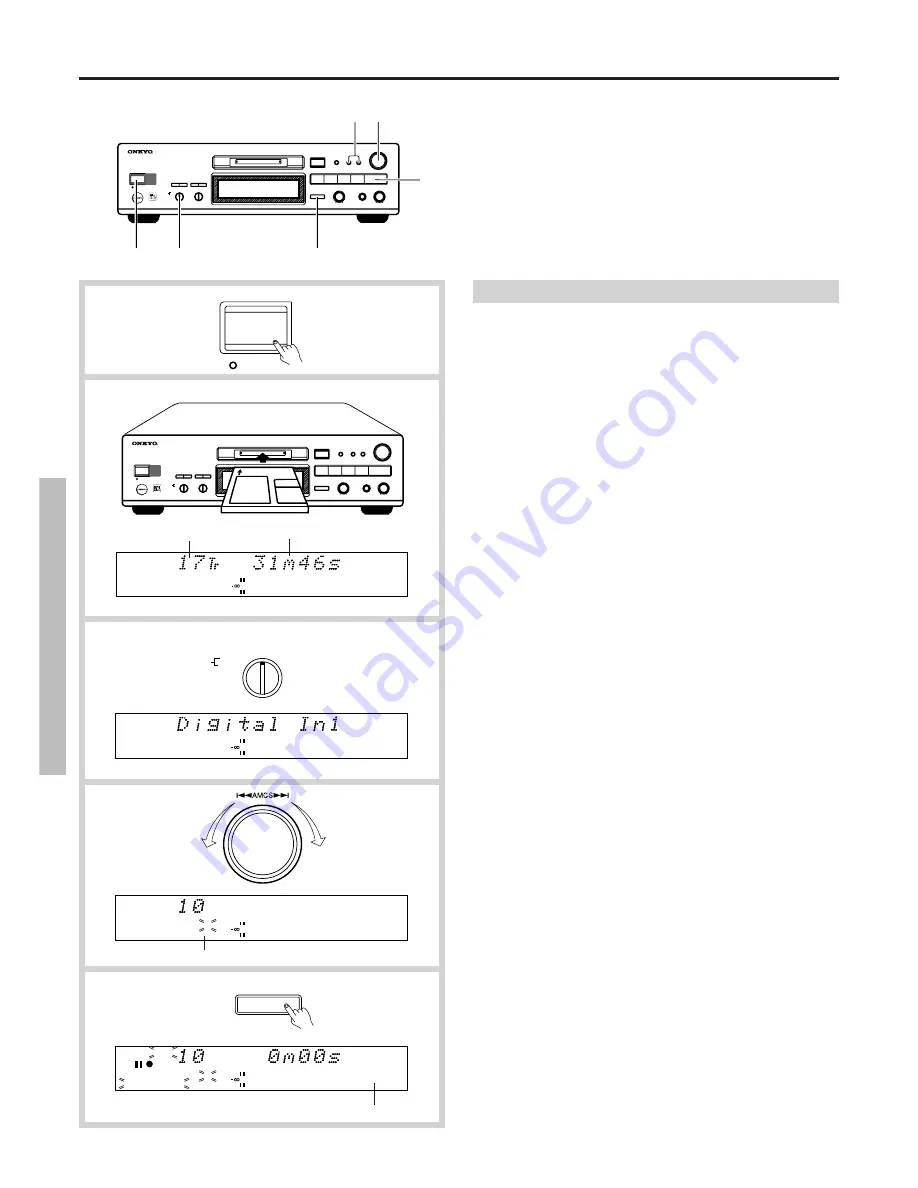
4. Select the position (track number) of the MD where you wish to
start recording.
• If a new MD is used for recording, or if you wish to record over the
existing track(s) of an MD, ignore this step and proceed to step 5.
• To record while erasing existing tracks on a prerecorded MD...
Turn the AMCS knob to select the track number from which you
wish to start recording. (The selected track number will flash.) The
recording will be performed while erasing that track and, if any, the
subsequent tracks, as the recording time requires.
• To record by erasing all of the existing tracks on a prerecorded
MD...
Start recording with Track 1 selected using the AMCS knob or after
erasing the whole contents of the MD (see "To erase all tracks of an
MD" on page 21).
5. Press the
o
o
o
o
o
REC button.
The MD recorder is now in the recording standby mode.
The sampling frequency (32 kHz, 44.1 kHz, or 48 kHz) of the
digital input source is indicated in the display.
Note:
If the display shows "D.In Unlock", the digital input source has not
been connected correctly. Check the connection of the digital input
source.
INPUT
DIGITAL-1
DIGITAL-2
DIGITAL-3
(COAXIAL)
STEREO
MONO
ANALOG
(PUSH ENTER)
q
AMCS
w
f
r
EJECT
DISPLAY
EDIT / NO
YES
g
PAUSE
e
STOP
s
PLAY
d
PHONES LEVEL
PHONES
REC LEVEL
MAX
MIN
MINIDISC RECORDER
MD-2521
o
REC
STANDBY
DIGITAL INPUT-2
STANDBY / ON
MEMORY CLEAR
REPEAT RANDOM
INPUT
TIMER
STEREO
MONO
ANALOG
DIGITAL-1
DIGITAL-2
DIGITAL-3
(COAXIAL)
OFF
REC
PLAY
MAX
MIN
DISC LOADING MECHANISM
3 DIGITAL INPUTS
z
c
b
n
m
v
(PUSH ENTER)
q
AMCS
w
f
r
EJECT
DISPLAY
EDIT / NO
YES
g
PAUSE
e
STOP
s
PLAY
d
PHONES LEVEL
PHONES
REC LEVEL
MAX
MIN
MINIDISC RECORDER
MD-2521
o
REC
STANDBY
DIGITAL INPUT-2
STANDBY / ON
MEMORY CLEAR
REPEAT RANDOM
INPUT
TIMER
STEREO
MONO
ANALOG
DIGITAL-1
DIGITAL-2
DIGITAL-3
(COAXIAL)
OFF
REC
PLAY
MAX
MIN
DISC LOADING MECHANISM
3 DIGITAL INPUTS
o
REC
TRACK
2
3
1
4
5
6
7
8
9
10
11 12 13 14 15 16 17
L
R
-40
-30
-20
-10
-4
-2
0
DIGITAL
-SYNC
IN 1
44.1kHz
LEVEL


