background image

18

Playing CDs

—Continued

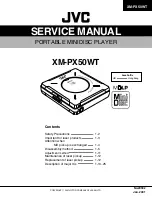
For MP3 CDs, tracks (MP3 files) may be organized in a 
hierarchically, with groups (folders) containing tracks 
and subgroups, as shown below.

• In this manual, MP3 files are referred to as 

tracks

.

• Likewise, folders (directories) are referred to as 

groups

.

If you don’t select a specific MP3 track or group for 
playback, all of the MP3 tracks on the CD will be played 
in numerical order starting with track #1 in parentheses.

For the DX-7355, there are two modes for selecting 
tracks (MP3 files): 

Navigation mode

 and 

All Group 

mode

.

In Navigation mode, you can select tracks (MP3 files) by 
navigating through the group (folder) hierarchy, moving 
in and out of groups (folders) and subgroups (subfold-
ers).

In All Group mode, all groups (folders) appear at the 
same level, making it easy to select groups (folders) 
regardless of the hierarchy.

While playback is stopped, press the [ ] button to enter 
the Navigation mode or the [ ] button to enter the All 
Group mode.

When operating directly the DX-7355, press the Stop 
[ ] button to enter the Navigation mode or hold down 
the Stop [ ] button for about 2 seconds to enter the All 
Group mode.
The combination between the way to press the button 
and the corresponding playback mode can be 
exchanged. When operating on DX-7355, the track 
selection in the Navigation and All Group modes can be 
disabled. (See “STOP KEY” of “Setting MP3 Prefer-
ences” on page 25.)

Selecting Tracks in Navigation Mode

In Navigation mode, you can select tracks by navigating 
through the group hierarchy. This mode can only be used 
while playback is stopped.

If any of random playback, memory playback, or 
1-group playback mode is currently selected, press the 
[PLAY MODE] button to cancel the mode before pro-
ceeding.

Selecting Tracks (MP3 Files)

Track #1
(Track #11)

Track #1
(Track #1)

Track #10
(Track #10)

Group #3

Track #2
(Track #12)

Root

Group #1

Group #2

Track #3
(Track #13)

Group #4

Track #1
(Track #14)

Track #5
(Track #18)

1

While playback is stopped, press 
the [ ] button.

The DX-7355 enters Navigation mode 
and “ROOT” appears on the display.

2

Press the [ ] button.

The first group name in ROOT appears 
on the display.

If the disc contains no groups, the first 
track name is displayed.

3

Use the [ ]/[ ] buttons to select 
other groups and tracks at the 
same level.

• Groups that don’t contain tracks or 

subgroups can’t be selected.

• Repeat steps 2 and 3 to select the 

tracks and subgroups in that group.

• To move up a level, press the [ ] 

button.

• To cancel the procedure at any point, 

press the Stop [ ] button.

4

To start playback, press the Play 
[

] button.

Playback will start with the specified 
track or group and continue until all of 
the tracks on the disc have been played.

, , ,

ENTER

MP3

GROUP

MP3

GROUP

Summary of Contents for DX-7355

Page 1: ...anual thoroughly before making connections and plugging in the unit Following the instructions in this manual will enable you to obtain optimum performance and listening enjoyment from your new Compac...

Page 2: ...aratus does not operate normally by following the operating instructions Adjust only those controls that are covered by the operating instructions as an improper adjustment of other controls may resul...

Page 3: ...en you ve finished using this unit remove all discs and turn off the power 7 Installing this Unit Install this unit in a well ventilated location Ensure that there s adequate ventilation all around th...

Page 4: ...in accordance with the following code Blue Neutral Brown Live As the colours of the wires in the mains lead of this apparatus may not correspond with the coloured mark ings identifying the terminals i...

Page 5: ...Rigidity Anti Resonant Chassis Aluminium Front Panel RI Compatible Remote Control VLSC and the VLSC logo are registered trademarks of Onkyo Corporation Supplied Accessories Make sure you have the fol...

Page 6: ...onnections 14 Connections Before Using the DX 7355 15 Setting the Voltage Selector Worldwide models only 15 Turning On the DX 7355 15 Playing CDs 16 Using the Remote Controller 17 Displaying CD Inform...

Page 7: ...ay buttons 16 Press to select the previous or next track Hold down the buttons to fast reverse or fast for ward during playback For MP3 CDs these buttons are also used for navi gation PHONES jack This...

Page 8: ...of the disc MEMORY indicator Illuminates when the playback mode is set to mem ory playback Repeat indicator Illuminates when the repeat playback is set 1 Message area Various information is displayed...

Page 9: ...PEN CLOSE button 17 Press to open and close the disc tray SEARCH button 20 For MP3 CDs the button is used to search and select a track file number or a group folder num ber ENTER button Press to set a...

Page 10: ...er of the same type is used in the same room or the DX 7355 is installed close to equipment that uses infrared rays the remote control ler may not work reliably Don t put anything such as a book on th...

Page 11: ...128 kbps recommended Incompatible files cannot be played Constant bit rate MP3 files are recommended how ever variable bit rate VBR MP3 files between 8 kbps and 320 kbps are supported Playing times ma...

Page 12: ...amplifier Disc Content Organization CD CDs contain tracks MP3 MP3 CDs contain MP3 Tracks organized into Groups Handling Discs Never touch the underside of a disc Always hold discs by the edge as shown...

Page 13: ...nd speaker cables Optical Digital Jack The DX 7355 s optical digital jack has a shutter type cover that opens when an optical plug is inserted and closes when it s removed Push the plug in all the way...

Page 14: ...lied cable See the manuals supplied with your other compati ble AV components for more information Notes Use only cables for connections To use you must make an analog RCA phono connection between you...

Page 15: ...ng in the unit Determine the proper voltage for your area 220 240 V or 120 V If the preset voltage is not correct for your area insert a screwdriver into the groove in the switch Slide the switch all...

Page 16: ...orks within the MP3 track that s currently playing To Pause Playback Press the Pause button The Pause indicator appears To resume playback press the Play or Pause button again To Stop Playback Press t...

Page 17: ...s Press the Previous button to locate the beginning of the currently playing or paused track Press it repeatedly to select earlier tracks Press the Next button repeat edly to select subsequent tracks...

Page 18: ...anged When operating on DX 7355 the track selection in the Navigation and All Group modes can be disabled See STOP KEY of Setting MP3 Prefer ences on page 25 Selecting Tracks in Navigation Mode In Nav...

Page 19: ...level press the Stop button 5 Press the Play button to start playback 1 While playback is stopped press the button The DX 7355 enters All Group mode and 1 appears on the display 2 Use the buttons to...

Page 20: ...up name contains any characters that cannot be displayed an underscore will be displayed in place of those characters Alternatively you can set the DX 7355 so that names containing such charac ters ar...

Page 21: ...ack mode The RANDOM indicator disappears and random playback is can celled Random playback is cancelled when the disc is ejected 1 Group Playback Only MP3 CDs 1 Press the PLAY MODE button repeatedly u...

Page 22: ...Use the Previous and Next buttons to select the first track you want to add to the play list and then press ENTER but ton Repeat this step to add additional tracks to the playlist You can alternativel...

Page 23: ...roups in that group 5 Press the ENTER button The first track is memorized in the playlist 6 Use the buttons to continue selecting the memory track To move up a level press the but ton To continue sele...

Page 24: ...disappears Repeat playback is cancelled when the disc is ejected Setting for MP3 With the MP3 preferences you can change the way MP3 track information is displayed and the way MP3 CDs are played The M...

Page 25: ...2 2 3 2 4 ID3 tags will not be dis played CD EXTRA AUDIO MP3 This preference applies to CD Extra discs and deter mines whether music in the audio session or MP3 tracks in the data session are played...

Page 26: ...tched Replace the disc Can t find a SETUP menu in need If any track has been selected even when the DX 7355 is stopped you must place it into the full stop state by pressing the button before you can...

Page 27: ...sions W u H u D 435 u 81 u 315 mm Weight 4 4 kg Operation condition Temperature humidity 5 35 C 5 85 no condensation Supported discs CD CD R CD RW MP3 Discs that have not been properly finalized may o...

Page 28: ...6 82194 Groebenzell GERMANY Tel 49 8142 4401 0 Fax 49 8142 4401 555 http www eu onkyo com ONKYO EUROPE UK Office Suite 1 Gregories Court Gregories Road Beaconsfield Buckinghamshire HP9 1HQ UNITED KING...

Reviews: