background image

17

Connecting the DV-CP704

This chapter explains how to connect the DV-CP704 to 
your other AV components.

• Read the manuals supplied with your AV components.
• Don’t connect the power cord until you’ve completed 

all audio and video connections.

Optical Digital Jack

The DV-CP704’s optical digital jack has shutter-type 
cover that open when an optical plug is inserted and 
close when it’s removed. Push plugs in all the way.

Caution:

 To prevent shutter damage, hold the optical 

plug straight when inserting and removing.

RCA/phono AV Connection Color Coding

RCA/phono AV connections are usually color coded: 
red, white, and yellow. Use red plugs to connect right-
channel audio inputs and outputs (typically labeled “R”). 
Use white plugs to connect left-channel audio inputs and 
outputs (typically labeled “L”). And use yellow plugs to 
connect composite video inputs and outputs.

• Push the plugs in all the way 

to make a good connection.

• To prevent interference, keep 

audio and video cables away 
from power cords and speaker 
cables.

Before Making Any Connections

Analog audio

Right (red)

Left (white)

(Yellow)

Right (red)

Left (white)

(Yellow)

Composite video

Wrong!

Right!

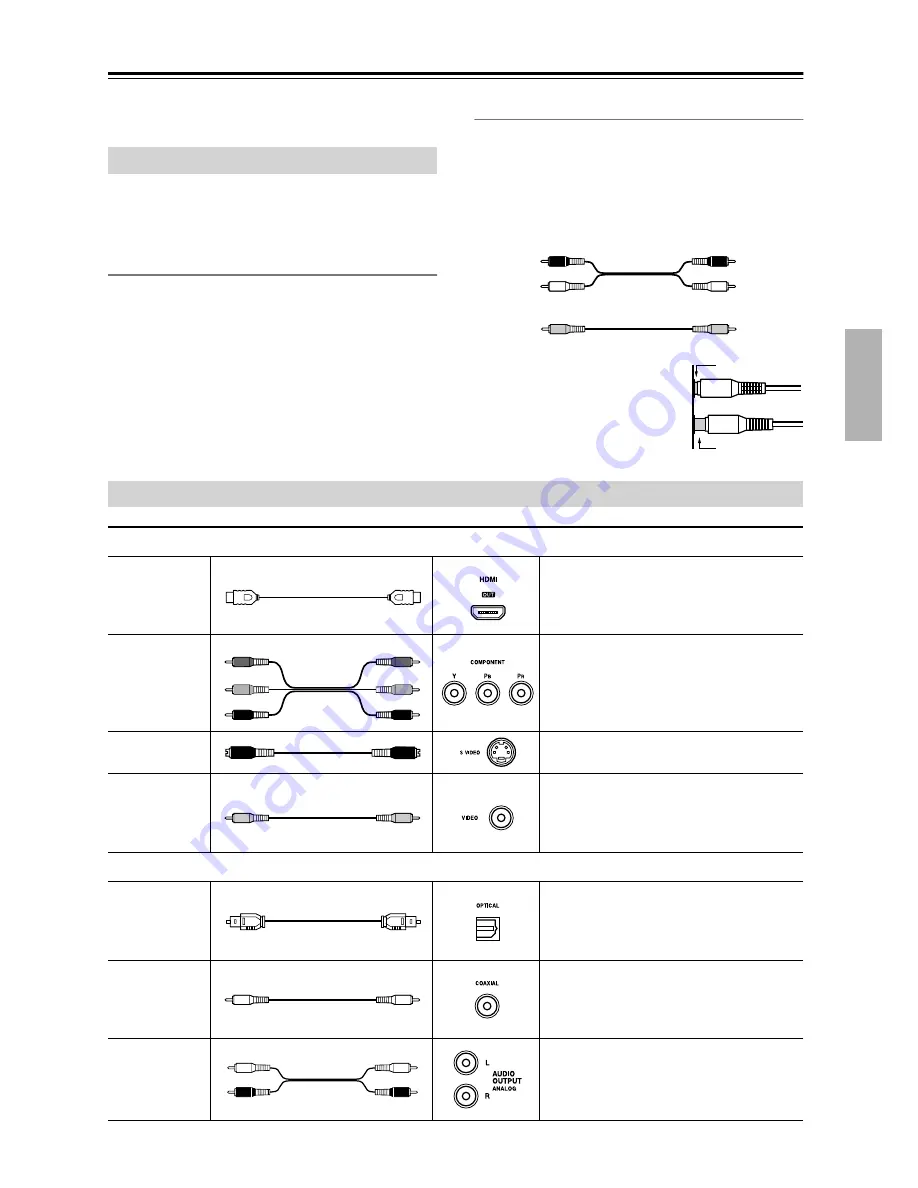
AV Cables & Connectors

Video

HDMI

HDMI connections can carry uncom-
pressed, standard or high definition digital 
video and digital audio, for the best picture 
and sound quality.

Component 
video

Component video separates the luminance 
(Y) and color difference signals (P

R

, P

B

), 

providing the best picture quality. (Some 
TV manufacturers label their component 
video inputs slightly differently.)

S-Video

S-Video provides better picture quality 
than composite video.

Composite 
video

Composite video can be found on virtually 
all TVs, VCRs, and other video equipment. 
Use only dedicated composite video 
cables.

Audio

Optical digital

Optical digital audio connections with the 
optical digital audio output and a suitable 
AV receiver, you can enjoy DVD-Videos 
with surround sound.

Coaxial digital

Coaxial digital audio connections with the 
coaxial digital audio output and a suitable 
AV receiver, you can enjoy DVD-Videos 
with surround sound.

Analog

RCA/phono analog audio connectors can 
be found on virtually all AV components.

C

B

C

B

P

B

/

/

P

B

C

R

C

R

P

R

P /

/

R

Y

Y

Summary of Contents for DV CP704

Page 1: ...ing your new DVD Changer A good understanding of its features and operation will allow you to achieve optimum performance and enjoyment Keep this manual for future reference Contents Overview 2 Connec...

Page 2: ...aratus does not operate normally by following the operating instructions Adjust only those controls that are covered by the operating instructions as an improper adjustment of other controls may resul...

Page 3: ...ources because its internal temperature may rise shortening the life of the optical pickup Avoid damp and dusty places and places subject to vibrations from loudspeakers Never put the unit on top of o...

Page 4: ...vide reasonable protection against harmful interfer ence in a residential installation This equipment generates uses and can radiate radio frequency energy and if not installed and used in accor dance...

Page 5: ...g Discs 23 Loading Discs During Playback 24 Selecting Discs 24 Starting Pausing Stopping Playback 25 Navigating Disc Menus 26 Using the Disc Navigation Window 27 Selecting Titles Chapters Tracks by Nu...

Page 6: ...digital output Optical digital output Analog output Others Load discs without stopping playback Adjustable display brightness Slow motion playback Fast forward and reverse Repeat playback options inc...

Page 7: ...en you attempt to use a DVD feature that is not available this logo may appear onscreen indicating that the feature is not supported by the current disc or by the DVD player Disc Notes Disc Logo Forma...

Page 8: ...ayed The folder numbered 001 appears as ROOT in the Disc Navigator The DV CP704 supports up to 255 folders and up to 255 files per folder If you try to play an incompatible file the message This forma...

Page 9: ...near heat sources Don t store discs in places subject to moisture or dust such as in a bathroom or near a humidifier Always store discs in their cases and vertically Stack ing or putting objects on un...

Page 10: ...dwidth Digital Content Protection The video encryption technology developed by Intel for HDMI DVI It s designed to protect video content and requires a HDCP compati ble device to display the encrypted...

Page 11: ...sc tray H RANDOM button 35 This button is used with the Random function I DIMMER button 31 This button is used to adjust the display brightness and turn the disc tray light on or off J DISPLAY button...

Page 12: ...e Last Memory func tion has been set 8 TOTAL indicator This indicator appears while the total time is being displayed 9 REMAIN indicator This indicator appears while the remaining time is being displa...

Page 13: ...AUDIO OUTPUT This optical digital audio output can be connected to an optical digital audio input on a hi fi amp AV receiver or surround sound decoder Dolby Digital DTS E HDMI OUT This HDMI jack outpu...

Page 14: ...he number 25 press the 10 button twice fol lowed by the 5 button D AUDIO button 26 38 This button is used to select foreign language soundtracks and audio formats e g Dolby Digital or DTS E SUBTITLE b...

Page 15: ...7 This button is used to cancel various functions W DISPLAY button 41 This button is used to display information about the current disc title chapter or track including the elapsed time remaining time...

Page 16: ...remote controller of the same type is used in the same room or the DV CP704 is installed close to equipment that uses infrared rays the remote control ler may not work reliably Don t put anything suc...

Page 17: ...ords and speaker cables Before Making Any Connections Analog audio Right red Left white Yellow Right red Left white Yellow Composite video Wrong Right AV Cables Connectors Video HDMI HDMI connections...

Page 18: ...OMPATIBLE WITH THIS PRODUCT AND MAY CAUSE ARTIFACTS TO BE DISPLAYED IN THE PICTURE IN CASE OF 525 OR 625 PROGRESSIVE SCAN PICTURE PROBLEMS IT IS RECOM MENDED THAT THE USER SWITCH THE CON NECTION TO TH...

Page 19: ...See the relevant manuals You can experience Dolby Digital only with DVDs that bear the Dolby Digital logo Likewise you can experience DTS only with DVDs or CDs that bear the DTS logo This section exp...

Page 20: ...t chan nels of digital audio Until now several separate video and audio cables have been required to connect AV com ponents together With HDMI a single cable is all that s necessary to achieve the bes...

Page 21: ...PCM 48 kHz 44 1 kHz 96kHz Dolby Digital DTS If your TV only supports HDMI digital audio up to 48 kHz change the Linear PCM Out setting to Down Sample On see page 45 If your TV doesn t support Dolby D...

Page 22: ...nguage page of the onscreen setup menus see page 46 Not all DVD Video discs have multi language menus foreign language soundtracks and subtitles In such cases the disc s default language is used Power...

Page 23: ...sc tray while it s open and don t load anything other than supported discs Doing so may damage your discs or DV CP704 Loading Removing Discs 1 Press the OPEN CLOSE button The disc tray opens and the s...

Page 24: ...button to access the other disc bays 3 When you ve finished press the OPEN CLOSE button again The disc tray closes Playback of the current disc continues uninterrupted until you either stop playback...

Page 25: ...t ton when you ve finished playing a DVD Video disc Your DV CP704 features a screen saver to protect your TV from the effects of burn in see page 46 With some DVD Video discs you may experience pic tu...

Page 26: ...DVD Video discs foreign language soundtracks and audio formats can usually be selected during play back by using the remote controller s AUDIO button see page 38 Similarly subtitles can be selected b...

Page 27: ...layed here E Information about the song currently playing e g song title artist name album name is displayed here if available 2 Press the Play button to start play back Press the Stop button to stop...

Page 28: ...ton to display the first nine pictures at thumbnail size see page 32 Depending on the disc the first nine pictures may be displayed automatically 3 Press the Stop button to stop playback Remote contro...

Page 29: ...c ify a chapter or title To enter for example 2 press the 2 button To enter for example 12 press the 1 button followed by the 2 button To clear the number press the CLR button Use the Left Right butto...

Page 30: ...k press the Fast Forward button to start fast forward Playback fast forwards and x 2 appears onscreen To change the fast forward speed press the Fast Forward button repeat edly to select x 2 x 4 x 8 o...

Page 31: ...ck Forward slow motion During playback press the SLOW button Forward slow motion playback starts and 1 2 appears onscreen To change the slow motion speed press the SLOW Forward button repeat edly to s...

Page 32: ...isplay the next or previous picture use the Next and Previous buttons To turn a picture upside down use the Up Down buttons not while zoomed in To rotate a picture clockwise or coun terclockwise use t...

Page 33: ...cator flashes on the display ALL All discs are played consecutively DVD All DVD Video discs are played consecutively CD All audio CDs including MP3 and WMA discs are played consecu tively To cancel Ch...

Page 34: ...back 1 Press the REPEAT button repeatedly to select a repeat option The currently selected repeat option appears onscreen and REPEAT appears on the display The available options depend on the current...

Page 35: ...om Playback function can be combined with the Repeat Playback function Random Playback 1 Select a disc See page 24 2 Press the RANDOM button repeatedly to select a random option The currently selected...

Page 36: ...List No Disc 1 001 002 008 02 01 03 04 05 Title Folder Chapter Track Remote controller 3 Press the ENTER button The new item is added to the memory list as step 01 4 Repeat steps 2 and 3 to add more i...

Page 37: ...be able to select different camera angles even though the camera indicator is displayed With some DVD Video discs you can select camera angles from a menu Some DVD Video discs won t allow you to sele...

Page 38: ...for details Notes With DVD Video discs when you stop playback and cancel the Resume function see page 25 or select another disc the subtitle language will revert to your default subtile language see p...

Page 39: ...ed Press the button again while HDMI OFF is displayed to turn on HDMI To turn off HDMI press and hold the RESOLUTION button 2 Press the RESOLUTION button on the remote controller repeat edly to change...

Page 40: ...sc again Using Last Memory 1 During playback press the LAST MEMORY button The last memory point for the disc is stored the LAST indicator appears and LAST MEM appears on the dis play If the LAST MEMOR...

Page 41: ...oming 1 During playback or paused press and hold the ZOOM but ton The picture is enlarged 2 Press the ZOOM again repeat edly to Zoom in The number of zoom steps available depends on the resolution of...

Page 42: ...I Audio Out Settings for the digital signal output by the optical coaxial and HDMI digital audio outputs 45 Linear PCM Out Select whether or not the DV CP704 downsamples 96 kHz dig ital audio 45 Dynam...

Page 43: ...hed select this option to correct the problem Notes This setting does not apply to DVD menus When the HDMI OUT signal is at a resolution of 720p or 1080i programs in 4 3 format will appear stretched s...

Page 44: ...also be changed by pressing and hold ing the Previous button and then pressing STANDBY ON button HD Resolution With this setting you can set the video resolution for the HDMI OUT Auto The resolution...

Page 45: ...this setting you can configure the optical coaxial and HDMI digital outputs All Dolby Digital and DTS signals are output as they are PCM Dolby Digital signals are down mixed to 2 channels and output a...

Page 46: ...ubtitles your preferred language will be selected automatically Select No Subtitle if you don t want subtitles dis played Select Others if you can t find your language See Selecting Other Languages on...

Page 47: ...n The security code input screen appears 3 Enter the security code using the remote controller s number but tons and then press the ENTER button The default security code is 8888 You can change the se...

Page 48: ...AA Malay MS Abkhazian AB Maltese MT Remote controller Remote controller Remote controller Afrikaans AF Burmese MY Amharic AM Nauru NA Arabic AR Nepali NE Assamese AS Norwegian NO Aymara AY Occitan OC...

Page 49: ...the resolution page 39 Press and hold down the remote controller s RESOLU TION button to turn off the HDMI OUT and then set the progressive Setting on the onscreen setup menus to Inter laced page 39...

Page 50: ...ut a mp3 or MP3 file name extension are not recognized Use the correct filename extension page 8 Can t play WMA files WMA files without a wma or WMA file name extension are not recognized Use the corr...

Page 51: ...s HDMI settings are configured suitably for that component Displayed ID Message MSG ID 002 The HDMI Output Setting is set to Off Change it to On page 44 MSG ID 003 MSG ID 004 The HDMI cable may not be...

Page 52: ...inear audio 4 Hz 22 kHz 48 kHz sampling rate 4 Hz 44 kHz 96 kHz sampling rate CD audio 4 Hz 20 kHz 44 1 kHz Signal to noise ratio 95 dB Audio dynamic range 95 dB Total harmonic distortion 0 007 1 kHz...

Reviews: