background image


8


Getting Started


—Continued


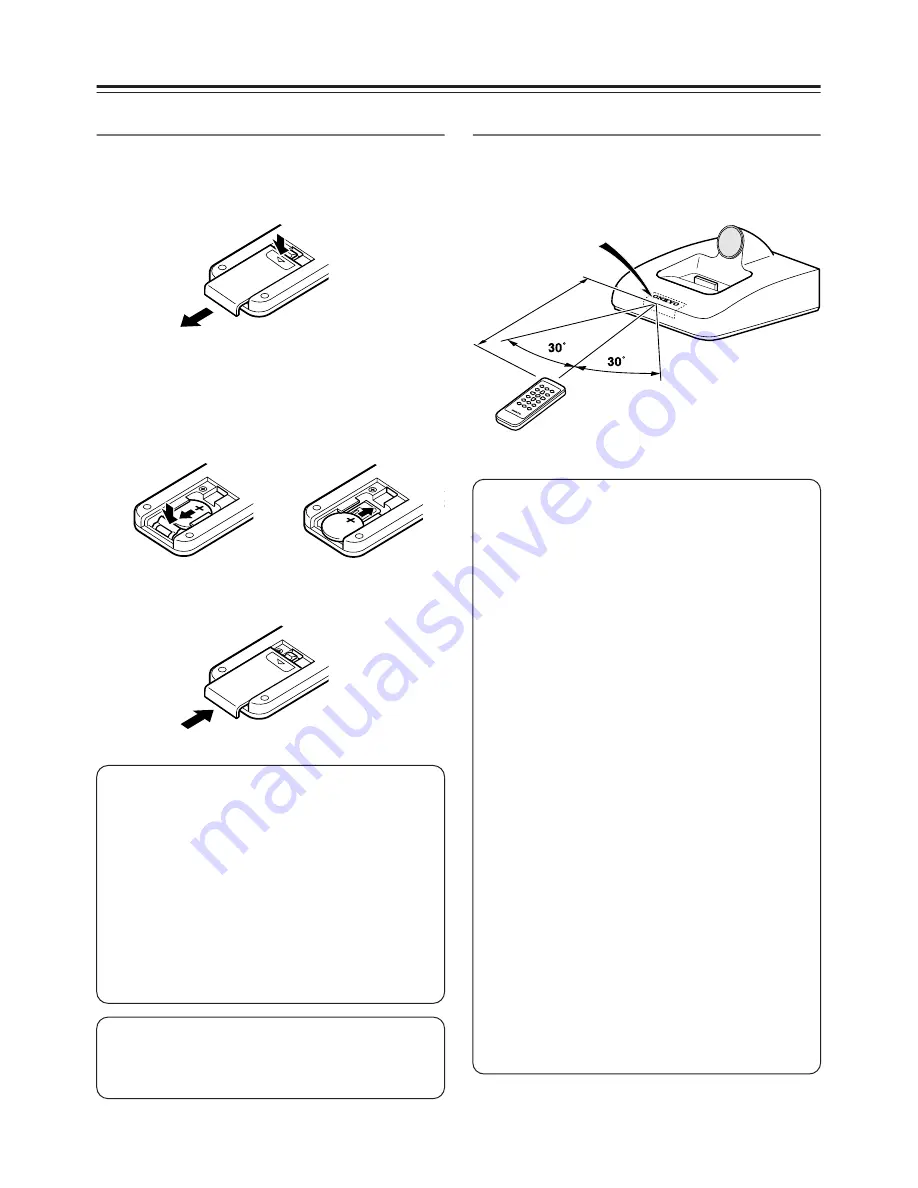
Replacing the Battery


Use only a battery of the same type (CR 2025).


1.


To open the battery compartment, press 
the small hollow and slide open the cover.


2.


While pressing the tab as shown, slide out 
the old battery.

Slide the new battery into the battery com-
partment with the positive side facing up.


3.


Slide the cover shut.


Aiming the Remote Controller


When using the remote controller, point it 
toward the RI Dock’s remote control sensor, as 
shown below.

Notes:

If the remote controller doesn’t work reli-
ably, try replacing the battery.

If you intend not to use the remote con-
troller for a long time, remove the battery 
to prevent damage from leakage or cor-
rosion.

An expired battery should be removed as 
soon as possible to prevent damage from 
leakage or corrosion.

Caution:  

Replacing the battery incorrectly 

may cause an explosion. Use only a battery 
of the same type or an equivalent.

Appr

ox. 5 m 

(16 f

t.)

Remote control sensor

RI Dock

Notes:

If the RI Dock is placed on top of another 
component, the remote controller’s sig-
nal may be obstructed and the remote 
controller may not work reliably.

The remote controller may not work reli-
ably if the RI Dock is subjected to bright 
light, such as direct sunlight or inverter-
type fluorescent lights. Keep this in mind 
when installing.

If another remote controller of the same 
type is used in the same room, or the RI 
Dock is installed close to equipment that 
uses infrared rays, the remote controller 
may not work reliably.

Don’t put anything on top of the remote 
controller, such as a book or magazine, 
because a button may be pressed contin-
uously, thereby draining the batteries.

The remote controller may not work reli-
ably if the RI Dock is installed in a rack 
behind colored glass doors. Keep this in 
mind when installing.

The remote controller will not work if 
there’s an obstacle between it and the RI 
Dock’s remote control sensor.

Summary of Contents for 29344880A

Page 1: ...10 Controlling Your iPod with the OSD 10 Music Mode 11 Video Mode 13 Resume Function 13 Setting the TV System European model only 14 Other Functions 14 Setting the Remote Controller s ID 15 Using Your...

Page 2: ...dropped 14 Damage Requiring Service Unplug the apparatus from the wall outlet and refer servicing to qualified service personnel under the following conditions A When the power supply cord or plug is...

Page 3: ...in a particular installation If this equipment does cause harmful interference to radio or television reception which can be determined by turning the equipment off and on the user is encouraged to t...

Page 4: ...In this manual the DS A3 Remote Interactive Dock is referred to as the RI Dock Easily linksiPod touch 1st generation iPod touch 2nd generation iPod classic iPod nano 3rd generation iPod nano 4th gene...

Page 5: ...t generation iPod photo iPod mini On these models the Video menu for the onscreen display OSD can be displayed on a TV connected to the RI Dock Package Contents DS A3 Remote Interactive Dock Remote co...

Page 6: ...lock wise moves it backward Getting to Know the RI Dock TAPE TAPE DOCK HDD DOCK or HDD iPod slot Dock connector Remote control sensor RI MODE switch jack VIDEO OUT jack COMPONENT VIDEO DC IN 5V 1 5A j...

Page 7: ...or Off G Play Pause button Starts or pauses playback of the selected song video H PLAYLIST PAGE MODE buttons Used to select the page modes During play back or when the OSD mode is set to Off they sele...

Page 8: ...osion Use only a battery of the same type or an equivalent Approx 5 m 16 ft Remote control sensor RI Dock Notes If the RI Dock is placed on top of another component the remote controller s sig nal may...

Page 9: ...o the RI Dock s DC IN jack If you ve connected the RI Dock s AUDIO OUT L R jacks to your amp s TAPE IN jacks and also want to connect the RI Dock s VIDEO OUT jack to your amp Connect the RI Dock s VID...

Page 10: ...this mode is selected your iPod dis plays the Onkyo logo Off Nothing is displayed on your TV and you navigate and select your contents by using your iPod s display To control your iPod without the OS...

Page 11: ...e InPmode you can page through the list consecutively In the S M and L modes you can page through the list in progressively larger steps 1 Use the PAGE MODE Up and Down buttons to select a page mode D...

Page 12: ...er You can set the time at which the screen saver is activated to any one of the following four options 1 minute 5 minutes 10 minutes or Off screen saver off When the screen saver activates the onscre...

Page 13: ...V 2 During playback or while playback is paused remove your iPod from the RI Dock or change the OSD mode to Off The current song video is remembered 3 When you reinsert your iPod into the RI Dock set...

Page 14: ...Pod as the input source Timer Play You can use your amp s Timer function to turn on your amp and iPod and start playback at a specified time Using Your Amp s Remote Controller You can use your amp s r...

Page 15: ...s one of the following buttons for more than 3 seconds to set the ID ID 1 PLAYLIST Up button ID 2 ALBUM Up button ID 3 PLAYLIST Down button ID 4 ALBUM Down button Notes This function only works when t...

Page 16: ...playback on the iPod If the iPod is not already on it s turned on automatically Pause Pause Stop Pause Pauses iPod playback Next song Next Selects the next iPod song Previous song Previous Restarts th...

Page 17: ...on trol youriPod Make sure your iPod is properly inserted in the RI Dock If your amp s remote controller has remote mode buttons make sure you ve selected the right mode Check the RI Dock s RI MODE sw...

Page 18: ...olor Specifications and operation are the same regardless of color The operating instructions in this manual apply to theiPod as of May 2008 and may change with future upgrades to the iPod software Th...

Page 19: ...19 MEMO...

Page 20: ...4 Groebenzell GERMANY Tel 49 8142 4401 0 Fax 49 8142 4401 555 http www eu onkyo com ONKYO EUROPE UK Office Suite 1 Gregories Court Gregories Road Beaconsfield Buckinghamshire HP9 1HQ UNITED KINGDOM Te...

Reviews: