background image

76

Cobra 350 User's Guide

05624-000 Rev. K

5.12  Installing User-Supplied Safety Equipment

DC

IN

24V

GND

AC

200 -

240V

Ø

1

XBEL

TIO

XIO

Servo

ENET

ENET

XSYSTEM

1

2

3

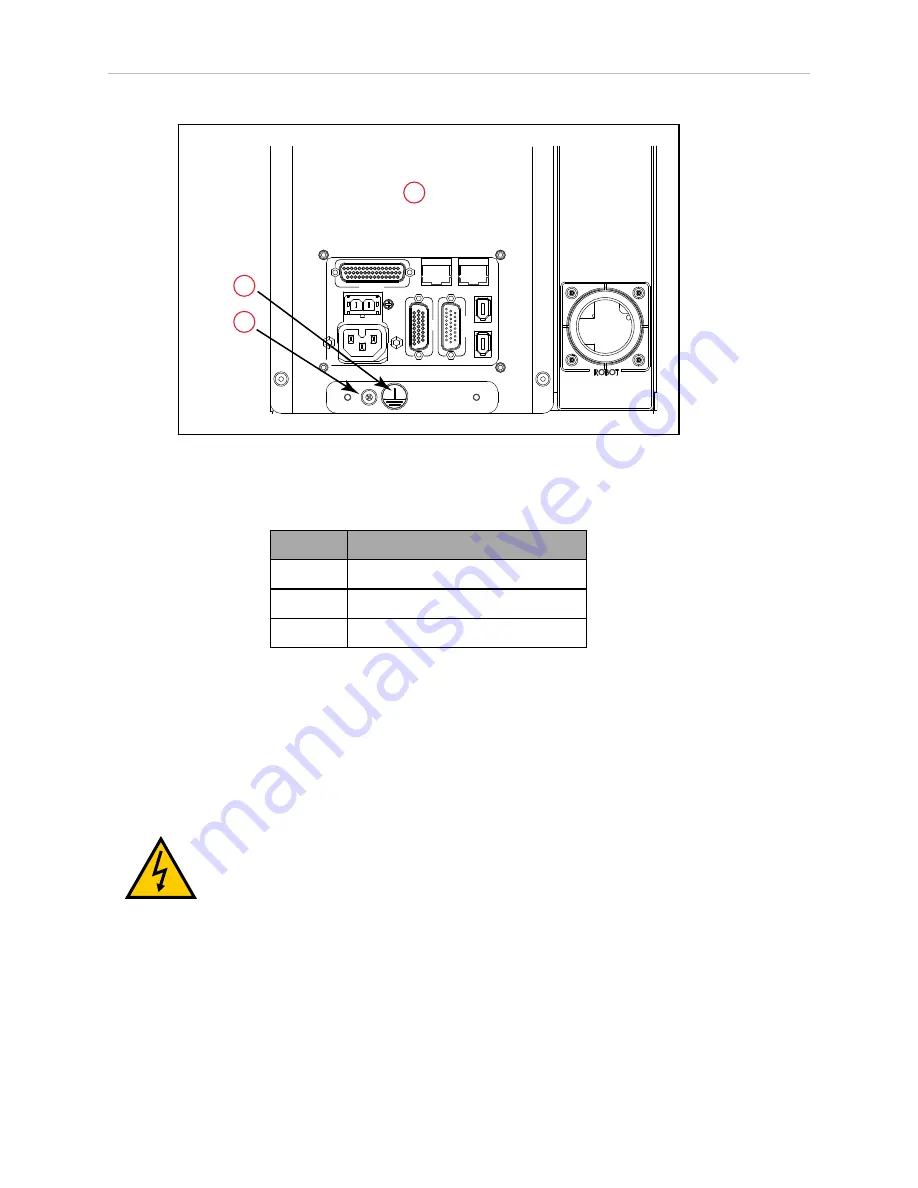
Figure 5-15. Earth Ground Location

Table 5-16. Earth Ground Location Description

Item

Description

1

Robot Interface Panel

2

Ground Label

3

Ground Screw

Robot-Mounted Equipment Grounding

The Cobra 350 Joint 3 quill and tool flange are not reliably grounded to the robot base. If haz-
ardous voltages are present at any user-supplied robot-mounted tooling, you must install a
ground connection from that tooling to the ground point on the robot base. Hazardous
voltages can be considered anything in excess of 30 VAC (42.4 VAC peak) or 60 VDC.

Also, see Tool Flange Dimensions for Cobra 350 Robots (Units in mm) on page 122 for the
grounding point on the tool flange.

WARNING:

ELECTROCUTION RISK

Failing to ground robot-mounted equipment or tooling that uses hazardous
voltages could lead to injury or death of a person touching the end-effector
when an electrical fault condition exists.

5.12 Installing User-Supplied Safety Equipment

The user is responsible for installing safety barriers to protect personnel from coming in con-
tact with the robot unintentionally. Depending on the design of the workcell, safety gates, light
curtains, and emergency stop devices can be used to create a safe environment. Read the

Robot

Safety Guide

for a discussion of safety issues.

Summary of Contents for Cobra 350 CR/ESD

Page 1: ...I591 E 05 Cobra 350 Robot User s Guide...

Page 2: ...ation is periodically reviewed and revised Omron Adept Technologies Inc assumes no responsibility for any errors or omissions in the doc umentation Critical evaluation of the documentation by the user...

Page 3: ...Personnel 15 2 3 What to Do in an Emergency or Abnormal Situation 16 Releasing the Brakes 16 Releasing an E Stop 16 2 4 Robot Behavior 17 Hardstops 17 Limiting Devices 17 Singularities 17 2 5 Intende...

Page 4: ...ut Cable 46 4 6 Mounting the eMB 40R 48 Dimensions and Mounting Holes 48 Mounting Clearances 49 Chapter 5 System Cable Installation 51 5 1 System Cables without SmartController EX 51 List of Cables an...

Page 5: ...lling User Supplied Safety Equipment 76 Emergency Stop Circuits 82 Remote Manual Mode 84 User Manual Auto Indication 84 User High Power On Indication 85 Remote High Power On Off Control 85 High Power...

Page 6: ...er Battery 106 Battery Replacement Time Periods 106 Replacement Procedure 107 8 7 Inspecting Timing Belts 110 8 8 Replacing the eMB 40R Amplifier 110 Remove the eMB 40R Amplifier 110 Installing a New...

Page 7: ...R ESD Cleanroom Option 129 Introduction 129 Specifications 130 10 2 Connections 130 10 3 Requirements 131 10 4 ESD Control Features 131 10 5 Maintenance 132 Bellows Replacement 132 Lubrication 134 10...

Page 8: ...oughout manual l Updated recommended power supply part numbers l Update T20 and XMCP jumper cable part numbers l Error reporting and Line E Stop clarification l Update ACE software disk to ACE softwar...

Page 9: ...oint locations NOTE The robot motors are powered by an eMB 40R servo controller amplifier The robot can be controlled by the eMB 40R running eV or an optional SmartController EX motion controller whic...

Page 10: ...ion controller is the foundation of our family of high performance distributed motion and vision controllers The SmartController EX is designed for use with l Cobra 350 robots l eCobra robots l Quattr...

Page 11: ...the Cobra 350 robot and runs the eV operating system for motion control of the robot The eMB 40R features l Four AC servo motor amplifiers l Emergency stop circuitry l High servo rate to deliver low p...

Page 12: ...stem reconfiguring installed com ponents and adding other optional components See the following table Table 1 2 Related Manuals Manual Title Description Robot Safety Guide Contains safety information...

Page 13: ...ich if not avoided might result in minor injury moderate injury or property damage Alert Icons The icon that starts each alert can be used to indicate the type of hazard These will be used with the ap...

Page 14: ...NING PERSONAL INJURY OR PROPERTY DAMAGE RISK A Cobra 350 robot can cause serious injury or death or damage to itself and other equipment if safety precautions are not observed WARNING ELECTROCUTION RI...

Page 15: ...llowing situations could result in injury or damage to the equipment l Do not place objects on the robot l Do not exceed the maximum payload capacity l Do not exceed the maximum recommended limits giv...

Page 16: ...nd then follow the internal procedures of your company or organization for an emergency or abnormal situation If a fire occurs use CO2 to extinguish the fire Releasing the Brakes In case of an emergen...

Page 17: ...tall their own safety rated category 0 or 1 dynamic limiting devices if needed that comply with ISO 10218 1 Clause 5 12 2 Singularities No singularities exist that cause a hazardous situation with a C...

Page 18: ...or not 2 6 Additional Safety Information We provide other sources for more safety information Manufacturer s Declaration of Incorporation This lists all standards with which the robot complies The Man...

Page 19: ...onment by the proper disposal of WEEE Waste Electronics and Electrical Equipment All electrical and elec tronic products should be disposed of separately from the municipal waste system via des ignati...

Page 20: ......

Page 21: ...erify that all items are present and that the shipment is correct and free of visible damage If the items received do not match the packing slip or are damaged do not sign the receipt Contact your loc...

Page 22: ...m Operating Environment Requirements Ambient temperature 5 to 40 C 41 to 104 F Humidity 5 to 90 noncondensing Altitude up to 1000 m Pollution degree 2 Robot protection class IP20 NEMA Type 1 NOTE See...

Page 23: ...ed as loc ating points for user installed dowel pins in the mounting surface These are shown in the following figure Using locating pins can improve the ability to remove and reinstall the robot in th...

Page 24: ...the dimensions of the mounting holes in the robot base l Drill four bolt holes M10 x 30 mm or 3 8 16 UNC for machine bolts user sup plied These either need to be tapped for the bolts or you can drill...

Page 25: ...ll an internally threaded positioning pin into the other 6H7 hole in the robot base 4 Turn joint 2 until the arm comes into contact with the mechanical hardstop to keep the robot in a safe position 1...

Page 26: ...ounted squarely will not rock back and forth before tightening the mounting bolts WARNING PERSONAL INJURY OR PROPERTY DAMAGE RISK The center of mass of the robot may cause the robot to fall over if th...

Page 27: ...rvo loop control l a node on the IEEE 1394 network l a power controller that uses single phase AC power 200 240 Volts l a status panel with a 2 digit alpha numeric display to indicate operating status...

Page 28: ...or cable shield from user supplied 24 VDC cable 3 24 V Pin 24V connection point 4 24 VDC Input Used for user supplied 24 VDC power The mating connector is provided 5 200 240 VAC Input Used for 200 240...

Page 29: ...d green LED The color and blinking pattern indicates the status of the robot See the following table 1 2 5 4 3 Figure 4 3 Controls and Indicators on eMB 40R Table 4 3 eMB 40R Control and Indicator Des...

Page 30: ...Solid Green or Red Initialization or Robot Fault Status Panel The status panel shown in Controls and Indicators on eMB 40R on page 29 displays alpha numeric codes that indicate the operating status of...

Page 31: ...power connections for shorts or opens Turn high power back on and restart the program If the error persists con tact your local Omron support AC RSC Power Fail ure 670 A loss of AC power was detected...

Page 32: ...normal response to many E STOP conditions Remove the source of the ESTOP and re enable high power F1 E STOP detected by robot 643 The End Of Arm Break away Sensor has tripped open circuit Reporting o...

Page 33: ...ation stages These steps nor mally sequence I0 I1 on the display during normal system boot None unless an ini tialization code per sists longer than 30 seconds This may indicate servo ini tialization...

Page 34: ...cal Omron support P5 Power system failure Code 5 1115 An inrush error was detected by the power sequencer This means the high voltage DC bus failed to rise at the expec ted rate when power was enabled...

Page 35: ...failure on chan nel 2 during the cyclic check of dual channel power system This may indicate a welded relay contact or other hard ware failure If the problem per sists contact your local Omron suppor...

Page 36: ...problem per sists contact your local Omron support T0 Safety System Fault Code 10 1109 An error was detected during a software self test of a secondary safety and monitoring cir cuit SRV_DIRECT SRV_ST...

Page 37: ...on is pressed while high power is on high power will auto matically shut down Brake Release Connector The 9 pin Brake Release connector provides low active input signals to manually release the brakes...

Page 38: ...inform ation Table 4 7 Digital I O Connection Options Product I O Capacity For more details XIO Connector on eMB 40R 12 inputs 8 outputs Using Digital I O on eMB 40R XIO Connector on page 39 XDIO on o...

Page 39: ...lox 2 8 Inputs 1121 1128 8 Outputs 0113 0120 5 Optional IO Blox 3 8 Inputs 1129 1136 8 Outputs 0121 0128 6 Optional IO Blox 4 8 Inputs 1137 1144 8 Outputs 0129 0136 4 5 Using Digital I O on eMB 40R XI...

Page 40: ...ctor on eMB 40R Interface Panel 2 24 VDC 3 Common 1 1 4 Input 1 1 1 1097 5 Input 2 1 1 1098 6 Input 3 1 1 1099 7 Input 4 1 1 1100 8 Input 5 1 1 1101 9 Input 6 1 1 1102 10 GND 11 24 VDC 12 Common 2 2 1...

Page 41: ...nector see the following table or through the optional XIO Termination Block See the documentation supplied with the Termination Block for details The XIO inputs cannot be used for REACTI programming...

Page 42: ...e sources are typically used to drive the inputs Typical Input Wiring Example 1097 4 1098 5 1099 6 1100 7 1101 8 1102 24V GND 9 3 2 1 1103 13 1104 14 1105 15 1106 16 1107 17 1108 18 12 GND 10 24V 11 1...

Page 43: ...ealant ready sensor etc 6 Bank 1 configured for Sinking NPN inputs 7 Bank 2 configured for Sourcing PNP inputs 8 Input Bank 1 9 Input Bank 2 10 Bank 1 Common 11 Bank 2 Common NOTE The off state curren...

Page 44: ...ting polyfuse The outputs are accessed through direct connection to the XIO connector see XIO Signal Desig nations on page 40 or through the optional XIO Termination Block See the documentation suppli...

Page 45: ...gure 4 6 Typical User Wiring for XIO Output Signals Table 4 13 Typical User Wiring for XIO Output Signal Description Item Description 1 Supplied Equipment 2 User supplied Equipment 3 Wiring Terminal B...

Page 46: ...he following figure This cable connects to the XIO connector on the eMB 40R and provides flying leads on the user s end for con necting input and output signals in the workcell The cable length is 5 m...

Page 47: ...ow Black 7 Input 4 1 Green 8 Input 5 1 Green Black 9 Input 6 1 Blue 10 GND Blue White 11 24 VDC Brown 12 Common 2 Brown White 13 Input 1 2 Orange 14 Input 2 2 Orange Black 15 Input 3 2 Gray 16 Input 4...

Page 48: ...es 0 425 5 20 6 204 2 404 9 51 6 331 7 9 8 0 228 6 67 3 222 3 106 7 182 9 170 2 6X SHCS M4 X 6 A B 0 47 6 377 8 0 7 6 45 7 129 54 C 0 32 7 197 8 0 7 6 45 7 C 0 32 7 197 8 0 7 6 45 7 C 0 47 6 377 8 0 7...

Page 49: ...d the eMB 40R for proper cooling 100 200 50 1 2 3 Figure 4 9 Clearance for the eMB 40R Units in mm Table 4 15 eMB 40R Clearance Description Item Surface Air Gap 1 Back 0 mm 2 Sides 50 mm 3 Front when...

Page 50: ......

Page 51: ...cludes the optional T20 pendant and optional SmartVision MX industrial PC These items may not be present in your system DC IN 24 V GND AC 200 240 V 1 XBELTIO XIO Servo ENET ENET XSYSTEM eMB 40R XMCP X...

Page 52: ...em Description Part Standard Option User supplied Notes A eAIB XSYSTEM Cable Assembly 13323 000 X B User E Stop Safety Gate n a X C XUSR Jumper Plug 04736 000 X Required if no E stop safety gate or mu...

Page 53: ...a X P Camera and cable n a X X Q Arm Power Signal Cable 05020 000 X R Robot Interface Panel n a X S User supplied ground wire n a X T PC running ACE Software n a X U Ethernet Cable PC ethernet switch...

Page 54: ...ing User Supplied Safety Equipment on page 76 for more information B C 3 Connect Front Panel cable to Front Panel and eAIB XSYSTEM cable XFP con nector If no Front Panel is used install FP jumper 3a o...

Page 55: ...hernet cable from PC to switch if used Refer to Connecting the PC to the SmartController EX on page 65 for more information T U NOTE A front panel ships with each Cobra 350 robot system but you can ch...

Page 56: ...t to the SmartController EX The figure includes the optional T20 Pendant SmartVision MX and SmartController EX These items may not be present in your system SmartController EX COM1 COM2 MOUSE KEYBD DV...

Page 57: ...in the SmartController EX User s Guide 5 Install a user supplied ground wire between the SmartController EX and ground List of Cables and Parts Table 5 3 Cables and Parts Description with SmartContro...

Page 58: ...er Cable 04118 000 X X 200 240 VAC single phase K 24 VDC Power Cable 04120 000 X X L 24 VDC 6 A Power Supply 04536 000 X X 85 264 VAC universal input M Ethernet Cable Switch if used SmartController EX...

Page 59: ...XFP connector or if no Front Panel install FP jumper on XFP connector 3a D E F 4 Connect Pendant adapter cable to XMCP connector and T20 Pendant If no Pendant install XMCP jumper 4a or bypass plug 4b...

Page 60: ...2 inputs and 8 outputs 5 m Refer to XIO Breakout Cable on page 46 for more information DB9 Splitter Cable An optional Y cable attaches at the SmartController EX XSYS connector and splits it into two X...

Page 61: ...ontroller EX Figure 5 3 System Cable Diagram with Belt Encoders Units in mm Table 5 5 Conveyor Belt Encoder Cables Description Item Description Part Standard Option User supplied Notes A Robot Interfa...

Page 62: ...9 PIN 1 PIN 4 PIN 12 PIN 2 ENC1_A PIN 3 ENC1_A PIN 11 ENC1_B PIN 12 ENC1_B PIN 19 ENC1_Z PIN 20 ENC1_Z PIN 4 ENC2_A PIN 5 ENC2_A PIN 13 ENC2_B PIN 14 ENC2_B PIN 21 ENC2_Z PIN 22 ENC2_Z PIN 1 5V PIN 10...

Page 63: ...IN 7 ENC1_A PIN 4 PIN 14 ENC1_B PIN 5 PIN 6 ENC1_B PIN 6 PIN 13 ENC1_I PIN 8 PIN 5 ENC1_I PIN 2 PIN 4 5V PIN 7 PIN 12 GND PIN 11 ENC2_A PIN 3 ENC2_A PIN 10 ENC2_B PIN 2 ENC2_B PIN 9 ENC2_I PIN 1 ENC2_...

Page 64: ...IN 2 PIN 9 PIN 1 PIN 12 PIN 4 PIN 8 PIN 1 PIN 15 PIN 9 PIN 8 PIN 1 PIN 15 PIN 9 PIN 1 PIN 10 PIN 19 PIN 9 PIN 18 PIN 26 Figure 5 8 SmartController EX Belt Encoder Y Adapter Cable Connections NOTE Cabl...

Page 65: ...installing ACE software 5 6 Connecting the PC to the SmartController EX The SmartController EX motion controller must be connected to a user supplied PC or the SmartVision MX vision processor for set...

Page 66: ...nstallation on page 51 1 Connect one end of the Arm Power Signal cable to the CN22 connector on the back plate of the robot Tighten the thumb screw securely For both ends of the cable line up the groo...

Page 67: ...Supplied 24 VDC Cable on page 69 1User supplied 24 VDC power supply must incorporate overload protection to limit peak power to less than 300 W or 8 A in line fuse protection must be added to the 24...

Page 68: ...upplied with the system but is available in the optional Power Cable kit See List of Cables and Parts on page 52 Procedure for Creating 24 VDC Cable 1 Locate the connector and pins from the preceding...

Page 69: ...r supplied 24 VDC power sup ply See the following figure The cable shield should be connected to frame ground on the power supply Do not turn on the 24 VDC power until instructed to do so in System Op...

Page 70: ...supplied cables to frame ground on power supply NOTE We recommend that DC power be delivered over shielded cables with the shield connected to frame ground at the power supply and to the ground points...

Page 71: ...of 200 240 VAC can lead to malfunction or failures of the robot or haz ardous situations Facility Overvoltage Protection The user must protect the robot from excessive overvoltages and voltage spikes...

Page 72: ...ase Supply Table 5 12 AC Power Installation with Single Phase Supply Description Item Description 1 Single phase 200 240 VAC 20 A L Line N Neutral E Earth Ground 2 User supplied must be slow blow 3 Us...

Page 73: ...male screw ter minal 10 A 250 VAC Qualtek P N 709 00 00 Digi Key P N Q217 ND NOTE The AC power cable is not supplied with the system but is available in the optional Power Cable kit See List of Cables...

Page 74: ...AC power source 1 2 5 4 3 Figure 5 13 AC Power Mating Connector Table 5 15 AC Power Mating Connector Description Item Description 1 Earth 2 Neutral 3 Removable bushing 4 Cable clamp 5 Line Installing...

Page 75: ...he user is responsible for supplying the ground wire to con nect to earth ground 1 Figure 5 14 1 Ground Point on Robot Base Ground Point on eMB 40R The user can install a ground wire at the eMB 40R ch...

Page 76: ...azardous voltages can be considered anything in excess of 30 VAC 42 4 VAC peak or 60 VDC Also see Tool Flange Dimensions for Cobra 350 Robots Units in mm on page 122 for the grounding point on the too...

Page 77: ...C contacts Shorted if NOT Used 3 16 Line E Stop used for other robot or assembly line E Stop inter connection Does not affect E Stop indication pins 7 20 N C contacts Shorted if NOT Used 4 17 Line E...

Page 78: ...ly operation 6 14 Remote High Power on off momentary push but ton User must supply moment ary push button to enable High Power to system Non voltage Free Contacts 5 13 System Supplied 5 VDC and GND fo...

Page 79: ...E Stop Push button CH 1 2 10 Pendant E Stop Push button CH 2 3 11 Pendant Enable CH 1 Hold to run 4 12 Pendant Enable CH 2 Hold to run 13 Serial GND Logic GND 7 Pendant TXD eV to Pendant TXD 8 Pendan...

Page 80: ...XPND 23 XUSR 2 XUSR 15 XSYSTEM 43 XUSR 4 XSYSTEM 39 XUSR 17 XSYSTEM 9 XUSR 16 XPND 8 XSYSTEM 38 XPND 25 XSYSTEM 29 XUSR 18 XSYSTEM 44 XUSR 19 ES1 ES2 SR1 SR2 AM2 AM1 XSYSTEM 14 XUSR 5 XSYSTEM 30 XUSR...

Page 81: ...f used 6 LINE E Stop external user E Stop system 7 T20 Pendant Enable 8 Muted Safety Gate Active in auto mode only jumper closed when not used 9 Manual Mode Path 10 Auto Mode Path 11 Force Guided Rela...

Page 82: ...R XSYSTEM cable provides connections for Emergency Stop E Stop circuits on the XUSR and XFP connectors This gives the controller system the ability to duplicate E Stop functionality from a remote loca...

Page 83: ...is in series with the local robot s E Stop push buttons a lock up situation could occur The Line E Stop input comes into the circuit at a point where it cannot affect the customer E Stop indication re...

Page 84: ...point of control If the user needs to control the Manual Automatic mode selection from other control equip ment then a custom splitter cable or complete replacement of the Front Panel may be required...

Page 85: ...space of the robot Pins 6 14 and 5 13 of the XFP connector provide this remote capability Pins 5 13 provide power for the lamp 5 VDC and ground respectively Pins 6 14 are inputs for voltage free nor m...

Page 86: ...fications l Wire Size must be larger than 26 AWG l Connectors must be 15 pin standard D sub male and female l Maximum cable length is 10 m NOTE The XMCP and XFP connectors can be interchanged without...

Page 87: ...removed In addition Joints 3 and 4 have electromechanical brakes The brakes are released when high power is enabled When High Power is turned off the brakes engage and hold the positions of Joints 3...

Page 88: ...d ance with the requirements of IEC 60204 1 and ISO 13849 The push button of the E Stop must comply with ISO 13850 Clause 5 5 2 1 2 5 4 3 Figure 6 2 Front Panel 1 XFP connector Connects to the XFP con...

Page 89: ...seconds If the button stops blinking you must enable power again 5 Emergency Stop Switch The E Stop is a dual channel passive E Stop that supports Category 3 CE safety require ments Pressing this but...

Page 90: ...the XSYSTEM on the eMB 40R l Pendant to the XSYSTEM on the eMB 40R l XUSR to the XSYSTEM on the eMB 40R l User supplied 200 240 VAC power to the robot 200 240 VAC connector l User supplied 24 VDC pow...

Page 91: ...robot should be on and the status panel should display OK before proceeding 1 Turn on the user supplied PC and start ACE l Double click the ACE icon on your Windows desktop or l From the Windows Star...

Page 92: ...See System Operation on page 87 Verifying E Stop Functions Verify that all E Stop devices are functional pendant Front Panel and user supplied Test each mushroom button safety gate light curtain etc...

Page 93: ...threaded hole is provided on the tool flange The user may attach a ground wire through the quill connecting the outer link and the tool flange 7 2 Removing and Reinstalling the Tool Flange The tool f...

Page 94: ...to tighten the setscrew to finger tightness Do not over tighten the setscrew because this will cause the flange to be off center from the quill shaft 3 Tighten one of the M4 screws part of the way th...

Page 95: ...Air and Electrical Connectors on Robot Table 7 2 User Air and Electrical Connectors on Robot Description Item Description 1 Brake release switch 2 Air piping joints M5 3 CN21 pin layout 4 CN20 pin lay...

Page 96: ...e XDIO connector on the SmartController EX and the CN20 connector on the robot Note this solenoid cable does not work with the Cobra 350CR ESD robots The part number is 05739 040 The solenoid cable br...

Page 97: ...E Do not remove the mechanical end bolts on the 1st and 2nd joints or the mechanical stoppers on the quill see the following figure Also do not use these bolts and stoppers to secure a stay to support...

Page 98: ...er parts of the robot Attaching Stays to Support User Connections You can attach a user supplied stay on the exterior of the robot to support air and electrical lines See the following figure See Dime...

Page 99: ...dia 5 1 101 6 R 2 0 2 0 30 0 76 2 8 9 2x dia 5 6 Figure 7 5 Dimensions for Fabricating User Supplied Stay Units in mm 7 4 Camera Mounting Camera Channel An optional camera channel 40861 00830 and cam...

Page 100: ...on 1 Camera Bracket 2 Camera Channel 3 Camera Mounting Block Camera Bracket A camera can be mounted on the Cobra 350 by installing a user supplied camera bracket The bracket is installed on the unders...

Page 101: ...0 25 B C L Figure 7 7 Camera Bracket Drawing 1 of 2 Units in mm Unless otherwise specified l Dimensions apply after process l Interpret drawing per ANSI Y14 5 l Tolerances l 2 place decimals 0 8 mm l...

Page 102: ...1 B 12 7 3 3 R Full 2x R 50 8 82 0 15 2x 111 1 2x 167 4 A 92 5 14 2 R 12 7 R 50 8 78 2 25 4 32 3 dia 26 9 2x 57 2 15 1 2 3 Figure 7 8 Camera Bracket Drawing 2 of 2 Units in mm Table 7 8 Camera Bracke...

Page 103: ...ts on 3rd and 4th joints 12 months Inspecting Timing Belts on page 110 WARNING ELECTROCUTION RISK The procedures and replacement of parts mentioned in this section should be performed only by skilled...

Page 104: ...ls instruct the user to read the user s guide before using the robot and to be aware of the potential of impact by the robot Figure 8 1 Read Manual and Impact Warning Label This is placed on the side...

Page 105: ...ightness of the base mounting bolts after one week and then every 6 months Tighten to 70 N m 52 ft lbf Also check the tightness of all cover plate screws 8 5 Lubricate Joint 3 Ball Screw Required Grea...

Page 106: ...ated in the base of the robot IMPORTANT Replace the batteries only with 3 6 V 2 7 Ah lithium batteries P N 06126 000 Battery information is located in the base of the robot NOTE Dispose of the battery...

Page 107: ...4 VDC input supply to the eMB 40R on 4 Switch off the 200 240 VAC input supply to the eMB 40R 5 Leave the 24 VDC supply cable from the eMB 40R 24 VDC input connector on See Connectors on eMB 40R Inter...

Page 108: ...two batteries connected at all times Failure to do so may lose the encoder positional data requiring factory recal ibration NOTE Some robots have PCAs with four battery connections On those robots co...

Page 109: ...om the holder 1 Figure 8 8 Top Old Backup Battery Removed from 1 Holder 10 Attach the second new backup battery to the connector that the old battery was dis connected from in the previous step 11 Rem...

Page 110: ...ne every 12 months 1 Turn off power to the eMB 40R and SmartController EX if present 2 Visually inspect the timing belts for Joint 3 and Joint 4 for excessive wear or missing teeth 3 If you discover a...

Page 111: ...an eMB 40R connect the existing XSYS cable to the eAIB XSLV Adapter which connects to the eMB 40R XSYSTEM connector 5 Connect the IEEE 1394 cable to the eMB 40R SmartServo Servo connector 6 Connect a...

Page 112: ...e system These two functions are only in the eMB 40R amplifiers They were not implemented in hard ware in the MB 40R amplifiers so these utilities do not apply to those amplifiers These two functions...

Page 113: ...Commissioning Jumper must be plugged into the XBELTIO jack on the eMB 40R NOTE This is the only time that this jumper will be used It is part num ber 11901 000 and must be removed for Verification and...

Page 114: ...roller On some systems the controller will reboot automatically 4 Reboot the eMB 40R E Stop Verification Utility This utility verifies that the hardware E Stop parameters are set correctly and that th...

Page 115: ...s that it set 4 Click Finish 5 Reboot the controller On some systems the controller will reboot automatically Teach Restrict Verification Utility This utility verifies that the Teach Restrict paramete...

Page 116: ...the over speed condition 4 Click Next to proceed to the Manual Mode Procedure If the Automatic Mode Procedure fails you will not be allowed to proceed with the Manual Mode Manual Mode Procedure The m...

Page 117: ...d to disconnect as you pull the front cover away from the body NOTE Separate the cover from the body slowly to avoid damaging the two wires that go between the LED and the PC board inside the body Pul...

Page 118: ...dicator 1 2 3 Figure 8 12 Lamp Body Contact Alignment Table 8 3 Lamp Body Contact Alignment Description Item Description 1 Back side of Front Panel 2 Wires between LED and body of Front Panel Be caref...

Page 119: ...nical Specifications 9 1 Dimension Drawings 75 75 60 60 0 4x 12 60 0 60 709 245 45 0 291 141 125 142 350 411 0 1 2 Figure 9 1 Cobra 350 Top and Side Dimensions Units in mm 05624 000 Rev K Cobra 350 Us...

Page 120: ...ble 9 1 Cobra 350 Top and Side Dimension Description Item Description 1 Work Area 2 Cabling Space NOTE The supplied tool flange sits 10 0 mm below the bottom of the quill shown in the previous figure...

Page 121: ...350 Robot Working Envelope Description Item Description 1 Maximum Intrusion Contact Radius R 412 mm 2 Maximum Radial Reach Functional Area R 350 mm 3 Minimal Radial Reach R 142 mm 4 Cartesian Limits...

Page 122: ...K 9 1 Dimension Drawings 4x M6 x 1 6H Thru 6 80 1 5 4 14 12 0 20 0 3 0 43 30 25 45 41 15 63 0 C B A 10 50 0 BC 6 0 C A B 03 00 M M M R 3 56 5 08 M3 X 0 5 6 H Thru 01 0 1 2 Figure 9 3 Tool Flange Dime...

Page 123: ...le 9 4 Cobra 350 and 350CR ESD Physical Robot Specifications1 Description Specification Reach 350 mm Payload rated maximum 2 0 kg 5 0 kg Joint Range Joint 1 155 Joint 2 145 Joint 3 200 mm 7 8 inches J...

Page 124: ...45 147 Joint 3 0 to 200 mm 5 to 205 mm Joint 4 360 not applicable Stopping Distances and Times The following graphs present information required by Clause 7 2 n of ISO 10218 1 This information should...

Page 125: ...ed Line Payload 66 Green Line Payload 100 1 Stopping Distance mm 2 Stopping Distance degrees 3 Stopping Time seconds 4 Speed 0 20 40 60 80 100 0 20 40 60 80 100 120 33 66 100 2 4 Figure 9 4 Joint 1 St...

Page 126: ...Robot Specifications 0 0 1 0 2 0 3 0 20 40 60 80 100 120 33 66 100 3 4 Figure 9 5 Joint 1 Stopping Time for Cobra 350 in Seconds 0 20 40 60 80 100 0 20 40 60 80 100 120 33 66 100 2 4 Figure 9 6 Joint...

Page 127: ...80 100 120 33 66 100 3 4 Figure 9 7 Joint 2 Stopping Time for Cobra 350 in Seconds 0 20 40 60 80 100 120 140 160 0 20 40 60 80 100 120 33 66 100 1 4 Figure 9 8 Joint 3 Stopping Distance for Cobra 350...

Page 128: ...ances and times will not degrade as a result of either aging or normal use Stop ping distance will vary only if there is an actuating mechanism failure which may require replacement of the failed comp...

Page 129: ...model This option is a factory installed configuration Changes to the robot include the addition of bel lows assemblies mounted at the Joint 3 quill increased sealing at the joints fully sealed acces...

Page 130: ...ections Specifications Table 10 1 Cobra 350 CR ESD Cleanroom Robot Specifications Robot Performance Specification Same as standard robot Ambient Temperature Specification 5 to 35 C 41 to 95 F 10 2 Con...

Page 131: ...inches of water differential pressure measured between the robot and the vacuum source 15 mm OD tube fitting at the back of the robot Quill inside diameter The inside diameter of the quill must be plu...

Page 132: ...the screw on the clamp See the following figure for details 2 Remove the tool flange Refer to Removing and Reinstalling the Tool Flange on page 93 for the tool flange removal procedure 3 Remove the u...

Page 133: ...n and remove the assembly at the top of the quill with a M3 hex wrench Note the position of the top assembly is such that the split nut lies just at the top of the quill 3 Replace the bellows 4 Replac...

Page 134: ...per Bellows Description Item Description 1 Top Assembly 2 Upper Clamp Ring 3 Bellows 4 Lower Clamp Ring Lubrication The upper and lower ends of the Joint 3 quill shaft require lubrication in the same...

Page 135: ...nroom Robots 10 6 Dimension Drawings 75 75 60 60 0 4x 12 60 0 60 810 245 45 0 291 141 125 142 350 411 0 1 2 Figure 10 5 Cobra 350 CR ESD Top and Side Dimensions Units in mm 05624 000 Rev K Cobra 350 U...

Page 136: ...imension Description Item Description 1 Work Area 2 Cabling Space NOTE The total height of the Cobra 350 CR ESD robot is different than the standard robot See Cobra 350 Top and Side Dimensions Units i...

Page 137: ...R ESD Robot Working Envelope Description Item Description 1 Maximum Intrusion Contact Radius R 412 mm 2 Maximum Radial Reach Functional Area R 350 mm 3 Minimal Radial Reach R 142 mm 4 Cartesian Limits...

Page 138: ...DEPT TECHNOLOGIES INC 4550 Norris Canyon Road Suite 150 San Ramon CA 94583 U S A Tel 1 925 245 3400 Fax 1 925 960 0590 Regional Headquarters OMRON EUROPE B V Wegalaan 67 69 2132 JD Hoofddorp The Nethe...

Reviews: